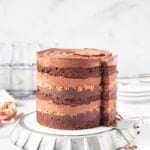
Chocolate cake with a coffee soak, layers of hazelnut frosting, crunchy filling, and a coffee ganache make this Mocha Hazelnut layer cake a real showstopper.
I've been itching to make one of Milk Bar's spectacular, bare-sided triple-layer cakes ever since my sister and I dropped $75 at the opening weekend of Milk Bar's L.A. store to try "a bit of everything."
If you haven't seen a Milk Bar cake before, they're towering cakes with bold layers of frosting and crunchy fillings visibly between equally thick, plush layers of cake.

Christina Tosi, the brilliant mind behind Milk Bar's spectacular creations is known for inventive desserts that are rich and decadent without being tooth-achingly sweet. They're great.
The official Milk Bar All About Cake cookbook has been staring me down for months now so, when Jimmy requested a coffee hazelnut birthday cake, I finally had a good reason to crack it open.
I was determined to deliver something unique. The wrinkle: Jimmy loves hazelnut but doesn't like Nutella (weird, I know!) so I had to find a way to incorporate the hazelnut flavor without using a Nutella-based recipe.
In the end, I used Milk Bar's basic Chocolate Cake recipe, the Stout Ganache from the Pretzel Layer Cake (with coffee instead of stout), the Chocolate Hazelnut Frosting from the Banana-Chocolate-Hazelnut Cupcakes recipe, and I adapted the crunchy filling from the German chocolate cupcakes to use hazelnuts instead of pecans.
The coffee soak, which is used to keep the cake layers moist, I made up on the fly. And thus, a Milk Bar-style mocha hazelnut layer cake was born.
But is a 3 layer mocha hazelnut Milk Bar-style layer cake practical?
Oh, absolutely not! There are five-and-a-half components that need to be created before you can even begin assembling this cake. If you're looking for a practical cake, go for this moist chocolate pound cake, this old fashioned vanilla pound cake, this ginger-pumpkin spiced cake or this rosemary chocolate chip cake or do a basic sheet pan cake with frosting.
To make this just slightly more practical, though, I've noted which two components are optional (the ganache and the hazelnut crunch). Bare minimum, all you need to make are the cake, the frosting, and the coffee soak. But the two optional components are pretty simple so if you have the time/energy/bandwidth, I do recommend making them.
Pros and cons of a Milk Bar cake
What I really loved about the process of building a Milk Bar cake was that the assembly itself was so simple that my brain was free to focus more on creating the individual components without feeling frazzled or rushed.
Yes, there are multiple components but because they can all be prepped ahead, or easily created right before assembly, you don't feel like you're constantly fighting against a clock or trying to time everything perfectly or convince icing to stick on a warm cake.
I also appreciated how efficient Milk Bar recipes are. Where usually you'd bake and trim 3 separate round cakes for a layer cake, the Milk Bar method has you bake one rectangular cake and use a 6" cake-cutting ring to cut your layers out of it.
But, like I said, this is not the kind of cake you can — or should — make all in one day. Here's how I did it:
- Day 1: Make the hazelnut praline paste for the frosting
- Day 2: Make the frosting and the cake, refrigerate both
- Day 3: Make the hazelnut crunch, the coffee ganache, and the coffee soak. Re-whip the frosting. Assemble.
A two-day timeline would look like this:
- Day 1: Make the hazelnut praline paste and chocolate cake. Refrigerate cake.
- Day 2: Make the frosting, hazelnut crunch, coffee ganache, and coffee soak. Assemble.
What I didn't love about some of the recipes in the Milk Bar book is that they call for really specific, often expensive, hard-to-find ingredients like hazelnut praline paste and Feuilletine and don't include recommendations for cheaper alternatives. I've noted below where I've made more affordable alterations to the recipes, but if you'd rather spend the money to just have the right thing without any extra steps, you do you.

Making the chocolate cake
While you can probably use any 13x9" chocolate cake recipe here, the official Milk Bar chocolate cake recipe produces a uniform cake with an exceptionally flat surface. Most cakes end up with a slightly domed top that needs to be sliced off for layering, but the Milk Bar recipe produces a flat-topped cake that requires zero trimming.
Make sure that you really let your mixer run for as long as the recipe says between steps to get a beautifully airy cake batter. If you use a different chocolate cake recipe or end up with a dramatically domed top to your cake, use a serrated knife to trim it flat.
The cool thing about these cakes is that you don't need to make 3 separate cakes to get your layers. You punch the top two layers out of a rectangular cake using a 6" cake cutter, and then use the remaining scraps to form the bottom layer.
If your cake top is only slightly domed, it should be fine. These aren't meant to be perfect-looking cakes, anyway. A little unevenness is okay.
TIP: Double-triple check the size of your sheet pan. In doing some research for this post I ran across several blog posts and forums that say the Milk Bar recipes are sometimes inconsistent with the size of sheet pan they call for (they call for a "quarter sheet pan"). But I found it works perfectly in a 13x9" rectangular cake pan, so I recommend using that.
Money Saving Alteration: The recipe calls for a ½ cup of buttermilk, but since the frosting calls for 4 tablespoon whole milk, you can use ½ cup whole milk mixed with ½ tablespoon lemon juice or vinegar to replicate the chemical reaction of buttermilk without spending money on two kinds of milk. Simply mix the two together about 5 minutes before the recipe calls for it to be used.

The secret to true hazelnut chocolate frosting
This frosting, which I borrowed from All About Cake's Banana-Chocolate-Hazelnut cupcakes is the icing on the cake here, literally and figuratively. It's buttery and light, and the hazelnut praline paste adds a rich, sweet flavor that doesn't make your teeth ache.
The only thing is... hazelnut praline paste is both expensive and hard to find. I couldn't find it in any grocery store near me, and online it was going for almost $20 for 11 ounces, which meant that, even though I was doubling the batch, I'd have leftover praline paste, which I didn't need.
So... I made my own praline paste. Exactly the amount I needed, with none leftover. And honestly, if you have the right tools, I think you should do that too. It's really not that hard.
What is hazelnut praline paste? It's hazelnut praline (toasted hazelnuts coated in a hardened caramel) pulverized in a food processor until the nuts release their oils and it reaches a peanut butter-like consistency.
How to make hazelnut praline paste: First make, make hazelnut praline by toasting the hazelnuts and pouring caramel over them. Once it hardens and cools, break the hazelnut praline into pieces and send them on a trip through the food processor until it turns into a peanut butter-like paste. Store at room temp until you're ready to use it. Boom.
You will need: A food processor (I used my beloved mini-KitchenAid food processor) and a silicone baking mat.
I know it seems complicated and potentially messy, but the caramel is actually really easy to clean up — once it hardens, it comes off the silicone mat without a problem, and if it gets anywhere you don't want it, hot water will melt and dissolve it right off.
Time-Saving Tip: Just buy the pre-made stuff.

How to assemble a Milk Bar-style layer cake
Instead of baking individual cake rounds, Milk Bar cake rounds are cut out of a single 13x9" rectangular cake. The bottom layer of cake is built out of cake scraps inside of the metal cake ring, which you line with the acetate cake collars to hold everything in place.
Start by cutting out your two 6" cake rounds. Then, place the 6" metal cake cutter in the center of a cardboard cake rounds and line it with a sheet of the acetate to hold everything in place.

Order of mocha hazelnut layer cake assembly:
- Layer 1: Cake — Break the remaining cake into chunks, and press it into the bottom of the cake round. Don't be shy here. The cake scraps don't have to be pretty but they do have to support another three layers of cake and frosting. Press 'em in, tear the cake pieces into chunks, crumble them up, and really push them in firmly. Once the cake comes out of the cake ring and you remove the acetate sheets, that bottom layer still has to support the weight of a cake above it. You want a firm foundation!
- Layer 2: Coffee Soak — Use a spoon or a pastry brush to liberally douse the cake layer with ⅓ of your coffee soak. The coffee soak will help the scraps stick together and keep the cake moist.
- Layer 3: Chocolate Ganache (OPTIONAL) — Half of the ganache goes on here. It's a pretty thin layer, spread it as evenly as you can across the surface of the cake.
- Layer 4: Hazelnut Crunch (OPTIONAL) — Half of the hazelnut crunch mixture goes down here — this one's a bit harder to spread so try to get it in an even layer as best you can. I like to make sure I have it around the edges so that there's a visible ring of it on the exterior of the cake.
- Layer 5: Chocolate Hazelnut Frosting — ⅓ of the chocolate hazelnut frosting goes down next. If you made this a day or two in advance it will firm up in the fridge. Loosen it by putting it back in your mixer bowl and beating it at medium speed for 3-4 minutes.
Insert the second cake round (if one of the two cake rounds is messier than the other, use that one).
STOP. DO NOT PASS GO. DO NOT SKIP THIS STEP: Take the second acetate cake collar strip and insert it inside the first one, tucking it behind the second cake round to hold it in place. (I always forget to do this until after I've put the next layer down and it's very annoying to do once the next layer of ganache is down.)
Repeat the order above: Coffee soak, chocolate ganache, hazelnut crunch, and chocolate hazelnut frosting.

The final layer: Place your last cake round on top, with whichever side is smoothest facing up. Apply the rest of the coffee soak, and a final layer of chocolate hazelnut frosting.
And that's it! You're done.
The final step is to stick the whole mocha hazelnut layer cake in the freezer for 3-5 hours
This gives the cake a time to set — the coffee soak freezes, the cake layers get all cozy and meld together.
Before serving, take the cake out of the freezer and let it defrost for 2-3 hours. Before serving, slide the metal cake ring off and peel off the acetate. That's it! You're ready to start slicing!
Use a dish towel dampened with warm water to wipe the knife blade between slices to help make clean cuts, especially if any parts of the center are still a little frozen.

Equipment Notes
- Acetate cake collars — The Milk Bar book calls for 3" tall ones, but I bought 4" ones and found they were just the right height. You'll need two 20" long strips.
- 6" cake-cutting ring — You will use this to cut out your cake layers and also to assemble the base of your cake.
- 8" cardboard cake rounds — You'll need to refrigerate or freeze your cake when you're finished, these are perfect for moving/picking up your finished cake and fitting it in your freezer or fridge.
- Small offset spatula — Since you need to be able to reach down into the acetate tube to spread your frosting and ganache layers, it helps to have a small, easily maneuverable tool on hand.
Practical Tips & Recipe Notes
- Look for hazelnuts that are already peeled. It's much easier to tell when they're toasted, and this way you don't have to try to remove the skins yourself. I use these ones. If you only have hazelnuts with the skins on, wrap them in a towel after toasting and roll them around to remove as much of the skins as you can.
- Pay attention to temperatures: To quickly bring eggs to room temperature, submerge them in warm water for 60 seconds. You'll need the butter to be very soft for both the cake and the hazelnut frosting, so leave it out overnight before use if you can.
- I find it easiest to use a large 18" piping bag to pipe the layers of hazelnut frosting. You're not looking for pretty piping, just an even layer of frosting so no need for piping tips, just cut a wide opening at the bottom. If you don't have a piping bag you can cut a hole in the corner of a large Ziplock bag or use a spatula.
- Neutral oil = canola, vegetable, grapeseed, safflower, or corn. This light extra virgin olive oil also works well. Basically any oil that doesn't have a strong flavor.
- If the second or third cake layers break or crumble when you go to put them inside the acetate, that's okay. Just use cake crumbs to patch any holes. The coffee soak and the ganache and the acetate will hold everything together for you.
- Instead of Feuilletine I used Frosted Flakes cereal. One of those round single-serving cereal cups is exactly the amount you need (60g). My pastry instructor recoiled in horror when I told him I'd made this swap, but given that Christina Tosi is a big proponent of cereal-inspired desserts, I like to think she'd approve!
💭 Have More Baking Questions?
I've rounded up answers to common baking questions and how-to guides, including:
- Ingredient swaps and FAQs
- Why my recipes are written in grams and not cups
- How to quickly bring eggs and butter to room temperature
- Ingredients I use (salt, flour, yeast, etc.)
- Step-by-step guides for bread and baking techniques
See my baking techniques & troubleshooting guide and ingredient swaps and FAQs for more!
📖 Recipe
mocha hazelnut Milk Bar-style layer cake
Recipe Notes
- If you don't have buttermilk, mix ½ cup whole milk with ½ tablespoon lemon juice or vinegar about 5 mins before you need to use it in the recipe.
- I find it's easiest to remove the cake ring after the cake has been in the freezer for about 2 hours. The outside of the cake will have frozen enough that the acetate won't come off (or you can tape the acetate closed with masking tape) but the cake also hasn't expanded so much that the ring is stuck in place.
- The original version of this recipe used a chocolate stout ganache instead of a coffee ganache. To make a chocolate stout ganache, simple replace the coffee in the ganache with chocolate stout.
Ingredients
hazelnut praline paste
- 115 grams hazelnuts (1 cup, skins removed)
- 115 grams sugar (½ cup)
- 30 grams water (⅛ cup)
- 2 tablespoon vegetable oil
basic Milk Bar chocolate cake
- 113 grams unsalted butter (8 TBSP, room temp)
- 225 grams sugar (1 cup + 2 TBSP)
- 60 grams brown sugar (¼ cup, tightly packed)
- 3 large eggs (at room temp)
- 121 grams buttermilk (½ cup, at room temp, see notes for substitution)
- 105 grams neutral oil (½ cup + 3 TBSP)
- 5 grams vanilla extract (1¼ tsp)
- 154 grams cake flour (1¼ cups)
- 70 grams cocoa powder (½ cup)
- 6 grams baking powder (1½ tsp)
- 7 grams diamond crystal kosher salt (1¾ tsp)
chocolate hazelnut frosting
- 80 grams semi-sweet baking chocolate (3 oz)
- 220 grams unsalted butter (1 cup, room temp)
- 320 grams powdered sugar (3 cups)
- 60 grams cocoa powder (½ cup)
- 1 teaspoon diamond crystal kosher salt
- 60 grams whole milk (4 TBSP)
- 200 grams hazelnut praline paste (½ cup + 2 TSBP)
hazelnut crunch (optional)
- 125 grams hazelnuts (1 cup, skins removed)
- 40 grams neutral oil (3 tablespoon + 2 tsp)
- 20 grams brown sugar (1 tablespoon + 1 tsp, tightly packed)
- 60 grams frosted flakes cereal (¾ cup)(a cheaper alternative to feuilletine)
chocolate stout ganache (optional)
- 250 grams 72% dark chocolate (9 ounces)
- 45 grams heavy cream (3 TBSP)
- 70 grams freshly brewed coffee (⅓ cup)
coffee soak
- ½ cup freshly brewed coffee
- ¼ cup sugar
Instructions
Hazelnut Praline Paste
- Heat oven to 350°F. Toast hazelnuts on an un-greased sheet pan for 15 minutes, shaking the pan every 5 mins to prevent burning.
- Transfer the toasted hazelnuts to a sheet pan lined with a silicone mat, grouping them closely together in the center.
- Combine sugar and water in a skillet and use a spatula to mix them together so the sugar is fully hydrated. Place the skillet over medium-high heat. Do not stir. The sugar will begin to bubble, and after a few minutes will take on an amber color. Gently swirl the pan so the sugar doesn’t burn until it's entirely caramel in color.If you start to see wisps of smoke that’s a good sign that you should be done.
- Quickly and carefully pour the liquid sugar mixture over the hazelnuts on the silicone mat. If the mixture doesn’t coat all the hazelnuts, pick up the loose ones and place them on top of the liquid or pick up the edges of the silicone mat to herd them into the middle. The caramel will harden quickly, so work fast.
- Once the praline has cooled, peel it off the mat (it should come up easily!) and break it into pieces. Place the pieces in the bowl of a food processor and puree until a peanut butter-like texture forms. Drizzle in oil with the food processor running, and puree until smooth.
- Transfer to an airtight container and leave at room temp until ready to use. (Praline paste can be stored in an airtight container at room temp for several months.)
Chocolate Cake
- Preheat your oven to 350°F. Generously spray a 13x9" rectangular cake pan and line it with parchment paper or a silicone mat. Try to keep the edges and corners as wrinkle free as possible.
- Place the butter, brown sugar, and granulated sugar in the bowl of your stand mixer. Use the paddle attachment to cream the butter and sugars together on medium-high speed for 2-3 minutes (set a timer!) until light in color. Scrape down the sides of the bowl about halfway through and again at the end.
- Add the eggs one at a time, beating on medium-high for at least 1 full minute after each egg is added. Scrape down the bowl before and after adding each egg. After all three eggs are in, beat the mixture on high for 4 minutes. Seriously, set a timer here. Let the mixer do its thing. Scrape down the sides and bottom of the bowl when the 4 minutes are up.
- While the mixer is running, whisk together buttermilk, neutral oil, and vanilla extract.
- With the mixer at medium speed, slowly pour the liquid mixture into the mixer bowl. It should take you about 2-3 minutes to pour it all in. Scrape down the sides of the bowl, then increase the mixer speed to medium-high and beat for 2-3 minutes until the mixture has almost doubled in size.
- In a separate bowl, mix the cake flour, cocoa powder, baking powder, and salt. With the mixer running on a very low speed, use a measuring cup (½ cup or ¾ cup recommended) to slowly add the dry mixture to the mixing bowl.Once all of the dry mixture has been added and the batter comes together — don’t over mix! — scrape down the sides of the bowl making sure to get the bottom too, then mix on low speed for 45-60 seconds just to make sure there are no lumps.
- Pour the cake batter into the prepared sheet pan and use a spatula to spread it in an even layer, making sure to get it into the corners.
- Bake at 350°F for 30-35 minutes. Halfway through the bake time, rotate the pan. At 30 minutes, jiggle the pan slightly — the center of the cake should not be jiggly. If the center of the cake still looks jiggly, leave it in an additional 5 minutes. (To test for doneness with a thermometer, you're looking for 200-210°F in the center).
- Let the cake cool completely in the pan on a wire rack. When cool, remove from the pan and wrap in plastic wrap (including the parchment paper). The cooled cake can be stored in the fridge for up to 5 days.
Chocolate hazelnut frosting
- Melt the chocolate over a double boiler, or in the microwave (10-second bursts until melted). Set aside and let cool to room temp.
- Use the stand mixer with the paddle attachment to combine softened butter, powdered sugar, cocoa powder, and salt until a dark, firm mass of chocolate has formed. Then, set a timer for 2-3 minutes and cream at medium-high speed until smooth and fluffy. Scrape down the sides of the bowl.
- Reduce mixer speed as low as it can go and slowly stream in the milk. Increase the speed to medium-high and beat for additional 5 minutes (again — set a timer!).The mixture should be silky smooth and glossy. As always, scrape down the sides and bottom of the bowl. Scrape down the mixer paddle too.
- Add the hazelnut praline paste and cooled melted chocolate to the mixing bowl and stir on low speed until the frosting is fully combined and no streaks of chocolate or hazelnut remain.
- If not using immediately, store in an airtight container the fridge. To use: Let come to room temperature and re-whip using the mixer with paddle attachment at medium speed for 3-4 minutes.
Hazelnut crunch
- Toast the hazelnuts on an un-greased sheet pan at 350°F for 10-15 minutes.
- Puree the toasted hazelnuts in a small food processor with the oil, brown sugar, frosted flakes, and salt until a wet, sandy texture is achieved.
Chocolate Stout Ganache (Day 3)
- Finely chop the chocolate and place it in a heat-proof bowl.
- Combine the freshly brewed coffee and heavy cream in a small pot over medium heat. Bring to a low simmer.
- Pour the hot coffee mixture over the chocolate, and stir in circles until completely smooth and no lumps remain.
- Use the ganache immediately. If you aren’t ready to use it right away, you can reheat it in the microwave in 15-second bursts, stirring in between.
Coffee soak
- Prepare a cup of coffee using whatever method you prefer. I use a French press, but you do you.
- Pour coffee into a small bowl, add sugar and stir until dissolved.
Cake assembly
- Use a 6″ cake cutter to cut two 6″ rounds out of the refrigerated chocolate cake. Place the ring in the center of a cardboard cake round, and line the inside of the ring with a cake collar (a 20″ strip should be enough).
- Use the remaining cake scraps to create the bottom layer of cake. Break them up, and crumble them with your hands, pressing them tightly, especially into the bottom corners, to create an even, solid foundation for your cake.
- Use a spoon or pastry brush to apply ⅓ of the coffee soak to the cake layer. Then apply ½ of the chocolate stout ganache, and use a small offset spatula to spread it all the way to the edges of the acetate.Top the ganache with ½ of the hazelnut crunch, again taking care to make sure it’s pressed up against the acetate. Finally, pipe ⅓ of the chocolate hazelnut frosting in a spiral over the crunch layer.
- Carefully place the second cake layer on next. If one of the two cake rounds is messier or more uneven than the other, use that one.
- Take the second 20″ acetate cake collar and insert it into the first one. Tuck it just under the top edge of the second cake layer so it stays in place.
- Now repeat the layers: ⅓ of the coffee soak, the rest of the chocolate stout ganache, the rest of the hazelnut crunch, and pipe in another spiral of the chocolate hazelnut frosting.
- Insert the final cake round. Place whichever side is flatter and smoother facing up. Then apply the rest of the coffee soak, and pipe a final spiral layer of chocolate hazelnut frosting. Use a mini offset spatula to smooth or create designs in the top layer of frosting.
- Take the whole cake and put it in the freezer for at least 3-5 hours, or overnight. If you plan on keeping it in the freezer for longer than overnight, cover the top with saran wrap.
- Before serving, remove cake from freezer and defrost for at least 3 hours. When ready to serve, slide the cake ring up to remove it and peel off the acetate sheets.
Video
This post was originally published on 11/15/2019.
Katherine says
Thanks so much for this detailed recipe! I'm excited to use it 🙂
Rebecca says
I've just updated it with all new photos and clearer instructions — hope you enjoy it!!
Alie says
Can't believe how great this was! I didn't have a lot of the right equipment (cake ring or collars, stand mixer) so just kinda fudged through it and did the best I could, and it still turned out great! The instructions were super helpful and clear. Thank you!
Alie says
(sorry, did not mean for this to be a reply, but rather a new comment. Eye roll at myself.)
Victoria says
I made this cake for my parents’ 75th birthday party for 30 people, modifying the ingredients to make a 12” round. I swapped out the ganache for a layer of cream cheese frosting. It was out of this world! Everyone was raving about it!
Rebecca Eisenberg says
Love the idea of of a cream cheese frosting here!! Happy birthday to your parents!
Rebecca says
I’m so glad it worked for you!! If you don’t mind sharing, what did you use instead? It would be helpful for other readers to know!
Alie says
Instead of a stand mixer, I used a hand beater for the cake (I think it was a bit too intense, because it didn't do the doubling in size that was supposed to happen, so the cake was probably a bit denser than it should have been, but it still came out ok!), and then I just used a firm silicone spatula for making the hazelnut chocolate icing (full disclosure, this took some strength/endurance and I needed some help from my brother). Instead of the cake rings & collars, I made the cake in two 8-inch rounds, and cut one across to make two layers (so the bottom cake layer was twice as thick as the top two cake layers, but that was ok). I assembled all the layers by stacking them, and used some of the extra icing to clean up the sides a bit. It definitely didn't look nearly as nice as yours, but it tasted great and we had a lot of fun making it!!
Rebecca says
Ahh this is so interesting! Thanks for sharing 🙂
Nam says
It looks incredible! Well worth the effort 😋
Julia says
Hi, I really like your recipes! Your focaccia is a huge success around here. Sorry if it's a very inelegant substitution, but do you think peanut butter could work in place of the hazelnut praline? I'm making this for my kid's birthday 🙂
Rebecca says
I haven’t tried it so I’m not sure. If you do want to try it I’d recommend going for a more oily peanut butter like a natural peanut butter instead of a JIF-style PB. And you may find it needs a little more powdered sugar bc you’ll be missing the sweetness from the caramel in the praline. Let me know how it goes!
Julia says
I will! At the very least we'll have a good laugh at my pedestrian take on your cake, haha. Thanks again!!
Rebecca says
I believe in you!!!
N.N. says
Looks delicious, and as a former Milkbar employee, Tosi would def approve of your using Frosted Flakes. Also, if ever you don’t have a small spatula to spread icing, we had dozens of old metal spoons that we’d fold into an L shape, and use the bottom of the spoon to spread the icing.
Rebecca says
Oooh that’s such a good tip, thanks for sharing!!
Chloe says
I veganized this for a friend's birthday (using the vegan chocolate cake recipe from the milkbar cake book and then vegan substitutions for the rest here) and it was amazing!! Thanks for such a great recipe 🙂
Rebecca says
So glad you loved!! And glad to know it works well with the vegan choc cake from the book!
Erin says
Hi there! Is the freezing step critical, or can it just be refrigerated overnight? Can’t wait to make this! Xoxo
Rebecca Eisenberg says
If you're planning on serving it within 24 hours, refrigerating is fine!
Lisa says
Directions were SUBERB, and the cake turned out PERFECTLY. Trader Joes' only had the roasted hazelnuts, and even after bleaching, they were really time consuming to peel! I am wondering if it would have tasted the same just to use the raw hazelnuts. The chocolate hazelnut frosting was 5-star bakery quality, as was everything. The one change I had to make is adding twice as much neutral oil to the praline paste (and a few teaspoons of honey and maple syrup to get it the right consistency. Needed to also add extra Frosted Flakes to get the crunch layer the right texture. But, everyone raved about how rich and decadent and gourmet your cake was 🙂
Kelsey says
Made this for a friend's wedding. It was a gigantic hit, everyone loved it. I made it gluten free by using bob's red mill gf flour and gluten free frosted flakes. Seed oil free by using coconut oil (the flavorless type) as my neutral oil.
People are still talking about it 24 hours later.