If you love a thin crust pizza with perfectly chewy edges and a crispy, sturdy-yet-foldable crust, this is the thin crust pizza dough recipe for you.
A long overnight rise in the fridge makes this pizza dough easy to stretch super thin, and the low-hydration dough is designed to make fantastic thin crust pizzas your a home oven on a baking steel.

This is the same pizza dough you'll find me using in most of the unique pizza recipes you'll find on my site. So if you're looking for pizza inspiration, check out some of my most popular pizza recipes like my white sauce breakfast pizza, homemade goat cheese hot honey pizza, or my classic loaded supreme pizza recipe.
Jump to:
- About This Recipe
- Why an Overnight Pizza Dough?
- Pizza Dough Ingredients: Flour, Water, Salt, Yeast, Sugar, Oil
- High Hydration vs. Low Hydration for Thin Crust Pizza
- Autolyse and Why It Matters for Pizza
- The Pincer Method: Incorporating Salt and Yeast
- Kneading and Bulk Fermentation
- Dividing, Pre-Shaping, and Overnight Rise
- When to Freeze Overnight Pizza Dough
- How to Hand Stretch Pizza Dough
- Equipment for Making Pizza Dough
- Using a Stand Mixer
- Practical Tips & Recipe Notes - Timing, etc.
- 💭 Have More Pizza Questions?
- Want this recipe, only smaller?
- 📖 Recipe
- 💬 Comments
About This Recipe
There's a lot of things to like about this pizza dough. But the most important thing is that it makes a great thin crust pizza. The dough stretches whisper thin with a gorgeously bubbly crust, is very easy to work with, and has a great pizza dough flavor.
If you're new to the world of dough — bread, pizza, or otherwise — this recipe is a great way to familiarize yourself with many commonly used techniques for mixing and developing dough structure.
You'll learn what an autolyse is and why it matters, and how to knead the dough, and get used to measuring ingredients by weight instead of volume.

Why an Overnight Pizza Dough?
While there are plenty of same-day or even one-hour pizza dough recipes out there, you just won't get the same flavor and elasticity from them that you'll get from a dough with a longer rise time.
The longer, slower rise gives the gluten network inside the dough time to both relax and strengthen, allowing you to stretch the dough for a thin and crispy pizza crust.

An overnight pizza dough works really well for most schedules — it only takes about an hour and a half of work at night (mostly resting time) and then goes into the fridge so it's ready to use the next evening.
Since this pizza dough has olive oil in it, which helps with browning and flavor but also slows down yeast activity, the slow overnight rise in the fridge is super important. It gives the yeast plenty of time to work and the dough plenty of time to build flavor before you use it!
This recipe makes enough for 4 medium pizzas. You'll want to use or freeze the dough within 24-72 hours of putting it in the fridge for the final rise.


Pizza Dough Ingredients: Flour, Water, Salt, Yeast, Sugar, Oil
Here are the ingredients you'll need to make this overnight thin crust pizza dough! Ingredient quantities can be found in the recipe card (at the end of the blog post).

- All-Purpose Flour - I use King Arthur Flour's all purpose flour which has a higher protein content than most all purpose flours. If you're using a store brand or generic brand of flour, you may find you get better results with their bread flour, due to its higher protein content. You can also use a 50/50 blend of all-purpose and pizza flour, like King Arthur's Pizza Flour Blend or '00' Pizza Flour.
- Instant Yeast - Instant yeast does not need to be bloomed or proofed in water before use. This is sometimes also called "rapid rise" or "bread machine" yeast.
- Salt - I use Diamond Crystal Kosher Salt which half as salty as other brands by volume. If measuring by weight, it doesn't matter what brand or type of salt you use. But if you're measuring by volume (teaspoons) and using a different brand of salt, even a different brand of kosher salt, cut the amount of salt in half.
- Water - Warm water, not hot water. Aim for about 85F. If it's too hot you risk killing the yeast and your pizza dough won't rise.
- Sugar - A small amount of sugar helps the crust brown and adds flavor to the dough.
- Olive Oil - A small amount of olive oil also helps with flavor and browning. Olive oil helps control the elasticity of your dough and gives you more control over how it stretches.
High Hydration vs. Low Hydration for Thin Crust Pizza
In baking, hydration is the amount of water in a dough relative to the total amount of flour, expressed as a percentage. (So a recipe with 100 grams of flour and 75 grams of water is a 75% hydration dough.)
This pizza dough is a relatively low hydration pizza dough (65%) for a pizza made in a home oven on a baking steel. A lot of the pizza doughs you see these days are designed for home oven use are high hydration doughs (70%+). This is because they're trying to replicate those unpredictably bubbly, airy, thicker crusts typical of Neopolitan pizzas.
Neopolitan pizzas, which are typically made with a low hydration dough (50-60%), bake up in 2-3 minutes at 900°F. A home oven, even with a preheated baking steel, can reach 500°, maybe 550°F.
This lower temperature means home oven pizzas take longer to cook (yes, 5-8 minutes is long when it comes to pizza), and the water in the dough has more time to evaporate. Adding more water helps keep the crust from drying out and contributes those giant, unpredictable bubbles across the surface of the pizza.
But that's not the type of pizza dough I was after with this recipe.

I was chasing something a little closer to a New York-style pizza (also traditionally made with a lower hydration dough) with this thin crust pizza dough recipe. I didn't want a thick, bubbly, ballooned pizza crust. I wanted a chewy, well defined crust around the outside of my pizza, with an evenly thin center and sturdy, crisp bottom all the way across.
Dropping the hydration to 65% and adding a small amount of oil and sugar (also typical of New York-style pizza dough) helps keep this thin crust pizza dough from drying out when it cooks, and keeps the dough from bubbling up where you don't want it to.
5 star reader review
“Recently we moved from NY to NC and finding a pizza we enjoy has been... Impossible. I saw this recipe (after trying several others) and figured i would give it a shot.. best move ever.. it makes a perfect NY style crust.”
—Laurie
When I first starting making pizzas at home on the Baking Steel I was surprised by how hard it was to find instructions for how to actually bake the pizza. Most recipes stop once the dough is made. That’s because depending on your toppings, oven heat, whether you’re using a steel or a stone, the baking times can change.
But I didn’t want to leave you hanging, so I’ve included instructions for using this pizza dough on a baking steel that should work with pretty much any sauce or toppings you choose.
Autolyse and Why It Matters for Pizza
Wait—come back! Don't be scared. Autolyse might sound like a fancy scientific (or French?) term but it's actually a very simple part of the mixing process.
The first step step of this recipe is an autolyse step and you don't even need to know what "autolyse" means to do it, but I want to explain it so you know why it makes a difference. Because #KnowledgeIsPower.
Autolyse just means mixing your flour and water together and giving them a chance to rest (anywhere from 10 minutes to several hours) before you add salt, yeast, or any other ingredients.
Autolysing your pizza dough gives the starches in the flour a chance to hydrate and start forming gluten strands (which makes the dough strong!) before you add other ingredients. If you added salt, yeast, or sugar at this stage, they would tighten the gluten network instead of helping it relax. And if you added oil during the autolyse stage, it would prevent the starch molecules from binding to each other, inhibiting gluten formation.
So water and flour get mixed first, then salt, sugar, and yeast get incorporated in the second step, and oil is added during the final kneading step, so it coats the gluten network instead of getting in its way.
Whew! Enough information. Let's get into what this actually looks like in practice. It's easy, I promise.
First, you'll mix the flour and water together. It will be a very shaggy, crumbly, dry looking dough.

The pizza dough isn't shiny or smooth or even kneadable during the autolyse stage. It's just a messy, stiff mixture of flour and water.
I like to start mixing with my dough whisk or a spatula, and then, once the water has absorbed, switch to using my hands. Smush the dough together into one mass of dough in the bowl, cover and let it rest for 10 minutes.
It's a small thing, but allowing it to rest like this for just 10 minutes gives your pizza dough more flavor and will make it stretchier, which is really important for a thin crust pizza dough.
That's it, that's the autolyse stage! I told you it was easy.

While the dough rests in the autolyse stage, take the time to mix together 15 grams of water with the instant yeast and sugar. This will dissolve the sugar, and activate the yeast to give it a head start before you add it to the dough.
Instant yeast doesn't need to be proofed, but in this case we're giving it a bit of a head start so when we add it to the dough it can get to work right away.
The Pincer Method: Incorporating Salt and Yeast
To incorporate the salt, sugar, and yeast, we're using a technique Ken Forkish refers to as "the pincer method." (You can see him demonstrate it in this video around the 1:50 mark)

First, sprinkle the salt over the surface of the autolysed dough. Then, pour the water, sugar, and yeast mixture on top of it. The water will start dissolving the salt.

Use your hand in a pincer shape (like a crab claw) to pinch across the dough four or five times in a row.
The dough will be very wet and squishy. There will be embarrassing, funny squelching noises. It's okay, you can laugh about it. This is how we force that salt, yeast, and sugar to incorporate evenly into the stiff autolysed dough.
Grab one tail end of the pinched dough and fold it in half. It will be wet and slippery. It might tear a little. That's okay. Rotate the bowl so the folded edge is facing away from you. Then use the pincer method to pinch across the dough again.
Alternate pinching and folding, until the water has absorbed and you don't feel the sharp granules of salt between your fingers when you pinch.

Shape the dough into a wet, messy ball as best you can. Then cover the bowl and let the dough rest for 20 minutes. It's been through a lot.
The sugar and salt and pinching have just cut through the gluten network we started building in the autolyse stage. Before we can add the oil, we need to give the gluten network some time to rest, relax, and reconnect.
Kneading and Bulk Fermentation
Finally! We have reached the last mixing step. It's time to add the olive oil. Prepare to be amazed by how quickly this dough goes from being a wet, sloppy mess to an absolutely joy to handle.

Pour the olive oil over the surface of the dough in the bowl. Fold the dough over itself a few times just so the oil isn't running all over the place.

Turn the dough out onto a very lightly floured surface and knead it until it becomes smooth and soft. It shouldn't feel greasy, wet or sticky.
You really only need to knead the dough for about a minute for it to smooth out and come together.
Kneading is one of those hard-to-describe things that just takes practice until you get the hang of it. Fold the dough over itself, use the heel of your hand to seal it together, and rock it forward. Rotate the dough a quarter turn and repeat. Keep going until the dough feels smooth and soft.
Dust in additional flour only as needed if the dough is very sticky — too much flour will prevent the dough from sticking to itself.

Shape the dough into a ball by tucking all the edges underneath to create surface tension on the top of the dough. Place it back inside the mixing bowl.
If it's particularly dry where you live, drizzle it with about ½ teaspoon olive oil and use your hand to brush the oil all over the surface of the dough.
Cover and let it rest at room temperature (70-75F) for an hour. This stage is known as "bulk fermentation." The dough will rise but won't quite double in size.
Dividing, Pre-Shaping, and Overnight Rise
A previous version of this recipe called for letting the dough rise overnight and dividing it in the morning. But having time in the morning to divide and shape pizza dough balls isn't always practical.
So instead we're going to divide and pre-shape the dough at night. By the time you go to bed, the pizza dough will be in the fridge and need no additional attention until the next day until you're ready to use it.
This shift comes straight from Ken Forkish's The Elements of Pizza. He wrote about a visit with Neopolitan pizzaiolos in Naples, Italy, who showed him the benefits of dividing and pre-shaping the pizza dough about 2 hours into the bulk fermentation stage.
"Shaping dough balls early in the fermentation timeline means there is less gluten organization in the dough, and the result is a more delicate crust," Forkish explains.
"What I like about the Neopolitan dough process is that the amount of time the dough ball has to rest before being stretched into pizza shape allows it to be very physically relaxed from when it was first shaped. The pizza dough becomes very extensible: easy to shape with little resistance, yet with a very delicate and lightly textured crust when baked."
— Ken Forkish, The Elements of Pizza

Divide the dough in four equal pieces using a kitchen scale. To shape into a ball, first gently flatten the dough.

Tuck the edges, then tuck ant new corners up into the center to round it out.

Pinch all the edges together to create a tight seam on the top of the dough ball. You want to create surface tension for a smooth surface on the underside of the dough ball.

Flip the dough over so the pinched together seam side is facing down. Cup your hand around it and move your hand in a circular motion to smooth out the dough ball.
Shaping a ball of dough can take some practice — be patient with yourself if you're new to it. If you have a method of shaping dough balls you like better, you can absolutely use that too.
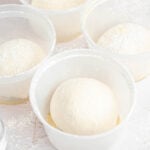
Once your dough balls are shaped, pop them into lightly oiled round 16 ounce deli containers with the lids on. It makes such a difference in how easy the pizza dough is to stretch.
The round shape of the containers trains the dough to stay in a circle shape as it relaxes, so it knows to keep that shape when you stretch it. The deli containers are also just easier to stack in the fridge.

Let the pre-shaped dough balls rest in the containers for an hour at room temperature before you pop them into the fridge. The dough balls will expand slightly and begin to fill out the bottom of the containers.
This gives the yeast and gluten network a chance to get used to their new shape before you slow down their activity in the fridge overnight. They won't rise much at all during this time.
The next day, take the dough balls out of the fridge about 60-90 minutes before you plan to stretch the dough and let it rest somewhere warm.
This loosens up the gluten network just enough to make the dough stretchy and elastic to work with, but not so stretchy that the dough tears when you handle it.
This final rise is when you'll finally see the dough double in size. It may not be as dramatic as what you see in the photo below (this batch of dough had exceptional main character energy) but you will see it rise and fill out the container even more as it warms up.

When to Freeze Overnight Pizza Dough
At any time after the overnight fridge rise, you can transfer the dough, in the plastic deli container, to the freezer. I recommend using it within 3 months of freezing, otherwise you might notice the gluten network starting to break down when you try to stretch it. It's not impossible to use after 3 months in the freezer, it's just more likely to tear.
Defrost it in the fridge before use, and make sure to let it sit at room temperature for 60-90 minutes before stretching it.
5 STAR READER REVIEW
“This is such an easy and delicious pizza dough recipe! I love that I can make a bunch and freeze it for our family's weekly pizza nights. The flavor of this pizza dough is amazing.”
—Kaitlin
How to Hand Stretch Pizza Dough
Hand stretching pizza dough is crucial to getting your pizza dough to bake up with a crispy thin crust.
If you were to just plop the dough ball on the counter and take a rolling pin to it, it won't bake up as a thin crust pizza. So, yes, you absolutely can use this dough to make a pizza with a thicker crust.
But if you're aiming for a classic thin crust pizza with the defined crust and crisp bottom, how you stretch it makes all the difference.
Hand-stretching pizza dough takes practice. Don't be upset if you don't get it right on the first try. Use plenty of flour, be patient, use a light touch so the dough can stretch through your fingertips, and let gravity do the work. If the dough tears, just pinch it back together and let it rest for a few seconds before you continue.
There's a lot more visual step-by-step guidance in my How To Hand Stretch Pizza Dough post if you need it.
Equipment for Making Pizza Dough
- Kitchen Scale - You need a kitchen scale (I use this kitchen scale) in order to measure the ingredients for this pizza dough. The ratio of ingredients is very carefully balanced and if you don't measure accurately, this can make a big difference in how easily and how thin the dough stretches. If you're a beginner baker, using a kitchen scale is one of the best things you can do to improve your baking. For weighing the ingredients with smaller quantities, a jeweler's scale can be useful but isn't necessary.
- 16 ounce Plastic Deli Containers - These are the perfect size and shape for letting your pizza dough balls rise without expanding outward too much. These are the deli containers I use.
- Dough Whisk - A dough whisk has a stiff coiled wire at the end designed for cutting through thick or wet doughs. It breaks up sneaky clumps of flour easily. It's also great for mixing things like muffin batters that you don't want to over mix. You don't need one to make this dough, but I usually start mixing the flour and water for the autolyse with one.
Using a Stand Mixer
If mixing and kneading by hand aren't for you, you can use a stand mixer to make this dough. I recommend doing it by hand as it helps to be able to feel the dough change as you work it. But I know that's not always a possibility for everyone.
- Use the paddle attachment to mix the flour and water in the autolyse stage. It is a very tough, dense dough. You will still need to use your hands to smush it together in the bowl.
- Switch to the dough hook to incorporate the salt and the water, yeast, and sugar mixture. Be patient here, the mixer will take longer to do this than if you did it by hand. You may need to pause and fold the dough over itself a few times while mixing.
- Use the dough hook again to incorporate the oil and knead the dough into a smooth ball.
From there proceed with the recipe as written!
Practical Tips & Recipe Notes - Timing, etc.
- This pizza dough, like all pizza doughs, is best when cooked on a scorching hot baking steel (use code TPK10 for 10% off!). If you have a pizza stone, you can use it the same way but baking steels get hotter and cook the pizza faster — just like wood fired pizza ovens do.
- I can't stress enough how important pre-shaping and hand stretching this dough is for getting a nice thin crust. Be patient, don't rush the shaping steps, give the dough plenty of time to stretch and relax, and you got this!
- Is this a New York-style pizza dough? I am not the authority on what makes something a New York-style pizza dough or not, so I can't claim true authenticity here. But this pizza dough recipe does have sugar and oil in it, which is more common in New York-style pizza doughs.
- Can you use this pizza dough with an Ooni or an outdoor pizza oven? I'm not sure, I haven't tested it. My understanding is they get much hotter than a baking steel or stone, so you'll likely need to cook your pizza for a much shorter amount of time so the sugars in the dough don't burn. But it should work!
💭 Have More Pizza Questions?
I've rounded up answers to common baking and pizza questions and how-to guides, including:
- Ingredient swaps and FAQs
- How to hand stretch pizza dough
- When to put fresh basil on pizza
- Ingredients I use (salt, flour, yeast, etc.)
- Step-by-step guides for pizza and baking techniques
See my baking techniques & troubleshooting guide and ingredient swaps and FAQs for more!
Want this recipe, only smaller?

Find it in my Small-Batch Breads cookbook, available for pre-order now!
Featuring fifty easy-to-follow bread recipes made using 1 cup of flour.
📖 Recipe
Overnight Thin Crust Pizza Dough
Recipe Notes
- You can replace half the flour with 00 pizza flour without changing the recipe at all.
- My overnight pizza dough schedule usually looks like this: 7:00 p.m. autolyse, 7:10 p.m. pincer method to incorporate salt, yeast, and sugar, 7:35 p.m. knead in the olive oil and bulk ferment, 8:45 p.m. divide, and pre-shape into the containers, 9:50 p.m. pop the dough in the fridge. 5:00 pm the next day, take it out of the fridge. 6:00-6:30 p.m., shape and bake my pizzas.
- Alternate schedule: After kneading in the olive oil, leave the dough to bulk ferment at room temperature for two hours before dividing and pre-shaping it in the containers. It can go directly in the fridge after that, no need to rest at room temperature again.
- Freezing: At any time after the overnight fridge rise, you can transfer the dough, in the plastic deli container, to the freezer. Use within 3 months of freezing, or you might notice the gluten network weakens when you try to stretch it. It's not impossible to use after 3 months in the freezer, it's just more likely to tear. Defrost it in the fridge before use, and make sure to let it sit at room temperature for 60-90 minutes before stretching it.
- If mixing and kneading by hand aren't for you, you can use a stand mixer to make this dough. I recommend doing it by hand as it helps to be able to feel the dough change as you work it. But I know that's not always a possibility for everyone.
- Use the paddle attachment to mix the flour and water in the autolyse stage. It is a very tough, dense dough. You will still need to use your hands to smush it together in the bowl.
- Switch to the dough hook to incorporate the salt and the water, yeast, and sugar mixture. Be patient here, the mixer might take longer to do this than if you did it by hand. You may need to pause and fold the dough over itself a few times while mixing.
- Use the dough hook again to incorporate the oil and knead the dough into a smooth ball. Proceed with the rest of the recipe as written!
- Credit: This recipe borrows dough mixing techniques and philosophies from Ken Forkish's book Flour Water Salt Yeast and The Elements of Pizza, includes oil and sugar as recommended in Joe Rosenthal's New York-style pizza guide, and calls for storing shaped pizza dough balls in round deli containers as recommended by Andris at Baking Steel which makes it easier to stretch the pizza in a circle shape.
Ingredients
Autolyse
- 500 grams all purpose flour (plus more for dusting)
- 310 grams water (around 90°F)
Yeast Mixture
- 15 grams water
- 6 grams sugar (1½ teaspoons)
- 2 grams instant yeast (⅔ teaspoon)
Additional Dough Ingredients
- 10 grams salt
- 6 grams olive oil
- 1½ teaspoons semolina flour (for dusting the pizza peel)
Instructions
- Autolyse. Combine flour and water in a medium mixing bowl. Mix with a spatula or dough whisk until the water is absorbed and not pooling in the bottom, then switch to your hands to smush it together in the bowl. The dough will feel very dry, dense, and stiff. Cover and let rest for 10 minutes.
- Activate the Yeast. Combine instant yeast, water, and sugar in a small bowl. Give them a quick stir to hydrate the yeast, then set aside.
- Pincer Method. Sprinkle 10 grams salt over the surface of the autolysed dough. Then drizzle the water, yeast, and sugar mixture on top. Use your fingers in a pincer motion to pinch across the dough. Grab one tail end of the dough, fold it over itself, rotate the bowl, and pinch across the dough again. Repeat this process, until the water has incorporated into the dough and you don't feel granules of salt between your fingers. Shape the dough into a messy ball. Cover and rest for 20 minutes.
- Kneading. Drizzle the olive oil over the dough. Fold the dough over itself a few times in the bowl, then turn it out onto a lightly floured surface and knead it until it smooths out, about 60-90 seconds. Dust in additional flour only if needed. Shape the dough into a ball, place it back in the bowl. Drizzle with ½ teaspoon olive oil and rub to coat the surface. Cover and rest for 1 hour.
- Divide. Divide the dough into four equal pieces. You can eyeball it, but I like using a kitchen scale to be precise. Each dough ball should be around 212-215 grams. Prep four 16 ounce round deli containers with a light coating of olive oil and set aside.
- Pre-shape. Working with one piece of dough at a time, gently flatten the dough against a clean countertop. Tuck the edges up and pinch them together. Keep pinching the edges together to create a smooth, taught surface under the dough with a seam on top. Flip the dough ball over and cup your hand around it with your pinkie against the counter. Drag your hand toward you, sliding the dough ball against the counter to tighten the seam at the bottom and create surface tension on the top. Rotate the ball 90 degrees and repeat. Place the dough balls into the oiled containers with the lids on. Let rest at room temperature for 1 hour.
- Overnight rise. After an hour at room temperature the dough balls will not have risen much, but may have filled out the bottoms of the containers slightly. Place the containers in the refrigerator overnight.
- Final rise. Remove the pizza dough balls from the fridge about 60-90 minutes before you plan to stretch them. Let the dough rest in the containers at room temperature or somewhere warm for 60-90 minutes. During this final rise, you will see the dough just about double in size.
baking steel instructions
- Preheat oven with the baking steel inside to 500°F for an hour before baking. Note: If your oven has a top broiler, the steel should be about 7 inches below the top of your oven. If you have a bottom broiler unit in the space below the oven, use the bottom rack of the oven and place an inverted sheet pan in the broiler area so you can slide the pizza onto it for the final minute of baking.
- Stretch. On a generously floured countertop, hand stretch the pizza dough. For a thin crust pizza you're aiming for something about 12-16" across. When you hold the dough up, it should be almost translucent in the middle with a thicker crust around the edge.
- Pizza Peel. Dust a pizza peel with semolina flour. Transfer the stretched dough to the pizza peel and arrange it back into a circle. Lift the edges to let out any air trapped underneath the dough.
- Toppings. Add your pizza sauce, cheese, and toppings, bringing them almost all the way to the edge of the dough. Leave about ½" margin or bare crust around the edge.
- Shimmy. Give the supreme pizza a shimmy on the peel to make sure that no parts of the crust have stuck. Carefully dust additional flour underneath any stuck spots if needed.
- Launch. Open the oven and line up the tip of the pizza peel with the back of the steel. Tilt it at an angle (20° or so) and give it a quick thrust to help the pizza begin sliding off. As the pizza slides, pull the peel straight back, keeping the tip of the peel on the steel, depositing the pizza on to the hot surface to begin cooking.
- Bake. Bake the pizza for 2-3 minutes, then use the pizza peel to rotate it in place on the steel so it cooks evenly. Bake 2-3 minutes more, then broil for 1 minute or until as browned as you like. Remove from the oven.
- Remove the pizza from the oven, add any fresh herbs or other fresh toppings. Slice and serve immediately.
Deb says
If you wanted to freeze some of the dough, how would go about it? At what point in the process; best way to store it; defrosting and final steps to get it ready to bake? Thank you
Rebecca says
You would freeze it after it’s been shaped in the deli containers with a bit of olive oil. Defrost in the fridge overnight before you plan to use it, then let sit out for about an hour at room temp before stretching it.
Deb says
Thank you! Looking forward to giving this a test drive. 😊
Rebecca says
Let me know how it goes! Good luck!
Nadja Meister says
When added the water and flour, my dough is extremely sticky, even though I measured all correctly, what am I doing wrong?
Rebecca Eisenberg says
First question: Did you measure by weight? And are you talking about just the autolyse stage where you mix the water and flour?
Nadja Meister says
Yes I measured in gramms and it was during the autolyse
Becky says
Any changes you’d suggest to the baking temps/times if I use a pizza/baking stone instead of a baking steel?
Rebecca says
I'd do it exactly the same — preheat at 500F for at least an hour on the top rack before using it. You may find you need a slightly longer bake time depending on how well your stone retains heat, but it should still cook pretty quickly! Luckily with the amount of heat a steel or stone retains, you don't hurt the pizza at all if you open the oven to check on it. As long as the bottom seems firm and the top is blistered/bubbly, you should be fine! Every oven is a little bit different, so just check the pizza after the first two minutes and keep adding 1-2 mins to the time if it doesn't seem done yet.
Leo Driscoll says
When I pull the fermented dough out of the frig in an air tight container and leave at room temp for 60 to 90 minutes I get condensation on my dough. (70% hydration dough recipe). Should I put a Baker's Couche over the top to allow the condensation to escape?
Rebecca says
I’m not sure I totally understand the question — do you mean after it’s shaped when you take it out before stretching it? If so, the condensation should be fine. Use plenty of flour to absorb it. I haven’t tried using a couche, so am not sure how it would change things. You don’t want the dough to dry out or form a skin, which might happen with more airflow! That will make it harder to stretch later.
Tricia says
This is the only pizza dough recipe I use now. It is so bubbly and the dough is easy to work with. I don't have a baking steel but I use a pizza stone. It makes the perfect crust every time. Thanks Rebecca!!
Rebecca says
So glad you like it!!! Enjoy your pizza!
Jessica says
My pizza sticks to the peel!
Rebecca Eisenberg says
Without more detail I can't help you troubleshoot this. Most likely you don't have enough flour on the peel. Remember to give it a jiggle to check for any stuck spots and dust more semolina/all purpose flour under any parts that are stuck. You also need to work quickly once you get the dough onto the peel, especially if you have heavy or particularly wet toppings. Don't let the pizza hang around there too long or it will absorb the liquids and the flour under the crust will start to hydrate, which means your crust will get stuck!
Laurie says
The 12-14 hour rise - where do you do that? In the fridge or on the counter?
Rebecca Eisenberg says
On the counter, usually, but you can slow it down for a longer rise by putting it in the fridge.
Kaycee says
I made this recipe on a Wednesday night for pizza night on Friday. I halved the recipe and separated it into 3 140-ish gram balls (my baking steel is only about 11”x11”). It turned out amazing! Best pizza I’ve ever made!
Amanda says
Such a great recipe! I don't have a steel so I baked on sheet pans, the thin crust pizza had a lovely crunch! (It wasn't quite as good as a thicker sheet pan style pizza, but next time I'll use less dough to make it thinner. Perfect size recipe, and I love your detailed instructions!
Rebecca Eisenberg says
So glad you liked it and thrilled to hear it worked well on a sheet pan!
CL says
can you make this printable with just the recipe so it doesnt take 4 sheets to print out
Rebecca Eisenberg says
Click the print recipe button on the recipe card. It will print just the recipe.
Rebecca Eisenberg says
I just updated my print recipe template so it should be a little more compact, but it is a long recipe — if you don't want the full instructions for the baking steel I recommend telling your printer to only print the first two pages! I can't make it more compact than it is, unfortunately.
Morgan DG says
I am going to try this in my OONI pizza oven tomorrow and will let you know how it goes! Fingers crossed!
Rebecca Eisenberg says
Oooh please do let me know how it goes! I haven't been able to test it in an oven hotter than my baking steel + home oven combo.
Morgan Garcia says
So, it totally worked! I was SO amazed by how round the dough remained and how easy it was to handle! There's a really fine balance between burning the outer crust and making sure the center crust is cooked through and crispy - I think next time we will let the oven preheat a bit more (so the stone gets hotter) and possibly reduce the sugar levels in the dough. Do you have any other suggestions? I have to reiterate that I was super impressed by the integrity of this dough and how easy it was to stretch it to transparent thinness without creating holes!
Kaitlin says
This is such an easy and delicious pizza dough recipe! I love that I can make a bunch and freeze it for our family's weekly pizza nights. The flavor of this pizza dough is amazing. The first time I made it (I am a beginner of pizza making) I didn't do a great job transferring the pizza into the oven so it looked a mess but it tasted INCREDIBLE and my kids devoured it! I have four balls of dough in the freezer right now and can't wait to use it again for one of your delicious looking pizza recipes!
Laurie says
Recently we moved from NY to NC and finding a pizza we enjoy has been... Impossible. I saw this recipe (after trying several others) and figured i would give it a shot.. best move ever.. it makes a perfect NY style crust. And enough for 4 small pies with each recipe. We froze two and even then, they defrosted and cooked perfectly. 5 stars all the way
Rebecca Eisenberg says
Yay!!! I’m so glad this worked for you 🙂 enjoy your pizzas!
Greg says
Hi there!
I’ll be right candid with you—I’ve never left a comment on a recipe blog post before. Usually I save them or make them once and move on but.. this pizza dough recipe was too amazing I couldn’t not just leave a comment.
This is perfect and I’ve been looking for a more New Jersey style pizza since I moved out of the state for years and this did it perfectly!
Thank you so much tor the great instructions, pictures and tips. It was super helpful and made this a success on my first try. Plus your tips on shaping the dough into a pie was super helpful.
Can’t wait to try other recipes!
Rebecca Eisenberg says
Wow, thank you so much for the high praise!! Enjoy your pizzas! 🙂
Sunshine says
You had me at grams! I cannot wait to make this. I always told my kids when they were growing up: do you want it good or do you want it fast? They are all great cooks.
Lisa says
I made this dough last night and could barely wait to make pizza today. It. Was. So. Good! I've tried a few different recipes and never really got what I was looking for (NY/NJ style pizza) I think this will be my go to from now on. Highly highly recommend!
Rebecca Eisenberg says
I’m so glad you liked it!!
Z says
I'm going to try this today.
Thanks very much
for the work you have put into developing the recipe, putting this page together and sharing.
Lisa says
Update: I've made this a few times now and it's honestly the best recipe. Today I tried something a little new...fresh out of the oven, I popped a big bowl over the pizza and let it sit for a few mins. Trying to give it that "steamed in a pizza box" chewiness vs crispiness. It. Was. Perfection. ❤️
Emma says
Hey I love this recipe! I was just wondering when it comes to freezing should I let it rise in the fridge overnight before putting it in the freezer? If so how long should I leave it in the fridge for? Thanks 🙂
Rebecca Eisenberg says
Let it sit in the fridge overnight before putting it in the freezer. You have a pretty big window of time in which to do this basically as long as it's been in the fridge for at least 8 hours you can freeze it. You could probably freeze it even sooner, you'd just want to give it longer in the fridge to defrost before you plan to stretch it. The goal is just to freeze it before it over proofs, but it can hang in the fridge for like 1-2 days before you freeze it. Enjoy!
Heather says
Great recipe! The other day I made my standard pizza dough, but it felt like it was lacking in flavour. Not a surprise since it has a very short rise time. If you want good, you have to wait! This stretched beautifully and baked up nicely. I also made sure not to bake too long before turning on the broiler (I think in the past that has dried out my pizza). This definitely had much better flavour. Not quite the pizza you get in the good restaurants, but for a home oven, pretty darn good. I just topped it with the fresh tomato sauce I made in the summer and buffalo mozzarella and some ricotta.
I halved the recipe to make only two balls since I am only one person and my freezer is full. Just fyi in case people want to try that; it worked fine. I'm going to bake off the second one tomorrow and see if there's any difference in flavour. It's still hanging out in the fridge.
Rebecca Eisenberg says
i’m so glad to hear you liked it and that the half batch version worked for you!
Ryan Lackner says
I took exact temperatures of the water in the preparation steps - the dough was super easy to work with just as decribed. However, after pulling from the fridge and resting 90min it really has not grown much in size at all, nothing like the pictures. What did I do wrong?
Rebecca Eisenberg says
It’s possible your yeast was less active or your kitchen is quite cold. Sometimes mine don’t rise quite as much as you’ll see in the photos; it sounds like things went according to the recipe for you. Were you able to stretch the dough and use it as the recipe promised? That’s the real test!
Ryan Lackner says
Thanks for the reply! My first attempt I was not really able to salvage, but with my next dough I left it out of the fridge longer (~2.5-3 hours) and moved it around to different warm spots in the kitchen and it turned out great! Our thermostat was set to about 65 so indeed I think the kitchen was much too cold only leaving it out for 90min.
Samantha Franceschi says
I LOVE this pizza dough! It has amazing flavor and my entire family gobbles it up each time I make it. I have learned to make it in big batches, we make pizza every Friday night, and it freezes really well.
Rebecca Eisenberg says
Oh wow, that's high praise indeed! I'm so glad you and your family like it so much 🙂 Happy pizza nights!
Val says
I really enjoyed the process of making this pizza dough. As with all of your recipes, the details along with the photos and step by step tutorial are so helpful. Your journalism background shines through with your attention to details. It feels like I’m at culinary school! The first pizza (pepperoni with your sauce) turned out great! I splurged and got a baking steel which is a game changer. I’m so glad i found your blog, I’ve learned so much and am enjoying this new found interest. Thank you!
Rebecca Eisenberg says
You are so welcome!! I'm so glad you enjoyed the dough and found the recipe easy to follow. The baking steel makes a big difference too, have fun with it!
Chad M says
I’ve been trying for years to perfect my pizza dough recipe and it never seems quite right. I saw this one and thought I’d try it and I wasn’t disappointed! I didn’t get to start the dough the night before, but that didn’t matter. I made the dough in the morning, it got about 6 hours in the fridge and turned out great! Thanks!
Mel says
I baked these pizzas on a traditional thin round metal pizza pan in a 500 degree oven for 10 minutes. I rotated it halfway through then used the broiler for a few minutes to finish it off. The results were wonderful and almost as good as using a stone or steel for baking.
Rebecca Eisenberg says
Oh love that — good to know how it works if you don't have a baking steel! Thanks for sharing 🙂
Damien says
This is the Best Pizza Dough Recipe period! I made this Dough and made two 16" NY thin crust pizza's out of it. Everyone was so impressed how good it was, including a true New Yorker.👍 I can only imagine how much better it would be if I had a Coal fired oven. You do have to plan ahead to make this, but so worth it. Thank you for a fabulous recipe!
Rebecca Eisenberg says
I’m so glad you liked it! Happy pizza making!
msk says
I've been making pizza for over 40 years, but always bought the dough. I never had luck making the dough myself. But after making your small batch focaccia bread and having good results, I thought I'd try the overnight dough. The thing I liked is how incredibly detailed the instructions are, and that the results looked and felt exactly how you described. When I made the pizza tonight, the dough was beautiful and handled really well. The pizza tasted great--the crust was firm, crispy and yet tender to the bite. I used a pizza stone as that is what I have. I have a handy tip for getting the pizza onto the stone from the pizza shake (peel). I put a sheet of parchment paper underneath the dough and it slides onto the stone perfectly. The paper does not stick to the dough or the stone, and the texture of the dough is perfect.
Rebecca Eisenberg says
I'm so glad you enjoyed this pizza dough! The parchment paper tip is great — I do recommend that especially for people who are nervous about the launching! 🙂
Kat says
This pizza dough immediately replaced the other one I relied on. So so good, wonderful texture and doesn't flop even as a thin crust. We bake ours in a cast iron pan and its works out well. Totally worth planning ahead to make this.
Delaney says
I have made a few different pizza doughs, and while I've enjoyed them, this one was fabulous.
You're skilled at explaining things so thoroughly, and I truly appreciate that. Most food bloggers have stories that I skim by to get to the recipe; however, I enjoy reading what you have to say because I learn from you, Rebecca, so thank you!
I divided mine into three balls of dough and was able to use two of them to feed my family (including a pizza-loving teenaged college student who's home for the summer). I have a 12-inch cast iron skillet and an enamel braiser that's just a little smaller. I have successfully used these in the past to make pizza dough, and viola! Success with this dough, too!
Because I divvied mine into three balls, I was able to fold over the edge in the skillet and the braiser to give it a studier crust. The braiser is smaller, so I actually split some mozzarella string cheese and pressed it into the crust to make a "stuffed crust" pizza for one.
I sprinkled cornmeal across the pans and spread olive oil on them before I spread the dough on each. Parbaked for about 6 minutes before pulling them out of the oven and topping. Pears, walnuts, swiss, gruyere on one (honey only after it's on the plate) and traditional cheese and pepperoni on the stuffed crust one.
Really yummy. I love that the recipe makes so much do ugh, too!
Bonnie says
Amazing! We use an Ooni pizza oven, and this is the easiest to work with and tastiest dough that we’ve tried!
Lisa C. says
I vowed to never try making pizza dough again but I’m so glad I found this recipe and tried it. Tastes great, easy dough to shape, freezes well, tastes great even after freezing. Pizza is a weekly part of the menu now!
Rebecca Eisenberg says
I love hearing this so much! Pizza dough really can be so fun to make and so worth making from scratch — enjoy your weekly pizza nights!
Sue says
I kept the recipe in my recipe box and called it “perfect pizza”. Usually I scan through beginning instructions but yours were poignant and I needed the instructions. Pizza was amazing! Crust was so like NY pizzas. Crunchy at tip of pizza, just the right amount of chewiness, perfect rise. So impressed! Thank you.
Rebecca Eisenberg says
I'm so glad you enjoyed it and found the detailed beginning instructions useful! Keep on enjoying those pizzas!
Michaela says
Just made this fantastic pizza dough…amazing…divided it into two portions and baked 12 minutes rotating every 3 minutes…came out perfectly ❤️
Sarah says
I have made this dough twice in the last week. It worked perfectly! I have long been frustrated with pizza dough and didn't understand what I was doing and how to get the thin, crispy crust I wanted. The instructions were thorough and easy to understand. Next time I make it, I'll be tripling it.
Flaoua says
Ok I need to say this: this dough recipe is amazing.
I wasn’t sure how it would turn out because after the bulk rise and when I divided and balled it, it wasn’t smooth at all and felt a bit “grainy”.
But after a 3 days cold rise in the fridge and 1 hour at room temp (77F), it turned absolutely amazing.
It was a breeze to stretch and after cooking for 6 minutes on a steel in a 550F oven + 1 minute under the broiler, it’s probably one of the best pizzas I ever made.
Thanks a lot for sharing this recipe and including all these very detailed instructions for all the steps!
Erin says
This has now become my favourite pizza recipe!
I've made a number of Rebecca's recipes now, and each one is better than the last. Her instructions are helpful and educational in an approachable way.
Kathy says
I made a pizza! Thank you for this recipe and most importantly the excellent instructions! I been wanting to try pizza crust but it always intimidated me. This recipe seemed doable, so I gave it a try! I’m so pleased with my first attempt and I think it will only get better from here. I’m thinking it’s time to tackle bread!
D says
Will adding garlic powder or oregano when mixing the dough mess up the dough?
Rebecca Eisenberg says
Nope, you should be fine to add either!
D says
Thank you!!
Christine says
My all time go-to recipe! Makes perfect pizzas every time ❤️
Paula says
I made the overnight pizza dough. The bottom was perfect, the crust was a bit too crunchy. Anything I can do differently? Thanks for all your amazing recipes. I’ve tried several so far and they all come out great.
Lauren says
I'm a huge fan of many of your other recipes (especially your focaccia!!) so I'm ready to give this a go. How long with the extra doughs last in the fridge if you don't make all the pizzas in one go?
Rebecca Eisenberg says
They're best used within 24 hours, but I've left them for up to 72 without issue. The longer they sit, the weaker the gluten network will become, making them more prone to tearing when you stretch the dough, but it doesn't mean it won't work. Keep an eye on them to make sure they're not going to bust out of their containers — if the dough is reaching the top, better to use them sooner than later!
Bonnie O’Neill says
Amazing recipe! We make it every 2 weeks and freeze half for our weekly pizza night!