
Today I'm spilling all the secrets to my best-ever classic chocolate pound cake recipe. It's velvety, moist, and decadent without being pretentious, made with simple ingredients like unsweetened cocoa powder, whole milk, brown sugar, and a dollop of sour cream for extra tenderness.
It bakes in a standard-sized loaf pan, and the chocolate flavor is so rich and dreamy there's no frosting needed — just a simple dusting of powdered sugar and this chocolate pound cake is ready to serve.

A few weeks ago I shared my recipe for a classic old-fashioned vanilla pound cake. Then I shared my best strawberry pound cake recipe. Of course the next logical step was to complete the trio of classic Neapolitan flavors and share my recipe for chocolate pound cake too!
Besides, chocolate is my favorite dessert flavor, it was embarrassing being a baking blogger without a simple chocolate cake recipe to share!

One of my chocolate cake pet peeves is when the chocolate flavor comes more from a rich ganache or frosting rather than from the cake itself. A lot of chocolate cake recipes, on their own, without frosting, can be kind of bland. That's right, I said what I said!
So when I developed my chocolate cake recipe, my top priority was to make a chocolate cake that could absolutely stand alone — no frosting needed. I dug into my pastry school notes and the science of chocolate; I did not want to make a boring chocolate cake. I also wanted to use unfussy ingredients and simple techniques that any home baker could manage.
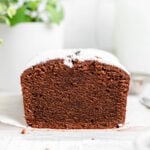
The final version of the recipe makes a single loaf of chocolate pound cake that is super rich and moist with a dense, velvety, almost fudgy crumb and an intensely, unforgettably chocolate flavor.

The real secret to bringing out the best chocolate flavor in this recipe is blooming the cocoa powder in whole milk and then mixing it with sour cream (more on this below!). The fat content in the milk and sour cream is important, so I always make sure to use whole milk and full-fat sour cream.
To keep things simple, I use natural unsweetened cocoa powder like the classic box of Hershey's. No need to mess with Dutch process or fancy cocoa powders here. And I'm sorry but I wouldn't tell you to sift something unless it really makes a difference and in this case it does.

My Secret: Blooming the Cocoa Powder
Cocoa powder is naturally very drying. It needs plenty of liquid to absorb or else the cake will end up dry. So in my chocolate cake recipe, I add the cocoa powder to the wet ingredients instead of to the dry ingredients. This hydrates the cocoa powder and adds lots of moisture and tenderness to the cake crumb. It also gives it a richer, more intense flavor.


My Simple Chocolate Cake Batter
To make this chocolate pound cake batter, I use the simple and standard creaming method of mixing. It's really simple; most cake and cookie recipes follow this process, but taking your time and getting it right is super important for making sure the cake comes out correctly. So, especially if you're new to baking, I do recommend clicking that link to read more about it!


Continue alternating adding another third of the dry ingredients, then the remaining half of the wet ingredients, etc. Always mix only on low speed just until combined and always scrape down the sides of the bowl before the next addition.

You'll end up with a luscious, thick, and fluffy chocolate cake batter that has a texture almost like a whipped chocolate frosting. Super dreamy and super smooth.

USA Pan Bakeware Aluminized Steel Loaf Pan, 1 Pound
Dimensions: 8.5 x 4.5 x 2.75. Durable construction with corrugated surface for optimal airflow. Non-stick finish is PTFE, PFOA and BPA free.
To control where the cake cracks open on top in the oven, I cut a thin slice of butter into matchsticks and place them in a line down the center of the pan.


It's hard to tell when a chocolate cake is done because you can't see any browning. So a few crumbs (not wet batter) clinging to the cake tester is the best way to know. You really don't want to over bake a pound cake or it will come out dry.


Dusting your chocolate pound cake with powdered sugar is optional, but I really like the way it looks. The sweetness is also really nice with the richness of the chocolate cake!
💭 Have More Baking Questions?
I've rounded up answers to common baking questions and how-to guides, including:
- Ingredient swaps and FAQs
- Why my recipes are written in grams and not cups
- How to quickly bring eggs and butter to room temperature
- Ingredients I use (salt, flour, yeast, etc.)
- Step-by-step guides for bread and baking techniques
See my baking techniques & troubleshooting guide and ingredient swaps and FAQs for more!
📖 Recipe
Extra MOIST Chocolate Pound Cake in a Loaf Pan
Recipe Notes
- Pay close attention to the ingredient temperatures — they're very important to how the final loaf turns out!
- When in doubt, SCRAPE DOWN THE BOWL. If it feels like you're stopping too often to scrape down the bowl, that means you're doing it right. You don't want any ingredients to go unincorporated or you'll end up with large air bubbles or clumps in your final cake.
- If you do the line of butter down the center of the cake, you may notice some white yellow coloring around the crack in the top of the cake — the powdered sugar dusting helps hide this!
- This loaf of chocolate pound cake can be stored at room temperature in an airtight container for 5-7 days. You can also refrigerate it in an airtight container for up to a week.
- The chocolate pound cake itself can be frozen for up to 3 months without powdered sugar on top. Defrost in the fridge, then dust with powdered sugar and let come to room temperature for serving.
- I use metal binder clips to help hold the parchment paper sling in place on the pan. The binder clips are optional, but keep the paper from folding in on top of the cake in the oven. Use metal binder clips only for this. Do not use plastic clips. I repeat, no plastic in the oven!!!
Ingredients
- 227 grams unsalted butter (65°F, softened)
- 225 grams sugar
- 50 grams dark brown sugar
- 2 large eggs (room temperature)
- 186 grams all-purpose flour
- ½ teaspoon baking powder
- ½ teaspoon diamond crystal kosher salt (use half as much of any other brand)
- 125 grams whole milk
- 40 grams cocoa powder
- 50 grams full fat sour cream
- 1 tablespoon powdered sugar (for topping)
Instructions
- Mise en Place. Bring butter and eggs to room temperature (the butter should be cool but soft to the touch, not melty or greasy). Measure both sugars into one container. In another container, whisk together flour, baking powder, and salt and set aside. Sift cocoa powder. Grease an 8x4" loaf pan and line with a parchment paper sling. Set aside.
- Preheat oven to 350°F.
- Bloom cocoa powder. Scald milk in a small pot over low-medium heat on the stove, swirling the pot frequently until small bubbles form around the edges. When you tilt the pot there will be lots of active little bubbles on the bottom of the pot. You're aiming for a temperature of 170°-180°F. Do not boil the milk. Remove from heat and add the sifted cocoa powder all at once. Whisk well until no clumps remain, then add sour cream and whisk until smooth and combined. Set aside.
- Cream butter and sugar. Cut the butter into large chunks and place in the bowl of a stand mixer. Beat on medium speed to soften, about 1 minute. Scrape down the sides of the bowl and add both sugars. Beat on medium-low speed until there's no loose sugar in the bowl, then increase speed to medium and continue creaming for 3-7 minutes, pausing to scrape down the bowl and the beater at least 3 times. Properly creamed, the butter and sugar will be pale brown and have a fluffy, airy, and paste-like texture. Scrape down the sides of the bowl.
- Add eggs. One at a time, crack an egg into a small bowl (to avoid getting shells in your cake!) then dump the egg into the mixer bowl, beating on medium speed for at least 60 seconds and scraping down the bowl again before adding the next egg. Scrape down the bowl and beater again at the end.
- Alternate adding dry and wet ingredients. With the mixer running on the lowest possible speed, alternate adding one third of the dry ingredients with one half of the wet ingredients, starting and ending with the dry ingredients (dry —> wet —> dry —> wet —> dry). Pause the mixer and scrape down the bowl and beater between each addition. Stop the mixer when the batter is mostly combined and just a few streaks of flour are visible. Use a spatula to mix in any final bits of dry ingredients from the sides of the bowl or beater, making sure to scrape and stir all the way to the bottom of the bowl where sneaky bits of butter and sugar may be hiding.
- Bake. Scrape the batter into the parchment lined loaf pan. Use a mini offset spatula to smooth out the batter, pressing it down into the corners and sides of the pan so that there aren't any trapped air bubbles. Cut a ⅛-inch thin slice of a stick of butter into small sticks and arrange them in a line down the middle length of the pan to help control the crack in the top of the loaf as it bakes. Bake in the center of a 350°F oven for 70-75 minutes, until a toothpick or cake tester inserted in the center comes out with just a few crumbs clinging to it.
- Cool. Remove the pan to a wire rack. Let cool 15-20 minutes, then use the parchment sling to lift the cake out of the pan to finish cooling on the wire rack.
- Powdered sugar. When the cake is completely cool, sift powdered sugar over top to serve.
nicole says
ooo this cake is a chocolatey dream! rich flavor and lovely texture, goes equally great with cream and strawberries or had on its own. we even crumbled a piece over nutella yogurt haha! cake for breakfast, A+.
i was a little intimidated at first, especially scalding milk since ive never done it, but it was really very simple and im glad i decided to try. i did swap dark for light brown sugar since its what we had, but after i realized we had molasses around and i might try again and see if i can make my light into dark with it. i also really appreciate the notes on butter temp, i never realized room temp butter is so firm still! i think ive been baking with too soft of butter my whole life, oops XD i think we over baked juuust slightly, our end pieces were a little drier than the rest, but nothing that couldn't be fixed with a few less minutes in the oven. and even the less perfect pieces were still delicious!
R. Jackson says
This looked so yummy! I was going to give it a try. However, I wish she could have just put the ingredient amounts in cups in addition to grams. I do not own a scale. So, on to another recipe….
Rebecca Eisenberg says
Please read the FAQ for why I do not provide recipes in cups and why measuring by weight is the best way to bake if you want the recipes to turn out correctly!
Seth says
Agreed. I don't have anything to measure grams.
Rebecca Eisenberg says
There are lots of other chocolate pound cake recipes out there for you to use. If you want to make mine, you'll need to buy a kitchen scale. I've explained why in the post. If you're going to make my recipes I want you to be successful! You will have a much higher failure rate (with all recipes) when you measure using cups instead of weights.
Adrian Clements says
Couldn’t possibly be more true. Weighing is the way to go
maria says
same don't have a scale
It sounds delicious😋
Rebecca Eisenberg says
Buy a scale and you’ll be able to enjoy it in no time! It’s worth it, I promise.
Linda says
Just use a conversion table which you can google. 😊
Rebecca Eisenberg says
Unfortunately there’s no standard for what 1 cup of flour weighs. You can definitely google, but there’s still lots of room for error!
Ginger says
Buy one a scale!! They are not expensive - makes a huge difference in baking.
Ginger says
Wanted to try but I don't work in grams. Translate?
Rebecca Eisenberg says
Please read the FAQ for why I do not provide recipes in cups and why measuring by weight is the best way to bake if you want the recipes to turn out correctly!
Nancy says
I purchased a scale and I think that now it’s even easier and less time consuming versus pulling out all the measuring cups. I’m going to try baking this in possibly 4 small loafs to give along with other treats at the upcoming holiday!
Rebecca Eisenberg says
We are all proud members of Team Kitchen Scale here!!!! I love the idea of baking this and giving it as gifts! I hope your giftees enjoy it 🙂
C says
Thank you for the detailed recipe and the use of gram measurements for accuracy!
One question: When determining if the cake is fully baked you mention that a cake tester inserted into the center should emerge with a few crumbs. If using a thermometer to test for doneness, what should the internal temperature of the cake be?
Thanks again!
Rebecca Eisenberg says
Great question! You're aiming for around 200°-205°F. If it's a little under but the cake tester comes out with a few crumbs on it, that's fine too — there will be some carryover cooking as it sits in the pan.
Kathy says
Cannot attempt to make this without normal measurements....it looks good but u r making it too complicated to make like this....sorry
Rebecca Eisenberg says
Weight measurements are normal measurements and are more accurate than measuring cups, which is what I assume you mean by "normal". When someone makes my recipes I want them to succeed. The best way to do that is to measure by weight. If you don't like that, you can go use any other chocolate cake recipe out there. You don't have to use mine.
Sean says
I’d usually use ml instead of grams when I bake, if I’m using liquid ingredients. I find that part confusing. Did you weigh the milk?
Rebecca Eisenberg says
Yes, I weight the milk! Milliliters are a volume measurement — we're using all weight measurements here!
Shalini says
Haven't named this yet but it's on my list 🙂
I can't believe how much crap you're getting for using weight measurements. It's so much easier to bake by weight and it's so cheap to get a digital scale, gosh.
Also, people can just look the gram to cup conversions up if they really want to use your recipe.
Zack says
What is the recommended cooking time? It says 60-65 minutes in the text and 70-75 minutes in the recipe.
Rebecca Eisenberg says
Thanks for catching that, it should be 60-65 but definitely check it with a toothpick for doneness in case it needs an extra 5 mins!
J says
Is the parchment necessary to keep it from sticking to the pan?
Rebecca Eisenberg says
I find it’s easier to remove from the pan with parchment paper but you could just grease the pan well instead and skip the parchment paper if you prefer.
Ryan Dee says
I'm making this cake now. One of the set of instructions said 70-75 minutes in the oven, the other said 60-65. I'm wondering which is correct? I'll check it at the earlier time, but the other instructions are so precise it's odd that the baking times are different.
Rebecca Eisenberg says
Hi! 60-65 should be fine, thanks for catching that error, I’ll fix it when I’m back at my computer.
Lina says
I just baked this, and let me tell you, I was sceptical about such a big amount of butter and sugar, but it's a.b.s.o.l.u.t.e.l.y delicious, amazing treat. It's not as complicated as it may sound; at least you'll learn some new techniques that are totally worth it. Also, to anyone in the comments, please, buy a kitchen scale. It's cheap and it will transform your baking game. Also, check out the focaccia recipe, it was so great I had to immediately start again and made it twice the same day.
Rebecca Eisenberg says
I’m so glad you liked the recipe and thank you as always for being #TeamKitchenScale!
katie w says
Really a delicious cake and the chocolate flavour is much stronger and intense than the usual just adding coacoa powder in the batter. Taking time to bloom makes a difference. We use full fat sour cream. Tried double cream but it wasnt as good.
Rebecca Eisenberg says
So glad you enjoyed it! Isn't it amazing what a difference blooming can make? So simple but so impactful! Happy baking!
Pat says
Your recipe sounds delightful & well-engineered if you have scales to weigh ingredients; however I do not have scales & the recipe is "unusable" as is. I would think most homecooks would require measurements, i.e. "cup", "tablespoon", "teaspoon" ; not every cook is sophisticated, numerically inclined, or has time to order a scale for a cake you need in present time. Sounds good though!
Rebecca Eisenberg says
There's lots of other chocolate cakes out there on the internet if you insist on using cups!
Roy says
Thank you for this insightful gem called blooming! OMG the taste in unreal! I literally ate the entire cake in one go! no regrets!!
quick question please: I obviously followed the recipe to the T (I believe every baker goes through tens of trials to get the measurements and instructions right), but it felt like the cake didn't rise as much as it should, and i couldn't keep it past 70 minutes because it was done and did not want it to come out dry. You think I can increase the baking powder a bit next time? or any other recos?
Again, thanks for the best Hyperglycaemia I ever had! 🙂
Rebecca Eisenberg says
I'm so glad you liked it!! You could definitely bump up the amount of baking powder to see if that helps with the rise, but it might also be that you didn't cream the butter and sugar long enough — that step can be crucial to getting a nice rise on the cake! Make sure you're taking your time there, scraping down the bowl frequently, and then yes, you can also up the baking powder slightly — a quarter to half a teaspoon! Enjoy!
Kate in San Diego says
Wow! I followed the recipe. It was well worth the effort of preparing several bowls of ingredients and "blooming" the cocoa in milk. Although, it would have been perfect with a dusting of confectioners sugar, I made a peppermint buttercream. I colored it red and green, spread some of each color onto a piece plastic wrap, made into a tube, cut off the end and dropped it into a piping bag with a star tip. Came out beautiful and so delicious. Many compliments from the teachers I work with.
Em says
Did this last night. It’s delicious, moist with a crispy crust. Perfect. An absolute crowd pleaser. Will do it again!!
ps: I was out of sour cream and used 60g of full fat yoghurt instead. I recommend!
BakerStevePA says
I've been baking for almost 50 years and this is hands-down the best and most incredible chocolate cake (pound or otherwise) I've ever tasted. The result has a rich buttery taste, perfect chocolate level, and a moist tight crumb, the hallmark of a good pound cake. Not gonna let this one go. Thanks.
Grace says
Was searching for a new chocolate cake recipe when I came across yours. Wow, super moist and chocolaty. I like the milk scalding/bloom method as it made cocoa powder dissolve in better. I used greek yoghurt instead of the sour cream as that is what I had on hand. Very nice crumb as well. I made a chocolate glaze to pour on top as well and the husband really loved it. Will be my go to from now on.
Meg says
So easy and so delicious! I have been day dreaming about this since you shared it on your stories a week ago and did not disappoint.
Melissa says
First time I measured. The batter looked lovely before baking and the cake was delicious.
Katie Wong says
I've made this more than 20 times. Have only cut down the sugar and added a tablespoon of coffee.
This is my go to chocolate loaf. It really taste of chocolate. Easy and I could use a whisk. It's soft even after a few days.
For variations, I add walnuts and canned cherries.
Anita says
Tried this and it was fabulous. Could I add a crumble/streusel topping to this? Love the thought of a crunchy top to this decadent cake
Rebecca Eisenberg says
You absolutely could add a crumble or streusel topping to this! Honestly, it would be great with a sparkling sugar topping, almost like a bakery-style muffin?