
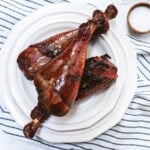
These smoked turkey legs are just like the ones you get at the Disney parks and Renaissance fairs — but better! Tender, juicy, and super smoky and flavorful thanks to an overnight brine and a braise in the oven to finish. (The best way to smoke turkey legs, imo!)
If you're new to the world of smoking this is a great recipe to start with.

These smoked turkey legs are definitely more of a summer-early fall seasonal dish just because it involves cooking outdoors. Unlike grilling, however, smoking is mostly hands off. It doesn't require you standing outside the entire time you're cooking, which makes it ideal as the weather gets colder.
Like all smoker recipes, this is a low-and-slow cooking process. But compared to larger cuts of meat which can take 8+ hours to cook, these turkey legs only need about 3.5 hours of active cook time.
Since Jimmy makes these turkey legs for us so often over the summer (and well into fall) I asked him to write up the recipe so I could share it with you.
Jump to:
Jimmy Says: About This Recipe
Since moving back east from our two years in Los Angeles, Rebecca and I have had to adjust to some big differences. Some of those changes were easy, like once again experiencing the joy of fall weather. Others were harder, like being in a city with fewer varieties of tacos.
The hardest adjustment though — the one we did not see coming — was the turkeys.
Real. Live. Turkeys.
There is a flock of Turkeys in our neighborhood in Boston and they are... the absolute worst. Someone down the block feeds them, and they're big and mean and completely unafraid of people. They're either aloof, standing in the road blocking all traffic, or they're aggressive and will chase you from your car to your house.
So when I decided to try making Alton Brown's DIY cardboard box smoker, I'd be lying if I didn't say choosing to test it with turkey legs wasn't fueled in part by vengeance.
And you know what? I have to give turkeys credit for something — they really are so damn delicious. And they're at their absolute best when smoked.

Why These are Better Than Disney Turkey Legs
The smoked turkey legs you get at Disney (or at Renaissance Fairs) are terrible, even though Jimmy buys one every time we visit, because he, in his words, is "a predictable man."
But Disney and Renaissance fairs make two major mistakes with their smoked turkey legs. First, they leave the skin on when they serve them to you. It makes the turkey legs look prettier, but the smoking process gives the skins a rubbery, unpleasant texture that's basically inedible.
Instead, we're going to cook them with the skins on to help trap moisture and juices and delicious fatty flavor, but then remove the skin before serving. The best of both worlds.
Second, Disney (as far as I've been able to find) doesn’t braise the turkey legs after smoking them. This is a step a lot of the other copycat Disney smoked turkey legs skip too (aside from Alton Brown's smoked turkey legs, which inspired my recipe), and I'm not sure why. It makes such a difference in the tenderness of the meat!
Turkey legs have a lot of tough tendons which can be a real pain to eat around. The meat clings to the tendons, and the tendons cling to the legs, so you end up trying to eat around these thick, quill-like tendons. It's awkward looking and robs you of some prime eats.
Braising the smoked turkey legs in the oven after they come out of the smoker helps break down those tough tendons. The turkey meat easily separates from the tendons making them much easier and less fussy to eat. Not to mention, it just adds a lot of flavor.
5 star reader review
“These were great! Thank you you for the recipe. I've smoked turkey legs before but never braised them. It really makes a difference!”
—Larry M.
Ingredient Notes
Here's what you'll need to make these smoked turkey legs. Ingredient quantities are listed at the end of the blog post!

- Turkey Legs - These can usually be found in the poultry section of your grocery store. I've been able to find them year round here in Boston, and I've had the most luck finding them at Wegman's, but have also found them at Stop and Shop. If you're not sure if your grocery store has them, call and ask!
- Kosher salt - I use diamond crystal kosher salt which is half as salty as other brands. If you're measuring by weight, it doesn't matter what brand of salt you use, but if you're measuring by volume, you'll want to use half as much salt in your brine.
- Dark brown sugar - Light brown is fine, but dark brown will give you better flavor.
- Onions - White or yellow
- Garlic - One whole bulb.
- Rosemary - Fresh rosemary is best here.
- Thyme - Fresh thyme is best.
- Black Peppercorns - Whole, un-cracked peppercorns.
- Bay leaves - I like these Turkish bay leaves from The Spice House.
- Unsalted chicken stock - This is for braising the turkey legs after the smoker. If you don't have chicken stock, broth or unsalted bouillon will work.
Equipment Notes
You will need a smoker in order to make these smoked turkey legs. There's no getting around that.
- Masterbuilt 30" Electric Smoker - This is the electric smoker I use. It's about ~$200 and a great entry level model. Make sure you can set it up on concrete or brick, and definitely not on grass.
- 6 qt Cambro Container - This should be big enough to fit all 6 turkey legs. You could also use a stock pot, large gallon bags, or any other large container with a lid or airtight seal. What matters most is that the turkey legs are completely submerged. Weigh them down with a plate or cutting board if you have to.
- Applewood or cherry wood chips - Make sure you're using the right type of wood for your smoker. The Masterbuilt 30" smoker users wood chips. But some smokers use wood pellets, not chips.
NOTE: Depending on what kind of smoker you have, the process for using it may differ. Make sure you read your smoker's instructions for proper heating and smoking!
The flavor of wood chip you use depends on your taste preferences. Lighter smoke flavors come from fruity trees, like applewood and cherry. These are great options, and if this is your first time smoking anything, I recommend picking one of them.
A stronger, more intense smoky flavor will come from hickory or mesquite wood chips. These are also great with turkey but can be overwhelming if you use too much. If you're going to use hickory or mesquite wood chips, only replenish the wood chips during the first hour of the overall cooking time in the smoker.
How Brining Prevents Dry Turkey Meat
If you hate turkey because you think it's always dry, I get it. Turkey is notoriously difficult to cook perfectly without drying out. This can be prevented easily with a step called brining.

For smoking turkey legs, I like to use a super flavorful liquid brine as opposed to a dry brine. Smoking takes hours, and we want the extra security of more liquid inside the meat.
By brining the legs for at least four hours or (even better) overnight, you'll get a lot of flavor inside the meat, and prevent the turkey legs from drying out. It also gives the salt time to start dissolving some of the muscle proteins in the turkey legs, meaning a more tender turkey for you!
Low and slow cooking is one of the best ways to keep meat juicy, and ain’t nothing slower or lower than smoking meats, baby.
To make the brine: Bring one quart of water to a boil on the stove. Stir in the salt, sugar, aromatics, and seasonings. Turn off the heat and let sit for 30 minutes, then pour it into large brining container along with 3 quarts cold water. Refrigerate until very cold before submerging the turkey legs.
How to Smoke Turkey Legs
Set your smoker to 250°F. When it reaches temperature, insert the wood chips according to your smoker's instructions.
When you start to see whisps of smoke rising out of the grate in the back, it's time to put the turkey legs in the smoker.
Remove them from the brine, pat them dry with paper towel. Make sure there's no brine trapped under the skins, then pull the skins back up so they're covering the legs.
Working quickly, so you don't let too much smoke escape, arrange the turkey legs in rows directly on the grates inside the smoker.

Smoke the turkey legs for two and a half hours, rotating them halfway through.
With an electric smoker, you don't need to worry too much about the temperature fluctuating. You do want to check on it periodically to make sure you can still see wisps of smoke coming out of it.
If you're not using an electric smoker, you will want to check the temperature periodically to make sure it hasn't dropped too much. And you'll definitely want to have a thermometer inside the smoker so you know what the ambient temperature inside it is.
When the turkey legs are done, remove them from the smoker. It's time to braise.

Bring the turkey legs inside and preheat your oven to 350°F. Use heavy duty aluminum foil to fashion two pouches, each big enough to fit 3 turkey legs.
Don't seal them just yet.
Pour half a cup unsalted chicken stock into each pouch, then seal them tightly. Place the pouches in a high-rimmed roasting pan or baking dish. Bake for one hour.
This braising period will break down those tough tendons inside the turkey legs making them much easier to eat.
Note: There's no right way to make these foil pouches. Just do your best. Use slightly more foil than you think you need. Lay 3 legs side by side alternating meaty end and bone end and fold the edges up just enough so you can pour the broth in. Then fold and pinch all the edges together to seal.

Timing Breakdown
Here's what your schedule will look like to make these smoked turkey legs.
| Brining turkey legs | 4-12 hours |
| Preheating smoker | 30 mins-1 hour |
| Smoking turkey legs | 2.5 hours |
| Braising turkey legs | 1 hour |
| TOTAL | 8 - 16.5 hours |
Note: The one thing that will change how long to smoke these turkey legs for is if you use a more intensely flavored wood chip. The total amount of time they spend in the smoker won't change, but you'll only want to feed new chips into the smoker for the first hour of smoking time.
Top Tip
It's super important that the brine is completely chilled before you submerge the turkey legs. This is a food safety issue — warm liquid + raw poultry is the perfect home for bacteria and bacteria is gross. So make sure the brine is completely chilled, then immediately put the brine and turkey legs in the fridge! Your gut will thank you for it later.
📖 Recipe
Better-Than-Disney Smoked Turkey Legs
Recipe Notes
- Recipe adapted from Alton Brown's Smoked Turkey Legs
Ingredients
- 6 turkey legs
For the brine
- 4 quarts water
- 225 grams diamond crystal kosher salt
- 225 grams dark brown sugar
- 2 medium onions (peeled and quartered)
- 1 bulb garlic (cut in half)
- 10 black peppercorns
- 4 sprigs fresh thyme
- 3 sprigs fresh rosemary
- 4 bay leaves
For the smoker
- 1 bag applewood or cherry wood chips (use whatever is appropriate for your smoker)
For braising
- 1 cup unsalted chicken stock
Instructions
- Make the brine. Bring 1 quart of water to a boil on the stove. Stir in salt, brown sugar, and all the herbs and spices. Turn off the heat, and let sit for 30 minutes. Pour the mixture into a large container and add 3 quarts of cold water. Put in the fridge until cold.The brine should be cold when the turkey legs go in, so if you need to speed up the process, fill the sink ¾ of the way full with cold water and ice and let the container sit in it for a while, stirring occasionally.
- Brine the turkey legs. Add the turkey legs to the cold brine so that they are completely submerged. Cover tightly and return to the fridge for at least 4 hours or overnight.
- Preheat the smoker. Set the smoker to 225-250°F. This may take 30 minutes to an hour. Then, add the wood chips. Continue adding woodchips throughout the cooking time every 30 minutes or when you stop seeing smoke coming out of the smoker.
- Smoke the turkey legs. Take the turkey legs out of the brine and pat dry with a paper towel. Place them directly on the grates in the smoker for 2.5 hours, flipping halfway through.
- Braise the turkey legs. Preheat oven to 350°F. Remove the turkey legs from the smoker. Create two foil pouches and place 3 turkey legs in each one. Pour half a cup of unsalted chicken stock in each pouch and seal the pouches. Place the pouches in a high-walled baking pan or braising pan (even two 9x9 square cake pans is fine) and braise for 1 hour.
- Enjoy! Carefully open the pouches (be cautious of hot steam escaping!) and discard the juices or use them to make a smoky pan sauce. Remove the skins from the turkey legs before serving — they're gross and tough and hard to eat. No one wants that!
Moore says
Can you rinse off the legs after you brine them?
Rebecca Eisenberg says
Why do you want to rinse them off? It's not necessary here, though it won't hurt the turkey legs if you do. However, for food safety reasons it's not recommended that you wash or rinse poultry — the water droplets splashing off of it spread bacteria and stuff.
Moore says
They were a little salty the last batch I done. Wasn't sure if you could rinse them off.
Rebecca Eisenberg says
Then yes, if you just want to rinse off some of the brine that’s fine! You could also reduce the amount of salt in the brine. The brine is absorbed into the meat, so rinsing it off might not be as effective (and food safe) as just reducing the amount of salt in the brine to start with!
Larry Maxwell says
These were great! Thank you you for the recipe. I've smoked turkey legs before but never braised them. It really makes a difference!
Tara Fonteyn says
Wow Rebecca, awesome. They were delicious! I followed your recipe, couldn't find but two turkey legs on the day after Thanksgiving,(my fault) so I added 6 large chicken drumsticks and made the brine. I used my tall 8 quart pot and brined them all for 12 hours. I put them in the Traeger smoker at 250 degrees. Here in Washington it is presently 40 degrees so I was hoping it would still work.
Well they looked amazing. After 2.5 hours, I reduced the temp to 225 and the temperature outside was headed towards 36 degrees. They were looking done but they were still pink and the temp was 165 so I left them in another hour. I tried them and they were delicious, but I put most of them in the oven with the packets and no-salt savory chicken stock. After braising, the turkey was unbelievably delicious and just melted in my mouth. The rest were awesome. I took amazing pictures as well.
Rebecca Eisenberg says
Oh wow, I love that you were able to adapt this turkey leg recipe to include chicken legs too! Thanks for sharing!
Eve says
Hello there. What internal temperature are you supposed to cook the turkey legs to in the smoker before braising? Turkey legs come in all sizes.
Rebecca Eisenberg says
Turkey legs should be cooked to 165°F!
Tim says
Have not made this recipe If I plan on serving turkey legs on a plateI I will cut the tendons with kitchen shears at the ankle joint prior to smoking/braising.
The tendons are easily removed by pulling downward along the bone leaving the meat. This will not work at a Renaissance Festival when walking around with leg in hand
Sam says
Would it be okay to pre-smoke the Turkey legs and braise the following day?
Rebecca Eisenberg says
I haven't tested this and can't speak to it from a food safety standpoint, though I think as long as you bring them back to 165°F during the braising it should be fine — you may need to extend the braise time though since you'll be starting with cold turkey legs instead of having them still hot from the smoker. Can't say how long you'd need to extend it to get the same results!
Sam says
Great, thanks!