
These ravioli with a simple gorgonzola, apple, and walnut filling were inspired by one of my fave pasta sauce recipes: Chef John's Gorgonzola Cream Sauce.
It's creamy with a little sharpness from the cheese, the apples are crisp and sweet, and the walnuts add a nuttiness that really ties it all together.

I love the flavor combo of Chef John's dish so much I wanted to try flipping it inside out — instead of serving the sauce on top a plate of ravioli, taking those flavors and stuffing the gorgonzola sauce inside the ravioli. And omg, it worked SO well.
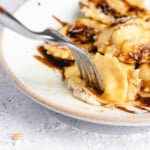
There's so much flavor packed inside each of these gorgonzola ravioli that you don't need a fancy sauce to serve it up with style. Some brown butter, a drizzle of balsamic vinegar (get the good stuff! I swear by this Traditional 25 Star Balsamic from one of my fave Baltimore shops), and a sprinkling of parmesan cheese is all you need. Of those three, btw, the balsamic is the one I consider mandatory. It really makes a difference.
I've made lots of cut or extruded pastas like fettuccini and rigatoni before, but I've always struggled with filled pastas. I am so far from an expert on this, and I learned so much as I was developing this recipe, so if you're a beginner to the world of ravioli, don't worry — I promise you can do this.
Disclaimer: I'm writing this post as someone who was recently a beginner at this too, because I think that's a useful perspective to share. If you want true pasta expertise, I encourage you to check out Pasta Grannies and Pasta Social Club.
And when you're ready to try some other filled pasta shapes, check out my butternut squash and goat cheese agnolotti recipe!

Using a Ravioli Stamp
If you're a beginner, the best thing you can do to set yourself up for ravioli success is buying a ravioli stamp (pictured above). I was skeptical of these for a while; I thought a cookie cutter was a good enough replacement, but no. It turns out not having a ravioli stamp is one of the reasons I had so much trouble making good ravioli.
Ravioli stamps have a unique fluted design to them that helps seal and cut through the pasta dough. It makes such a difference in getting uniformly shaped ravioli that don't burst open when they cook.
You can use a cookie cutter, but it won't seal the way a stamp does. And you can use a fluted wheel cutter, but when you're a beginner it's hard to cut in straight, uniform lines, and it's hard to know how close to the filling you should be cutting (it's closer than you think!).
I've tried those ravioli making trays, too — you know, the ones where you can run a rolling pin across the top to punch out several ravioli at once — and I don't love them. The pasta roller attachment for my KitchenAid mixer doesn't roll the sheet of pasta dough wide enough to fit across the tray with any excess to trim. If you want to use one of those, go ahead, but make sure your pasta roller is at least 1-2" wider than the tray.

Pasta Dough Notes
The pasta recipe I used here is a basic egg pasta dough. I've given the instructions for making the dough using a stand mixer with a dough hook because I don't like making a mess on my counter.
If you prefer making pasta dough by hand on the counter or in a food processor you can absolutely go right ahead and do that too.
- All-purpose flour is just fine. No need to use specialty pasta flour or "00" flour. Save buying that for when you realize you've fallen in love with pasta making and want to try getting a little fancy with it. Different flours absorb liquid differently so if you do use a different flour you might need to adjust the amount of liquid your dough needs.
- It can take a bit of time for the dough to fully come together. Before you knead the dough (which develops the gluten strands which will allow it to stretch as you roll it) you need to get the flour and eggs to combine. This process can take longer than you think. Let the mixer run on low for 8-12 minutes, and go wash dishes or do other things while it works. Check on it every 3-5 minutes to push any flour trapped on the sides into the center, or make sure the sticky part of the dough is facing out so it can pick up any dry bits. It's really hard to over mix pasta dough, and you'll have to knead it after this step anyway, so don't worry that you'll hurt it by letting it take its time.
- Pasta dough will always seem dry at first. The only liquid in this dough comes from the eggs — two yolks plus two whole eggs. Yolks are 100% fat and provide the gorgeous color and supple texture. The whites do contain a bit of water, but not much. You'll need to knead this dough for quite a while. That means 7-10 minutes in the stand mixer after it comes together (aka after there's no dry bits of flour in the bottom of the bowl).
- The dough hydrates as it rests. Once the dough has been kneaded together, you'll shape it into a disc, wrap it in plastic, and let it rest in the fridge for at least 30 minutes. When you come back to it, you'll notice it's much softer, a lot more flexible, and definitely not dry. Don't skip this step.
- Add additional water ONLY if you absolutely need to. And by additional water I mean, like, a teaspoon. Maybe two. If it's been like 8-10 minutes and the dough is still a shaggy mess with lots of dry flour bits in the bottom, drizzle a teaspoon of water or olive oil into the mixer bowl (on top of the dry bits) and let it run for a minute before you add any more. But really resist adding water unless you think it's absolutely necessary.
- Use the dough within 24 hours of making it. After that the egg yolks start to oxidize and your pasta dough will be unpleasantly green in color. I learned this the hard way. Womp womp.
how to use a ravioli stamp
I roll my pasta dough to a "6" thinness on my KitchenAid pasta roller. You don't want it to be too thick, because there's two layers of pasta for every ravioli, but you don't want it too thin either, or the moisture from the filling will tear through the fragile walls.
![[gif] using ravioli stamp to mark spots for filling on pasta dough](https://thepracticalkitchen.com/wp-content/uploads/2021/03/shape-ravioli-1.gif)
![[gif] placing filling in ravioli](https://thepracticalkitchen.com/wp-content/uploads/2021/03/shape-ravioli-2.gif)
![[gif] adding extra nuts to each ravioli](https://thepracticalkitchen.com/wp-content/uploads/2021/03/shape-ravioli-3.gif)
![[gif] placing a top layer of pasta dough over ravioli filling](https://thepracticalkitchen.com/wp-content/uploads/2021/03/shape-ravioli-4.gif)
![[gif] patting air bubbles out of ravioli before cutting](https://thepracticalkitchen.com/wp-content/uploads/2021/03/shape-ravioli-5.gif)
![[gif] stamping out ravioli](https://thepracticalkitchen.com/wp-content/uploads/2021/03/shape-ravioli-6.gif)
Dust your counter well with flour under the bottom sheet of pasta so that the dough doesn't get stuck. Try to keep the top of that pasta sheet and both sides of the top sheet of pasta dough as flour-free as possible, so that the two layers stick together when you press down.
Try not to let any air get trapped with the filling when you seal the two layers together. Even though the stamp will seal the two layers of pasta together at the edges, you'll still need to use your fingers to seal the dough around each little mound of filling. Press out any air bubbles before you start stamping.

Practical Tips & Recipe Notes
- The filling uses a base of ricotta cheese, which is super common in ravioli fillings because of how well it takes on other flavors and how stiff and smooth it is. You'll want to remove some of the moisture from it before you mix it by sandwiching it between four sheets of paper towels — this keeps your filling from being too watery!
- If you're using a more mild gorgonzola for your ravioli, you can increase the amount of gorgonzola in the filling or reduce the amount of ricotta. Because the filling doesn't need to be cooked, you can taste as you go and adjust as needed.
- All-purpose flour works just fine here. No need to use specialty pasta flour — save buying that for if you realize you've fallen in love with pasta making and want to try getting a little fancy with it.
- This will make about 26-30 ravioli. You can re-roll your pasta dough scraps as long as they don't have any filling on them. Just knead the scraps into a ball and let them rest for a bit before sending them through the roller again.
- Add a few extra gorgonzola crumbles to the ravioli filling after you've spooned it out to make sure the gorgonzola flavor is as prominent as you want it to be. You can always cut and test one ravioli before you finish filling the rest to get that balance of flavors just right.
- For a smoother gorgonzola ravioli filling you can run it all through a food processor, but I find that takes away from the nice crunch of the apples and walnuts.
📖 Recipe
Apple, Walnut, and Gorgonzola Ravioli (From Scratch)
Recipe Notes
- To freeze arrange ravioli on a sheet pan dusted lightly with flour and place in the freezer for 20-30 minutes. Then transfer to an airtight container. Add 1-2 minutes to cook time when cooking from frozen.
- Do not store ravioli in the fridge longer than 24 hours, the eggs will start to oxidize and turn green.
- If the shaped ravioli dough has dried out a bit before you start boiling, add 1 minute to the cook time.
Ingredients
Pasta dough
- 200 grams all-purpose flour (1½ cups)
- 2 eggs (large)
- 2 egg yolks (large)
- ⅛ teaspoon diamond crystal kosher salt (use 2x of another brand)
- 1-2 teaspoon olive oil (a small drizzle only if your dough is super dry)
Ravioli filling
- 170 grams whole milk ricotta cheese (a scant ¾ cup)
- 113 grams gorgonzola cheese (½ cup)
- 40 grams walnuts (toasted and very finely chopped)
- ⅓ cup crisp, flavorful apple (like pink lady, gala, or jazz) (minced)
Instructions
The pasta dough
- Combine flour and salt in the bowl of a stand mixer. Make a well in the center. Pour the whole eggs, yolks, and 1 teaspoon olive oil into the well and whisk with a fork, gradually incorporating more flour in from the sides until you have a very thick, wet mixture in the middle.
- Attach the dough hook and run the machine on low, pausing occasionally to push more flour from the sides into the center.
- Once the dough comes together in a shaggy mass and there's no loose flour left in the bottom of the bowl (add the extra 1 teaspoon olive oil to the dry bits if they're not getting incorporated), up the speed to medium low and knead on low until the dough is smooth, about 6-8 minutes. It will feel quite stiff.
- Wrap the dough in plastic and let chill in the fridge for at least 30 minutes, or up to 24 hours before use.
The filling
- Drain the ricotta: Line a quarter sheet pan with two layers of paper towels. Spread the ricotta in a thin layer and cover with two more layers of paper towels, pressing them gently onto the surface of the cheese. Let sit for 5 minutes.
- Toast the walnuts: Arrange whole walnuts on a sheet pan and toast in a 300°F oven for 15-20 minutes until well browned, giving the pan a shake every 5 minutes or so. Remove from the oven. Once cool, finely chop them and set aside.
- Blend the cheeses: Combine the drained ricotta, gorgonzola cheese, salt, and pepper in the bowl of a mini food processor. Process on low just to combine and to break up the larger gorgonzola crumbles.
- Stir together cheeses, finely chopped walnuts, minced apple (tossed with a squeeze of lemon juice to prevent browning) in a medium bowl. Adjust salt and pepper to taste. Cover and chill until ready to use.
Ravioli assembly
- Divide pasta dough in half. Keep dough you aren't using wrapped until ready to use.
- Roll pasta dough to a "6" thinness using a pasta roller, starting with the widest setting on the roller. Roll the dough through twice on each setting so that it fully relaxes and doesn't shrink back. Dust with flour as needed to prevent sticking.
- Lightly dust a clean countertop with flour and lay out the sheet of dough. Trim ends where they're lopsided so you have a clean rectangle.
- Fold the dough in half lengthwise (so if it was 20"x5" it would now be 10"x5"). Unfold and cut where the crease was so that you have two equal sized sheets of pasta.
- Dust additional flour under the sheet that will form the bottom of your ravioli so it doesn't stick to the counter. Use a pastry brush or dry paper towel to brush and excess flour off the surface of the pasta sheet.
- Without cutting all the way through the pasta, use your ravioli stamp to lightly mark two rows of ravioli so you know where to place the filling. If using a circle cutter, leave about ¾-1" between each; If you're using a square ravioli cutter they can be much closer together or not have any gap at all.
- Scoop 1½ teaspoon of filling into the center of each ravioli.
- Lay the other sheet of pasta over the filling. Working from the center outward, use your fingers to gentle smooth out the dough and seal the two layers together around the mounds of filling. Seal the outer edges of the pasta sheet last so to avoid trapping air bubbles.
- Carefully place your ravioli stamp over each mound of filling and press down firmly to cut through the pasta and seal the edges shut.
- Pull up any excess dough and knead or combine together to re-roll later.
- Gently pull ravioli up off the counter (use a bench scraper or thin metal spatula if they're sticking) and transfer to a lightly floured sheet pan to dry or cook immediately.
Cooking & serving
- Bring a pot of salted water to a rolling boil, then reduce to a simmer. Cook fresh ravioli for 3 minutes (4 minutes if they've dried slightly) without crowding the pan.
- Serve with brown butter and a drizzle of balsamic vinegar.
Robyn says
So good! First time I’ve made my own pasta and recipe was very easy to follow. I’ve made it a few times now, freezes very nicely. I’ve thrown in some broccoli or spinach and extra walnuts into the brown butter a few minutes before adding the pasta. Also tried this using a cinnamon pear balsamic vinegar and it was a great pairing. Also like to use any extra filling by just tossing it with plain pasta. My partner has added this onto his favorite meal list, thanks for the recipe!
Rebecca says
so glad to hear you and your partner enjoyed it!! love the idea of using a cinnamon pear balsamic with it + adding some greens!