
This stand mixer butter is my new favorite way to use up leftover heavy cream. How easy is it to make butter with a stand mixer? So easy I figured out how to do it the first time based on a vague memory of seeing someone do it once on a TV show and absolutely zero additional research.
Of course I've since done a bunch of research and tested different methods and techniques. But my point still stands! If you have a stand mixer and some heavy cream, you can make stand mixer butter in about 10 minutes. It's incredible. It feels like doing magic.
I'm obsessed. So I'm dragging you into my butter obsession too.

Once you start making your own butter from scratch you won't be able to stop. Soon you'll be making all sorts of fun, flavored compound butters like this easy whipped honey butter or this roasted garlic and chive butter!
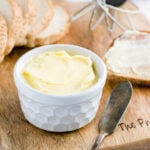
Whether you leave it plain or add lots of flavor, this homemade butter is so good slathered on a freshly baked slice of my no-knead dutch oven bread and sprinkled with flaky salt.
5 star reader review
“Wow - it never occurred to me to make homemade butter, but it was so simple and tastes sooooo yummy that I am telling everyone. This recipe is easy to follow and I appreciated the video because I wasn’t sure exactly what it meant to put the butter in an ice bath. Just try it … you will be amazed! Enjoy”
—Destiny
Why Make Homemade Butter
Any time I see a recipe call for like, 2 tablespoons of heavy cream, I cringe a little. Heavy cream can be expensive! Trying to find other things to do with it before it goes bad can be... tricky.
Sure, you can use up excess heavy cream in your coffee or to make whipped cream, but ice cream isn't exactly quick. And whipped cream has an even shorter shelf life! So that's only a useful option if you've got something to put whipped cream on immediately. Like ice cream. So now you're back where you started.
Homemade butter, however, is fast, requires no additional ingredients, and is super versatile. It stays good in the fridge for a few weeks and freezes well, too.
Of course you can also make butter using a jar like you did in elementary school, but if you've got a stand mixer that can do the work for you...? I know what I'm choosing.
One other perk of making homemade butter, by the way? The byproduct of homemade butter is buttermilk. Which is also expensive and can be hard to find in the store. For the price of one pint of heavy cream, you get butter and buttermilk? What a win!
The art of making butter is ancient — at least 4,000 years old! So you're joining a very long tradition in a very newfangled way by making butter in your fancy-shmancy stand mixer. And trust me, our ancestors are extremely jealous.
Ingredients and Tools

- Heavy cream - aka Heavy Whipping Cream. Full-fat. Not light cream, not half and half, not whole milk. Real heavy cream. I've used pasteurized and ultra-pasteurized, and both work just fine.
- Ice water - This prevents the butter from melting while you rinse any remaining buttermilk particles off of it. Make sure you have plenty of ice before you get started, it melts faster than you think.
- Fine sea salt - Optional! If you want to make salted butter, the fine grains of sea salt will flavor the butter without making it grainy.
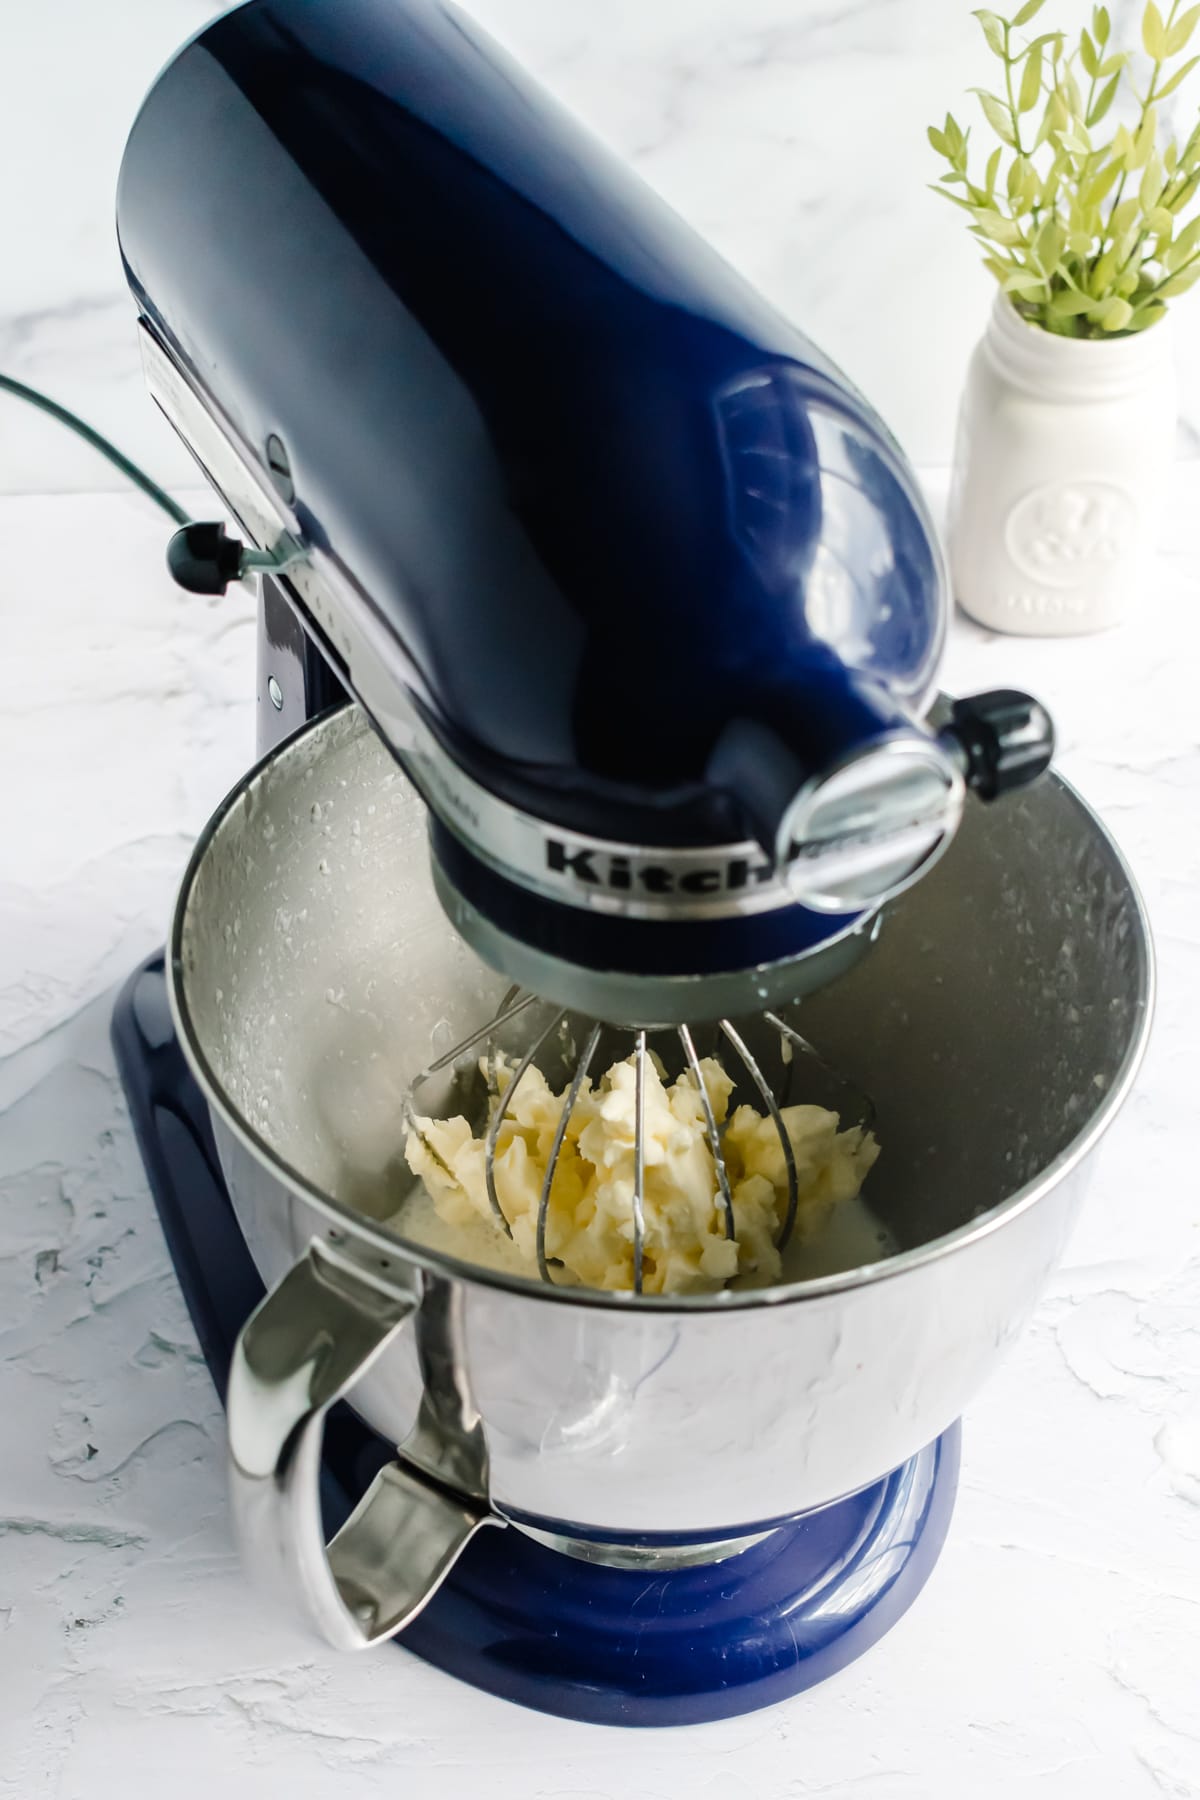
- Stand mixer with whisk attachment - I used a 5 quart tilt-head KitchenAid mixer for this because my big 7 qt mixer bowl is a bit big for this small amount of heavy cream. You can use a hand mixer, but you need to be mixing on high speed for a long time so make sure your arm is ready for that kind of workout!
- A wire spider - You don't need one of these but I found it was much easier to pick smaller pieces of butter out of the ice bath with the help of the wire spider.
How to Make Butter Using a Stand Mixer
There are a lot of different ways to make homemade butter out there — and there are even several different stand mixer butter methods out there. As I was developing this recipe and trying different techniques and processes, I pulled together a method that works very well for me.
The first time I tried making butter I was super impatient and thought it wasn't working because it was taking forevvvver (it wasn't) and I stopped the mixer about 30 seconds before it would have fully separated. I don't want that to happen to you. So I've got step-by-step photos so you'll know exactly what to look for.
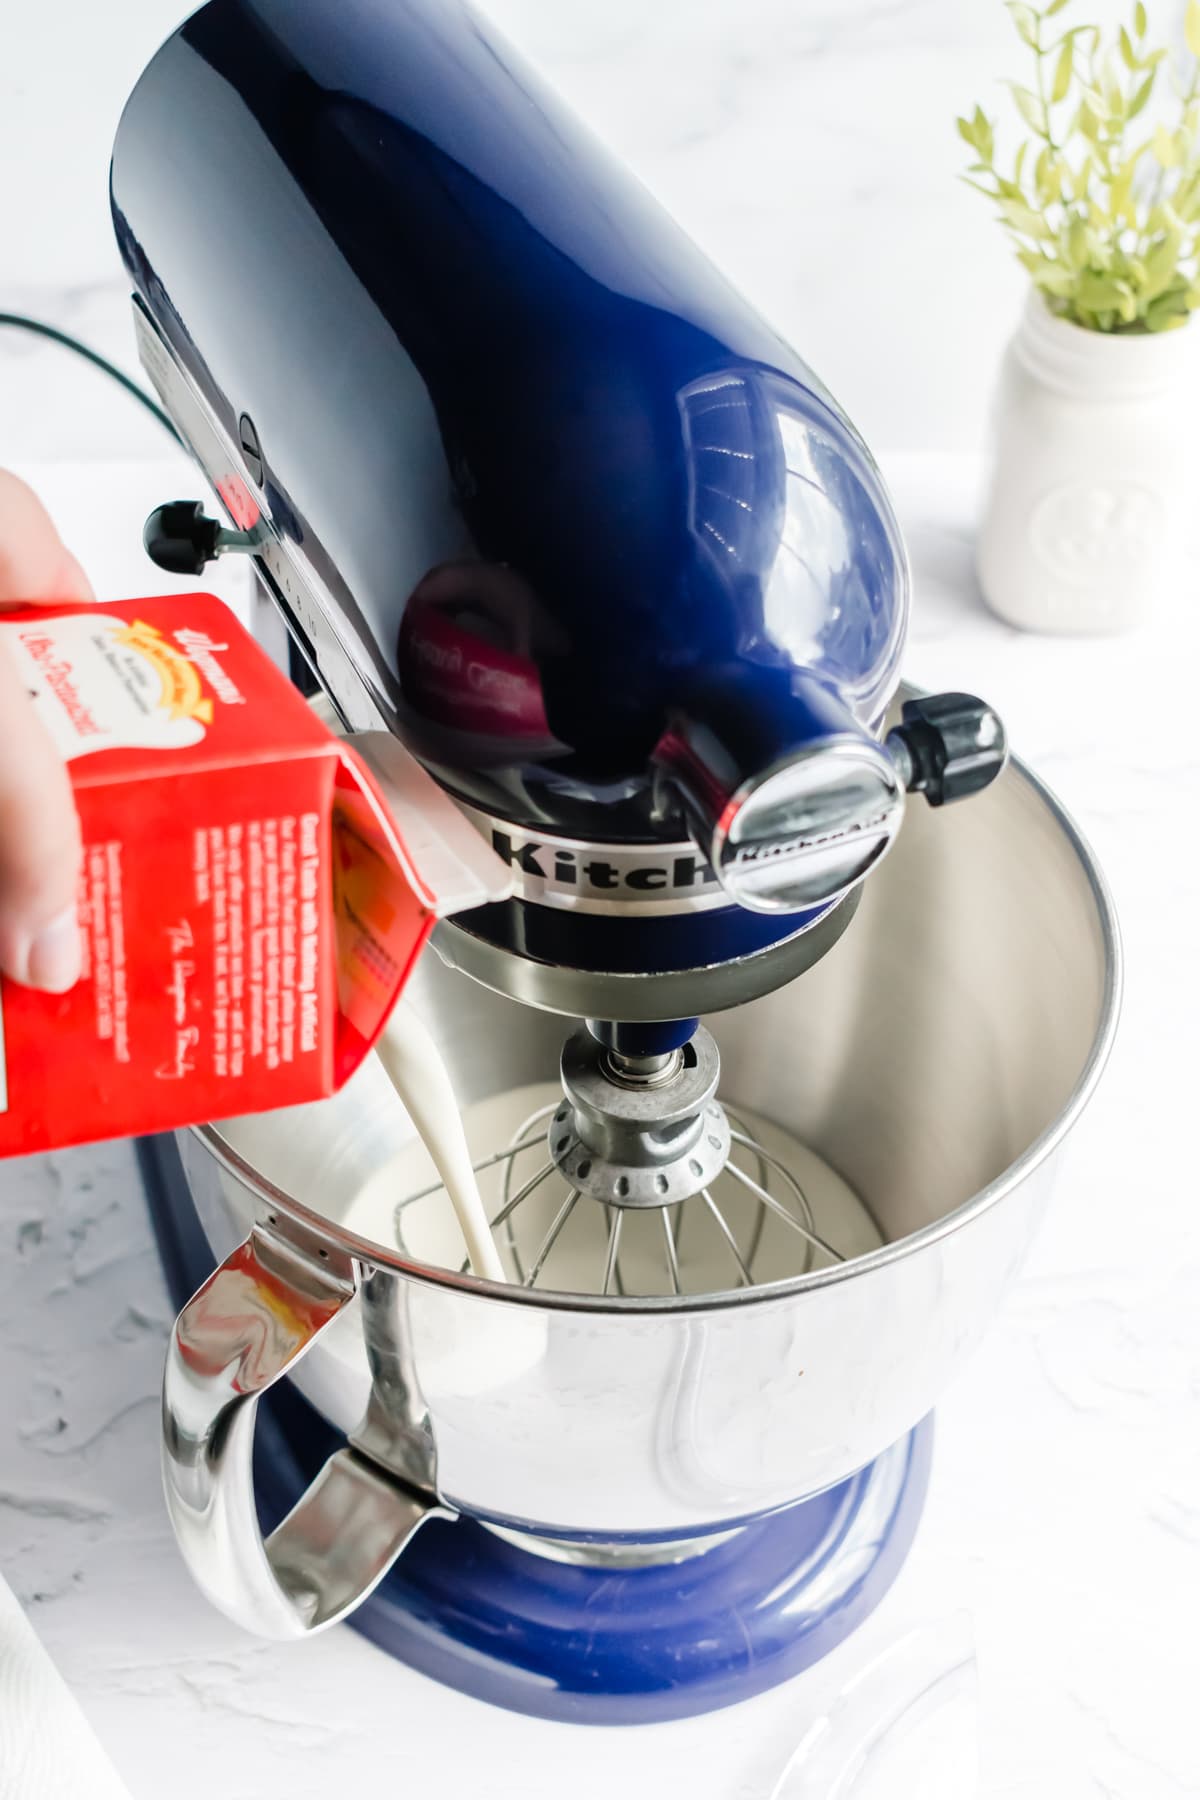
The first step of making butter is to let the heavy cream sit out at room temperature for at least 30 minutes before you get started. This encourages the cream to separate.
You don't want the heavy cream to be warm, but the closer it is to room temperature when you start whisking it, the faster it will separate and turn into butter.
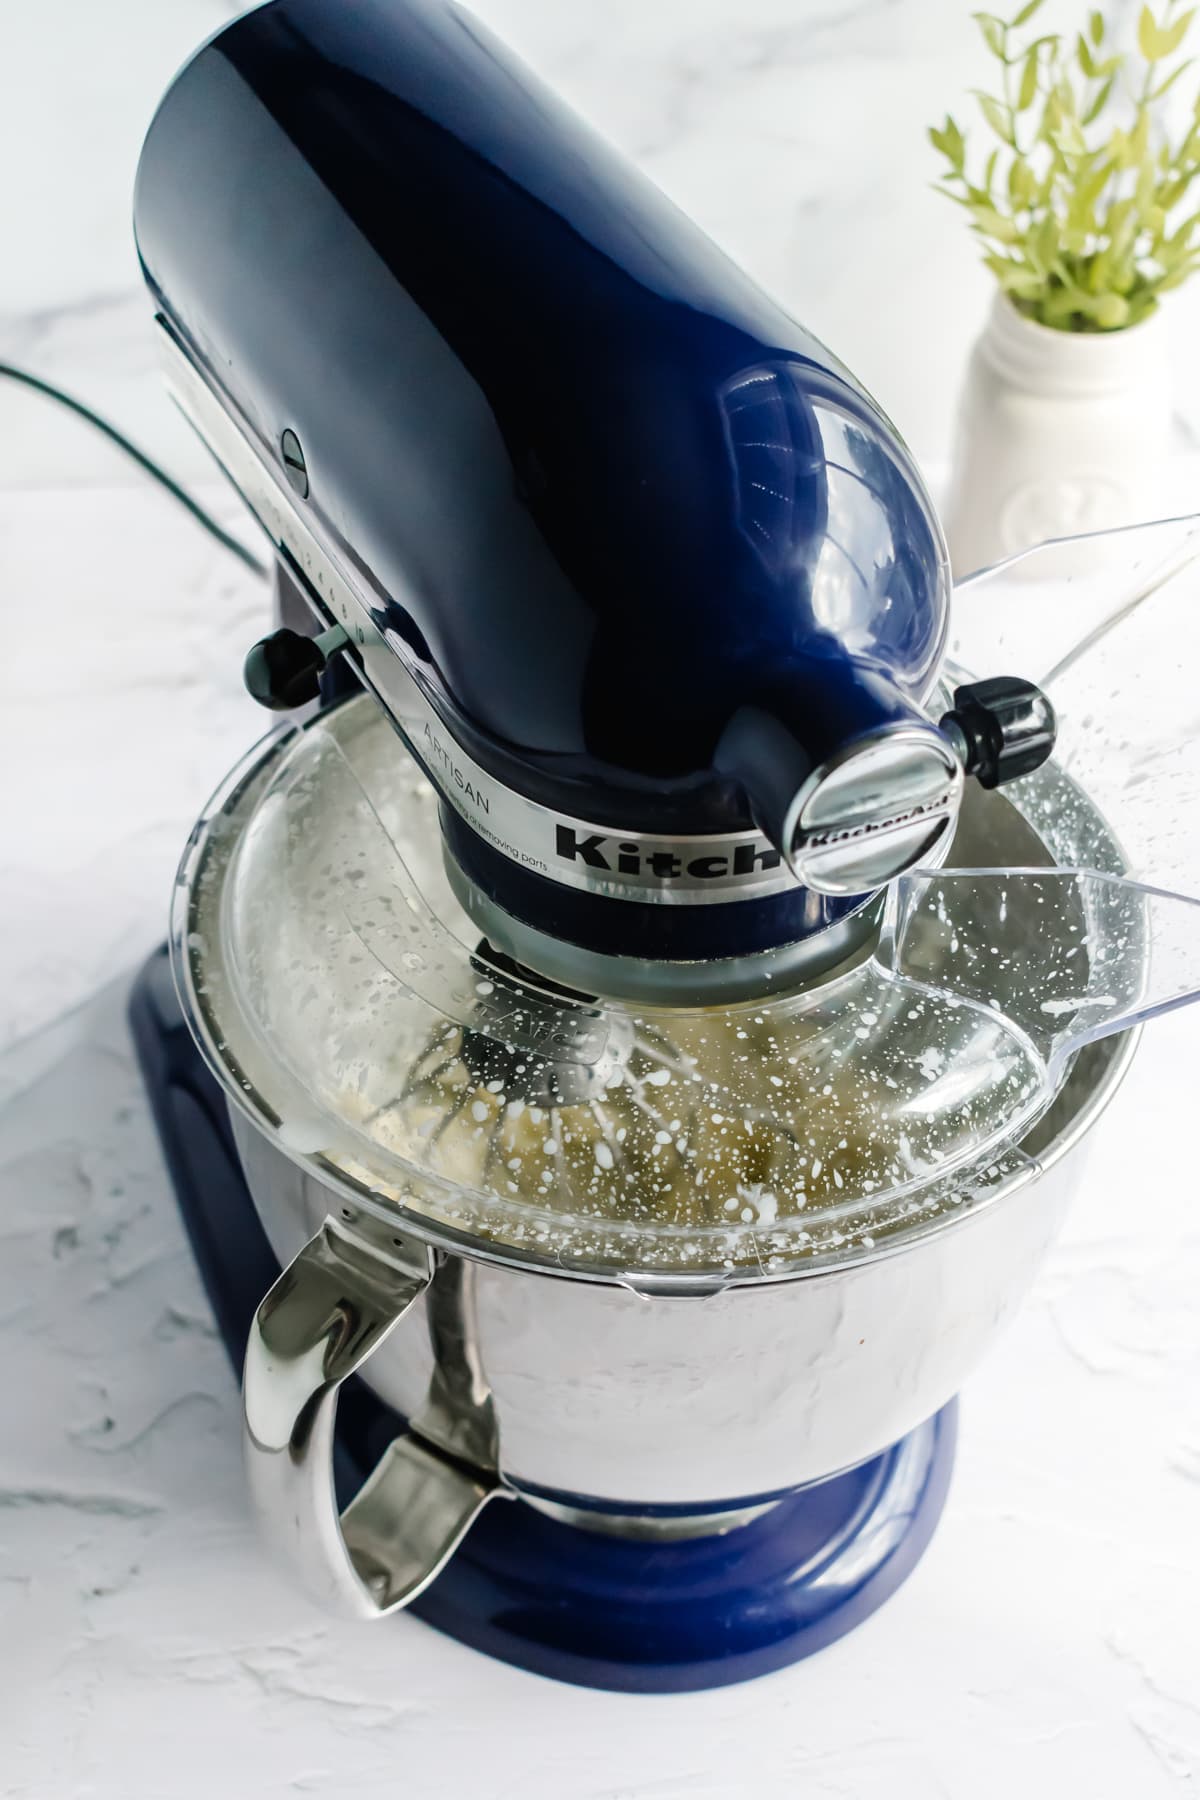
By the way... you won't see it in these photos, but I always use a mixing bowl shield when making butter. Most KitchenAid mixers come with one; it's that plastic thing that clips around the top of the bowl. The heavy cream splashes a lot at the beginning and again at the end of the butter-making process; the shield helps contain the mess.
If you don't have a bowl shield, tent aluminum foil around the rim of your bowl or stretch plastic wrap across the top of the bowl with a hole in the middle for the whisk to move around. Draping a large kitchen towel over the top of your mixer also works.

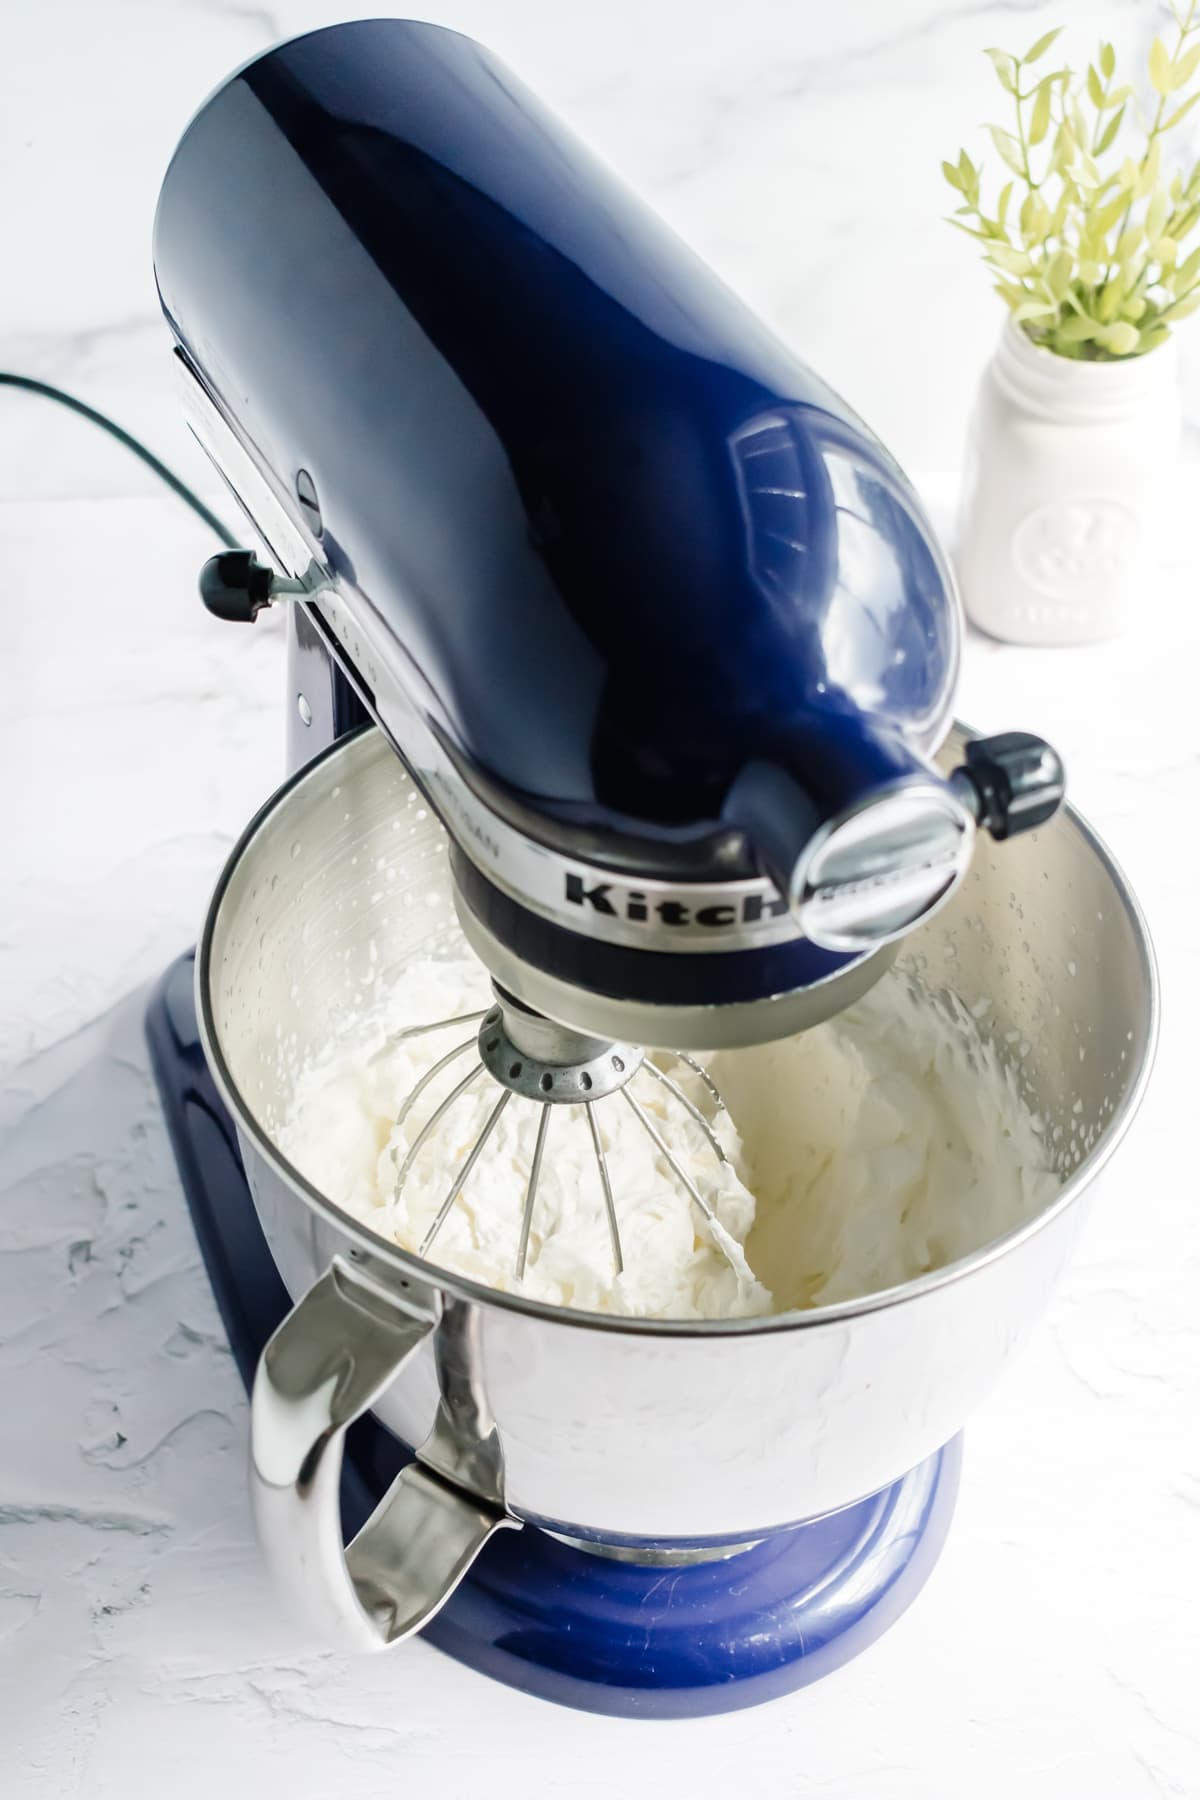
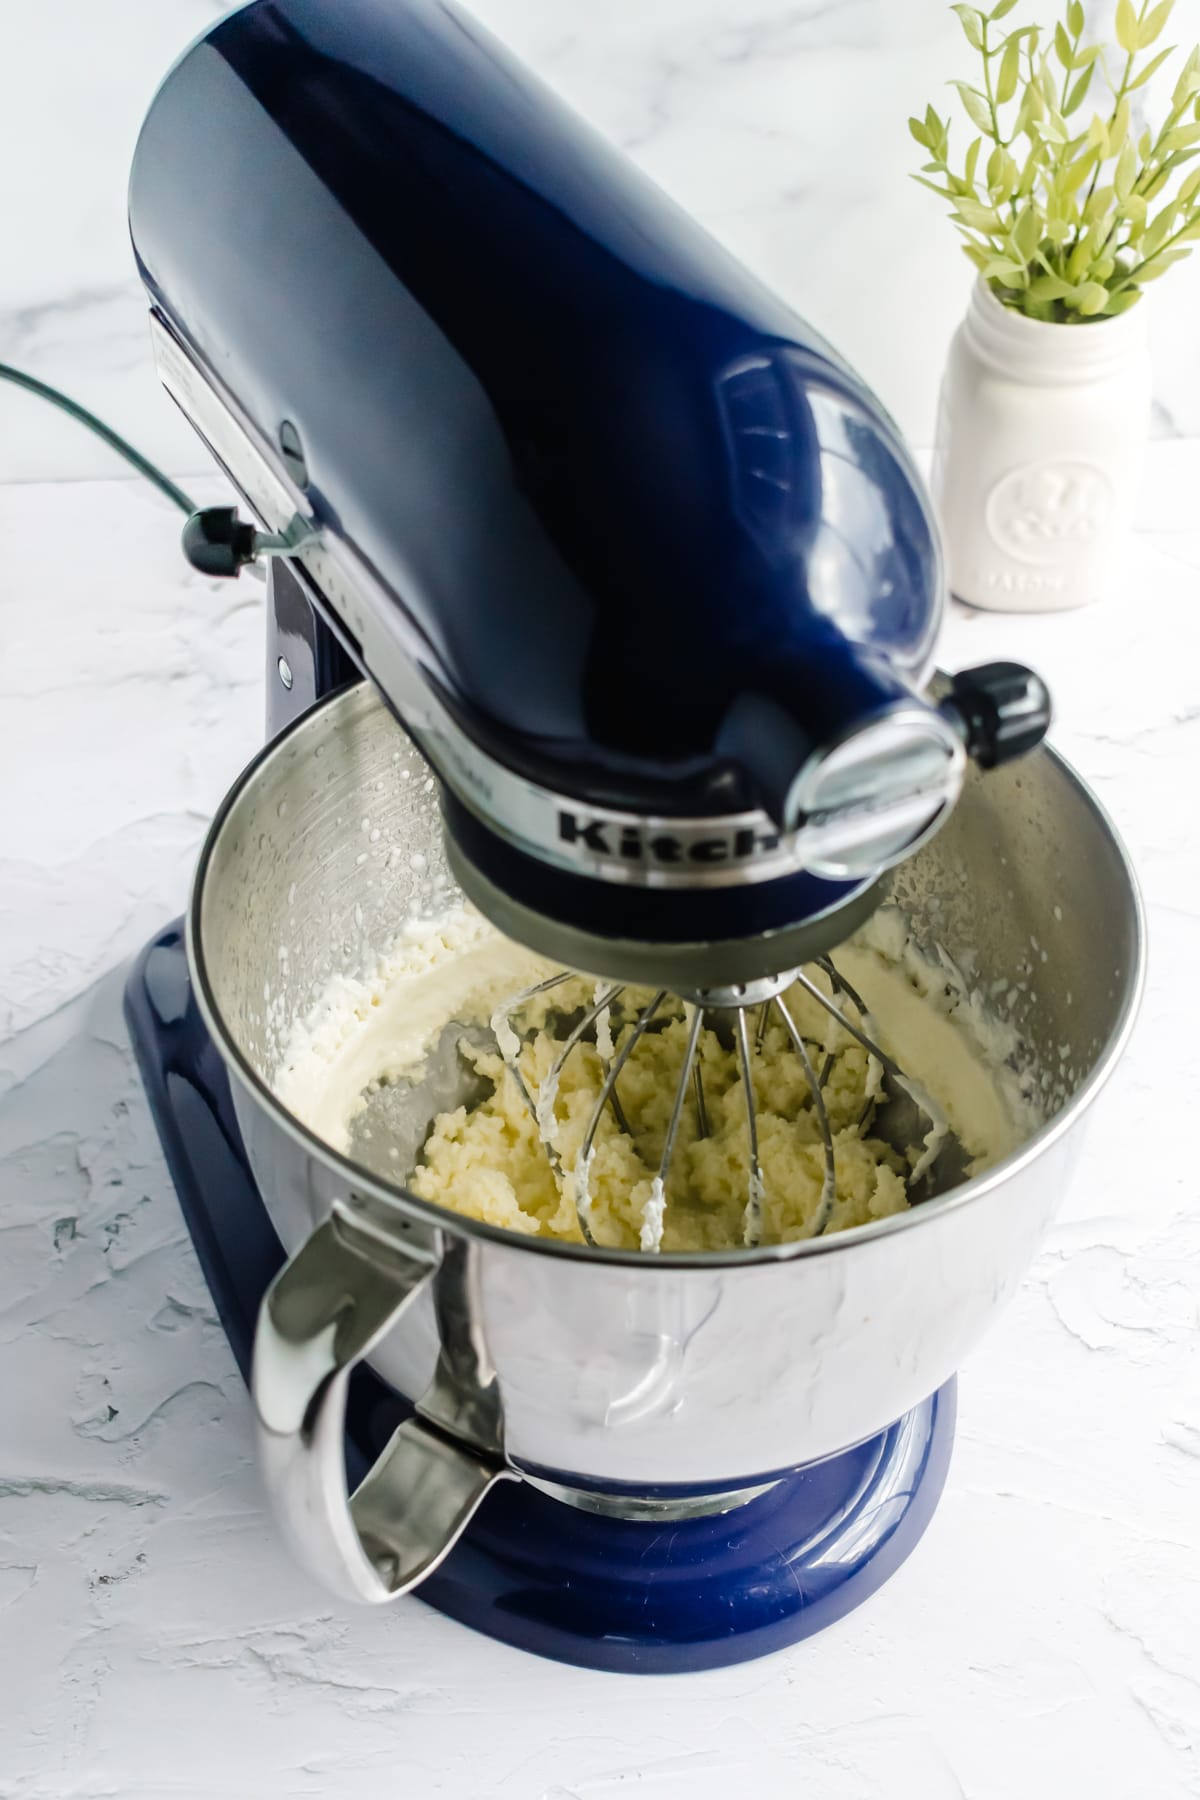
First, the heavy cream whips up into fluffy whipped cream. But when you keep going, it starts to break apart and becomes yellowish and kind of grainy. The butter will start clinging to the walls of the bowl. You might even hear or see small amounts of buttermilk sloshing in the bottom of the bowl.
Keep going! It's not butter yet.
You'll actually be able to see the moment it becomes butter happen before your eyes. The butter will start coming off the sides of the bowl; you'll hear a lot more buttermilk splashing, and the butter will collect inside the whisk. This happens in a span of about 15-20 seconds. And you'll definitely want to have a bowl shield in place when it does!
You *Must* Rinse Your Butter in Ice Water
Rinsing the butter is crucial. You really don't want any buttermilk particles to get trapped in the butter, because they can cause it to go rancid! Yuck. Ice water is the best for rinsing the butter since it keeps it firm so it doesn't melt into the water.
When you first scrape the butter out of the whisk into the ice bath, break the butter up into smaller pieces so they get rinsed quite well. The water will quickly become cloudy. Use a wire spider to gather the butter pieces up on a paper towel and empty and refill the ice bath.
Repeat, this time using a spatula to smush and fold and break apart the butter in the ice water, then reform it into a ball. Remove it from the water, refresh the ice water, and repeat until the water runs clear. This usually takes about 3-4 rinses for me.
Once the water runs clear, gather the butter back up in a clean paper towel and squeeze well to press out any excess water.


It's better to use a few large ice cubes in your ice bath than to use lots and lots of small ice cubes. Do as I say, not as I do. In the photos above I have way too many ice cubes in my bowl. Usually I use one or two of these big round cocktail ice cubes, but I was making so much butter in testing and shooting this recipe that I bought a bag of ice for these photos without thinking about how ice size would change the process.
You want to rinse the butter very well to remove any remaining buttermilk particles. And trying to scoop up small pieces of butter without trapping any tiny shards of ice in the butter isn't easy!
5 star reader review
“"Great instructions! I've been making butter for a while now and wanted to see if you had any tricks I hadn't thought of...and you did! The large craft ice cubes are a great idea and will definitely make the washing easier! [...] Thanks for putting in ALL of the details."”
—Sue
Practical Tips & Recipe Notes
- DO NOT SKIP RINSING YOUR BUTTER. If you have any buttermilk particles left behind in the butter, it can go putrid, rancid, and take on a funky, cheese-like smell. This will happen particularly quickly if you keep it at room temperature. Which brings me to...
- Do not leave homemade butter out at room temperature for longer than 4 hours. If you're planning on using it softened you can leave it out overnight, but definitely not any longer than 12 hours.
- This recipe is written using a pint of heavy cream (aka 16 oz, aka 2 cups) and makes approximately 6.25 oz butter. For reference, one American stick of butter (½ cup) is 4 oz.
- If you want to shape your butter into sticks you can use one of these silicone molds which even has tablespoon markings on it. Freeze the butter well before unmolding. You can also find cool vintage and custom butter molds on Etsy.
- This is not the same as cultured butter and cultured buttermilk. Cultured butter uses a similar method, but the heavy cream has a culture (like yogurt) added to it at the beginning.

Can I use homemade butter in baking?
Yes, you can but you might get slightly inconsistent results. Butter is made up of milk fat, water, and milk solid particles, and store bought butter brands use very precise ratios that are hard to intentionally replicate at home. Depending on the brand of heavy cream, how well you rinse the butter, how much salt you add, etc. your homemade butter can vary wildly.
That doesn't mean you can't use it for baking, it just means it's not going to be as reliable as store bought butter. That said, I've been using my homemade butter and buttermilk to make biscuits without a problem.
📖 Recipe
Homemade Butter (Stand Mixer Method)
Recipe Notes
- If you don't have a bowl guard or shield for your mixer you can stretch plastic wrap over the bowl and cut a hole in the middle for the whisk attachment to fit through.
- If you live in a very warm or humid environment, use cold heavy cream right out of the fridge. If the butter still hasn't separated after 5-7 minutes and you're in a humid/hot environment, the butter is likely melting into the buttermilk — refrigerate the bowl for 10 minutes and you should see the butter chunks starting to separate and solidify!
- Store homemade butter in the fridge in an airtight container. How long it lasts depends on how well you've rinsed the butter — it can stay good for up to 2-3 weeks if you've rinsed all the buttermilk out. If you haven't rinsed it thoroughly, it will probably start to sour after about a week. Basically, if it smells like sour milk, don't eat it. Wrapped well in the freezer it will stay good for up to 3 months! I do not recommend storing homemade butter in a butter bell at room temperature.
Ingredients
- 1 pint heavy cream
- 1 bowl ice water
- ¼ teaspoon fine sea salt
Instructions
- Remove heavy cream from fridge and let stand at room temperature for 30-60 minutes to encourage separation.
- Pour heavy cream into stand mixer bowl, fitted with whisk attachment. Place bowl guard/pouring shield on bowl to prevent splashing.
- Gradually increase mixer from lowest to highest setting. This should take 20-30 seconds. After about a minute or so it will look like like whipped cream. Keep going at full speed — after about 3 minutes it will separate. The butter will collect inside the whisk and the buttermilk splash around in the bottom of the bowl.
- Spoon any lumps of butter out of the buttermilk and smush them onto the butter in the whisk. Pour the buttermilk into a separate container and set aside. You can use it for baking, drink it, or freeze it for later.
- Fill a bowl with 3 cups of water and a few ice cubes. Use a spatula to knock the butter off the whisk into the water. Swirl the butter around, then start gathering the pieces together on a paper towel. Change the ice water a few times as needed until it runs clear. Then smush and fold the butter firmly against the walls of the bowl to press out any additional buttermilk.
- Wrap the butter in several layers of cheese cloth or two layers of paper towels and squeeze to remove any additional moisture. Flatten the butter into a disc between two paper towels, then fold back into a ball and repeat, until the paper towels aren't picking up any moisture.
- Place the butter back in the mixer bowl and beat on medium with the paddle attachment. Add salt or any desired herbs to taste and beat again to combine.
- Wrap butter well in an airtight container and chill.
Lara Clifton says
Life changing!!! We've been making our own butter and we've been using the buttermilk for baking 🤤💓
Debbie says
Unfortunately my butter making is going on over an hour and a half! I have a large KitchenAid and it is not working for me at all. I used 1 quart of heavy cream. It’s been the consistency of cottage cheese for quite some time.
Rebecca Eisenberg says
If your butter isn't separating cleanly, it's very possible the mixture is warm enough that the butter is melting into the buttermilk instead of separating cleanly. Check out the troubleshooting section of the blog post for some tips!
Cynthia says
This recipe has me omitting buying butter from the store! It is so good, and works perfectly!! Thank you so much!
Heidi says
Hey, tip for everyone. Ripping apart your butter in the ice bath is a messy way to accomplish a simple task. you don’t need to be fishing pieces out every time. just knead the butter or if it’s smaller, smash and smear it in your palms. the milk will be forced out of the butter, without the need to go fishing for a bunch of tiny pieces. it’s much faster, and more effective. every time you pull it apart, you’ll incorporating more air and/or water into the butter, that you’ll then have to remove later. i’ve never seen this method of washing the butter anywhere else, and i find it an odd way to make a simple task a whole lot harder.
also, i use ridge cold heavy whipping cream, and it doesn’t take much longer than room temp. make sure you’re on max speed in your mixer. it was maybe 3-4min total and i let it go a little extra, so everything was in the whisk. i periodically stopped it to push the cream back down, and clean the whisky, so everything was mixed evenly. if you’re churning by hand, then the extra minute will prob feel like forever lol
Krista Bass says
So, I am trying this recipe today and I cannot find my paddle attachment. Do I absolutely have to use it to incorporate the herbs or any other flavorings to the butter, or can I still use the whisk attachment? I am fairly new with baking and using a stand mixer, so I am clueless on what to actually do. Once I actually make the butter, I will give you a better rating.
Rebecca Eisenberg says
the paddle attachment is the most efficient way to incorporate the flavors. If you continue using the whisk you’ll be adding more air which might cause the butter to break. The butter also tends to collect in the whisk, so I don’t recommend adding it that way. If you don’t have your paddle, use a spatula or a fork and add the flavoring by hand. Good luck, and enjoy the butter!
Krista Bass says
Thank you! I didn’t add any flavors into my first batch, but it still came out amazing! I will definitely try using the spatula to incorporate flavors next time.
Rebecca Eisenberg says
Oh good, I'm so glad it turned out well! A whole new world of flavored butters awaits you. Enjoy!
Laura says
This was my first time making butter. It was easier than I thought it was going to. I didn't add salt, and my husband said it tasted great. Thank you. I will definitely make butter more often.
Rebecca Eisenberg says
I'm so glad you and your husband liked it! Happy butter making!
Alyssa Guggisberg says
unbelievable and tasty so creamy I love it five stars easily
Haley Baker says
So excited to try this recipe! About how much buttermilk does it create? I am looking to make 1 cup of buttermilk for a cinnamon roll recipe and not sure how much heavy whipping cream to use to yield that
Rebecca Eisenberg says
You know what? I don't think I've ever measured the amount of buttermilk it makes! I've been so focused on the butter. I don't think it makes a cup of buttermilk, but I could be wrong. I would maybe start with two pints of heavy cream, you should definitely end up with at least a cup of buttermilk then!
Randie says
Any tips to help keep it soft once it’s in the fridge? This was my first time making butter and it turned out great but once it sits in the fridge it’s not as spreadable. Thanks for the recipe and help.
Rebecca Eisenberg says
There's not really a way to do that — you're making butter, not butter spread. Think like the sticks of butter you get at the grocery store versus the spreadable butter you get in the tub. If you want it to be spreadable, you have to let it come to room temperature!
Pam Wetjen says
I love the fresh butter along with fresh muffins. Or anything. Reminds me of my childhood. I just put a towel over my mixer to prevent splattering. Thank you!