
Be the star of your next burger night or cookout with this recipe for super soft brioche burger buns. These homemade buns are burger perfection, with a pillowy, tender crumb and a glossy golden crust speckled with sesame seeds.
Making brioche dough is a labor of love, producing burger buns that are rich, buttery, and slightly sweet — totally worth the effort to take your burgers to the next level.

Whether you're serving up my best-ever juicy homemade turkey burgers, classic beef patties, grilled portabello mushroom burgers, or tender chicken patties, these brioche buns make a great base for all sorts of burger creations.
About This Recipe
This burger bun recipe uses a riff on the dough from my loaf of brioche bread recipe as a base. Instead of making one loaf of bread, it's divided up to make 6 large burger buns. Before you know it you'll be a bun-making wizard, whipping up super soft homemade hot dog buns, fluffy oversized kaiser rolls, and more!
Don't be intimidated by the burger bun shaping process. My step-by-step burger bun shaping guide will help you easily achieve bakery-quality buns right in your own kitchen. And there's a video at the end of the post if you need more visual assistance!

One of my personal favorite things about this brioche burger bun recipe is that it takes just a few hours to make, with two one-hour-long rise times where the dough is unattended and you are free to move around your kitchen/house/apartment/cabin without having to manage it.
A lot of brioche bun recipes require a long cold overnight rise, and while I have included notes for how to do that in this post, you don't need a long rise to make these burger buns.
5-star reader review
“Just finished eating a homemade smash burger on one of these bad boys! They turned out wonderfully! The buns have the perfect density for a burger; they are thick enough to mop up any extra grease but light enough that they don’t fill you up!”
—Emilie
Ingredient Notes
Here's everything you need to make these soft brioche buns for burgers! See recipe card for ingredient quantities.

Whole Milk - The fat content of whole is important for an enriched dough like this.
Unsalted Butter - Make sure your butter is softened truly to room temperature. You should be able to easily press a finger into it. The colder and firmer your butter is, the longer it will take to incorporate into the brioche dough.
Sesame Seeds - (Not Pictured) For topping your brioche burger buns! You can also use everything bagel seasoning, black sesame seeds, poppy seeds, dried minced onion, etc.
How to Make Brioche Dough
I've gone into detail about why brioche dough is kneaded in two stages and how to troubleshoot it in my brioche bread loaf post, so pop over there to read more about it if this is your first time making brioche.
If you're already somewhat familiar with it, this recipe follows the basic brioche process:
- Mix the dough - Whisk the dry ingredients together, then whisk the liquid ingredients together and pour them into the dry ingredients. Mix everything together on low speed with a dough hook until it comes together in one mass on the dough hook and there aren't any dry bits of flour left in the bottom.
- Knead the dough - Increase the speed and knead on medium until the dough passes the windowpane test.
- Add the butter - Add the soft, room temperature butter 1 tablespoon at a time, letting it fully incorporate between each addition. Be patient — it can take 60 seconds for each cube of butter to incorporate.
- Knead the dough - Once all the butter has been added, knead the dough again on medium speed until it passes the windowpane test a second time.
At the end of each mixing stage, the dough will clear the sides of the bowl. If the dough is super sticky, dust in more flour. If the dough is super dry, you may need to drizzle in more milk.
Shape the dough into a ball and place it in a lightly greased bowl. Cover the bowl and let it rise until doubled in size.


Kitchen temperature makes a big difference in how quickly your brioche rises. If your kitchen is cold, the butter will be more solid and the dough will rise slowly. If your kitchen is warm, the butter will be warm and the dough will rise quickly.
To check if the dough is ready to shape, gently press a lightly floured fingertip into the top of the dough. If the indentation fills in quickly and completely, it needs more time.
If the indentation it fills in slowly and leaves a slightly visible dent, it's ready to shape.
Due to the extra weight of the butter on the gluten network, don't worry if your dough needs up to an extra hour of time to rise, especially if your kitchen is cold. It's more important that the dough looks and feels right than that a certain amount of time has passed. If the dough needs another 30 or even 60 minutes to rise, that's fine.
How to Shape Brioche Burger Buns
Gently deflate the dough, then turn it out onto a clean counter or work surface to shape. Do not flour the countertop; Flour will prevent the dough from sticking to itself, and we want to use the slight stickiness to help build tension in the dough during shaping.
If the dough is very sticky because it's warm in your kitchen and the butter is melting, pop the dough in the fridge to cool down the butter so it's easier to handle.

Weigh the entire batch of dough, then divide it into six equal portions using your kitchen scale.

Gently flatten each portion of dough, stacking any smaller pieces on top of the larger pieces if needed.

Tuck all the edges up and in across the middle. You can also do this almost like you're kneading the dough into a ball.

Pinch the edges together so you have a smooth side on one side and pinched together seam on the other.

Place the seam against the counter and cup your hand around it with your pinkie flush against the counter. Roll your hand around to tighten the seam at the bottom and create tension to smooth out the top.

The "tightened" seam side of the dough ball should look like this. The top side of the dough ball should be nice and smooth — any wrinkles, edges, or folds will be seen on the final burger bun.
Cover the buns on the countertop with a clean kitchen towel and let them rest and relax in this new shape for about 10 minutes. Repeat the last shaping step, cupping your hand around the dough and moving it in circles on the counter, to tighten up the burger buns one more time.
Arrange the six dough balls on a parchment lined sheet pan, leaving plenty of space between them to spread out as they rise.

Brush the buns with oil or spray them lightly with non-stick spray, then cover with plastic wrap.

Carefully place another sheet pan on top of the buns. This will weigh them down as they rise.
Don't press down on the sheet pan, you don't want to force the dough to expand faster than it's ready to. Just the weight of the sheet pan alone will be enough to push the dough to expand outward during this final rise. This will give you nice, wide brioche burger buns that bake into a flat bun shape, rather than a round ball!
Let the buns rise with the sheet pan on top of them for 1-2 hours or until doubled in size. When you poke or tap them gently they should jiggle and spring back. If they're not ready after an hour, check on them in 15-minute increments until they're ready.
TIP: In a warm kitchen, the burger buns will rise faster; in a cold kitchen, they will rise slower.
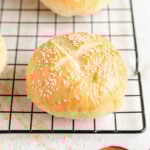
Before baking, brush the buns with an egg wash. Then, lightly score the top of each brioche bun with an 'X' to help them expand in the oven.


Once the buns are baked, let them cool on the pan for about 5 minutes, then remove the burger buns to a rack to finish cooling completely. If you slice the buns while they're hot, the steam still trapped inside them will turn the starches into mush.

You Can Do a Cold Rise with Brioche Burger Buns
A long cold rise gives the dough more time to develop its flavor and texture. It also helps you fit the baking process into your schedule.
The nice thing about brioche dough is that it's incredibly resilient. Cold temperatures don't just slow down yeast activity, they also help the butter firm up, which further slows down the rising process.
This brioche dough will be fine in the fridge before shaping for up to 48 hours! Make sure it's in a bowl or container that gives it plenty of room to expand.
If refrigerating the brioche after shaping the burger buns, you can leave the buns in the fridge with the sheet pan weighing them down for about 8-12 hours prior to baking. If you go this route, give them at least an hour to sit at room temperature before baking.

Equipment Notes — Use a Stand Mixer!
You need a stand mixer with a dough hook to make these brioche burger buns. You can't use a hand mixer, and brioche dough is very hard to make by hand.
If you have a KitchenAid mixer with the tilt head and the bowl that screws in at the base, the motor might have trouble with this dough. Hold the bowl in place to make sure it doesn’t unscrew during the kneading process.
If you have a bowl-lift model, still keep an eye on it during mixing and kneading. You don't want the mixer to walk off the counter! If your mixer’s motor feels like it’s overheating, you can pause for 5 minutes and then resume mixing.

💭 Have More Baking Questions?
I've rounded up answers to common baking questions and how-to guides, including:
- Ingredient swaps and FAQs
- Why my recipes are written in grams and not cups
- How to quickly bring eggs and butter to room temperature
- Ingredients I use (salt, flour, yeast, etc.)
- Step-by-step guides for bread and baking techniques
See my baking techniques & troubleshooting guide and ingredient swaps and FAQs for more!
TL;DR — Recipe Summary
- Mix dry ingredients. Mix wet ingredients. Pour wet ingredients into dry ingredients. Use dough hook to mix until combined in a shaggy dough and knead to windowpane stage.
- Add room temperature butter 1 tablespoon at a time until incorporated.
- Knead until windowpane stage is reached again.
- Cover and rest at room temperature for 1 hour or until doubled in size.
- Divide and shape the dough into six dough balls. Cover and rest 10 minutes, then roll again to tighten them up.
- Spray the buns with non-stick spray, cover with plastic wrap and place a sheet pan on top. Cover and rest 1 hour or until doubled in size.
- Brush with egg wash, sprinkle with sesame seeds.
- Score lightly with an 'X' then bake for 17-20 minutes at 350°F. Let cool briefly on the pan, then transfer to cooling rack.
📖 Recipe
Soft and Buttery Brioche Buns for Burgers
Recipe Notes
- If you only have "active dry" yeast, use 7 grams of yeast instead, stir it into the milk and honey and let it sit for 2-3 minutes before adding it to the dough.
- The butter in the brioche dough can make it sticky and harder to handle. Pop it in the fridge for 10-15 minutes to help the butter firm up before shaping.
- For a long, cold rise, the dough can be refrigerated for up to 2 days before shaping. Shaped buns can be refrigerated for 8-12 hours with the sheet pan on top of them, let them rest at room temperature for 1 hour prior to baking.
- If you don't reach a perfect windowpane before adding the butter and it's been at least 10 minutes of kneading, you can go ahead and start adding butter. It won't be a technically perfect brioche, but it will still be delicious!
- If your dough overproofs during the first rise, knock all the air out, knead the dough against the counter to shape it back into a ball, and let it rise for another 20-30 minutes before shaping.
- Storage: These burger buns will be softest in the first 24-48 hours after baking but will stay good at room temperature in an airtight bag for up to a week.
- To freeze: Slice the buns almost all the way through first so they stay together but are still easy to separate, though you can freeze them whole if you prefer. To toast up the frozen sliced buns, separate the two frozen halves and pop them in a 350°F oven for about 4-5 minutes. To simply defrost and warm up the burger buns, leave them in the bag on the counter for about an hour, then warm them up in a 250°F oven for about 10-15 minutes.
Ingredients
For the Dough
- 350 grams all-purpose flour
- 6 grams instant yeast (or use 7 grams active dry)
- 5 grams diamond crystal kosher salt
- 168 grams whole milk (90°F)
- 1 large egg (room temperature)
- 20 grams honey
- 85 grams soft room temperature unsalted butter (6 tablespoons)
Egg Wash
- 1 large egg
- 1 teaspoon whole milk (or water)
Optional Topping
- 2 tablespoons sesame seeds
Instructions
- Mix the dough. Combine flour, salt, and yeast in the bowl of a stand mixer fitted with a dough hook. In a separate bowl, whisk warm milk, honey, and egg. Pour the wet ingredients into the dry ingredients. Mix on low speed until the dough comes together in a shaggy messy ball on the dough hook. The dough will look dry at first, but will hydrate as it mixes. Be patient!
- Knead the dough. Increase speed to medium and knead until the dough passes the windowpane test, about 7-10 minutes. Dust in more flour or drizzle in more milk ¼ teaspoon at a time only as needed. If the dough hasn't reached windowpane after about 10 minutes, cover and rest for 5-10 minutes. Knead 2-3 minutes more. It should get there!
- Add the butter 1 tablespoon at a time. With the mixer on medium, add the butter one tablespoon at a time. Let each piece fully incorporate before adding more. The dough will look like it is falling apart each time you add more butter, but will come back together. If the butter chunks are struggling to incorporate, lightly dust in ¼ teaspoon of flour — it will help the butter cling to the dough. Resist adding more flour unless absolutely needed!
- Knead the dough again. Increase speed to medium-high and knead until the dough is smooth, shiny, and passes the windowpane test again, about 5-10 minutes.
- Cover and rise. Place the dough ball in a lightly greased bowl or container. Cover and let rise 1 hour at room temperature (72-75°F) until just about doubled in size. If not doubled after an hour, let it rise an additional 30-60 minutes until doubled. When you push a finger into it, the indentation should fill back slowly and incompletely.
Assembly and Shaping
- Divide the dough. Turn dough out onto a clean, lightly floured work surface. Divide it into six equal pieces using a kitchen scale (each piece should weigh about 110 grams).
- Shape the burger buns. Gently flatten each piece of dough against the counter, stacking any smaller pieces on top of larger pieces if you're combining them. Fold or tuck the edges up across the middle of the dough to create a ball, then pinch the edges together to to create tension and a smooth round top on the other side of the dough. Place the dough down with the smooth side up and the pinched together seam on the counter. Cup your hand around it with your pinkie against the counter and scoot it in circles to tighten the seam and further tighten up the top. Repeat with the remaining five pieces of dough, then cover with a clean towel and and rest for 10 minutes.
- Tighten. Give each brioche bun another scoot in circles on the counter to tighten them up and make sure all the edges are tucked underneath, then place on a parchment lined sheet pan with plenty of room to spread out.
- Final Rise. Lightly brush with oil or spray the tops of the buns with non-stick spray, then cover with plastic wrap. Place a second sheet pan on top of the shaped buns to weigh them down. Cover and let rise at room temperature for 1-2 hours or until the dough balls have doubled in size and are looking quite airy and spring back when you poke them.
Baking
- During the last 30 minutes of the final rise, preheat the oven to 350°F. Whisk together egg and milk to make the egg wash.
- Egg wash and bake. Brush the tops and sides of the buns lightly with egg wash and sprinkle with sesame seeds (if using). Use a sharp knife or lame to cut a shallow X in the top of each bun. Bake for 17-20 minutes until golden brown on top and an internal temperature of at least 190°F.
- Cool. Let cool for a few minutes on the pan, then remove to a rack to finish cooling completely.
Storage & Freezing
- You can store your homemade brioche burger buns in an airtight bag with as much air pressed out of it as possible for 5-7 days at room temperature. They will be at their softest on the same day you bake them and will become firmer over time. To freeze, I usually slice the buns almost all the way through first so they stay together but are still easy to separate, though you can freeze them whole if you prefer. To toast up the frozen sliced buns, separate the two frozen halves and pop them in a 350°F oven for about 4-5 minutes. To simply defrost and warm up the burger buns, leave them in the bag on the counter for about an hour, then warm them up in a 250°F oven for about 10-15 minutes.
Karen González says
Hi, I followed your recipe for hamburger buns and it went out delicious 🤤 thanks for sharing your knowledge!!
Rebecca Eisenberg says
thanks for sharing your experience, i hope you enjoy the buns!!
Emilie H says
Just finished eating a homemade smash burger on one of these bad boys! They turned out wonderfully! The buns have the perfect density for a burger; they are thick enough to mop up any extra grease but light enough that they don’t fill you up! Following the recipe closely, I thought there was little room for error. Another great bake 🙂
Meredith says
Smelled delicious and tasted fantastic. We had these with beyond burger patties. My husband said they tasted like restaurant burger (a good thing!) The actual making of the dough was a little more difficult that I expected. This was my first brioche, so I'm not entirely surprised. I had trouble reaching true windowpane at first and tried some of the recommendations (resting) to troubleshoot, but ultimately moved on to the next step and the second windowpane test was perfect. As another reviewer stated, there was a little room for error. Thanks for the recipe!
Rebecca Eisenberg says
I'm so glad you liked them! And yes, that first windowpane stage can be tricky but if you just keep going, the second one usually works! Enjoy the burger buns!
Cathe says
I’ve been following The Practical Kitchen for a little while now and I enjoy reading through the recipes and drooling over the yummy photos.
Until now I’ver only made “no knead” bread recipes and the occasional focaccia, until today. Pretty basic stuff.
Today I made these brioche rolls and they turned out perfect, delicious AND photo worthy!
The Practical Kitchen provides so much more than a recipe, Rebecca’s guidance, explanations, and encouragement were just what I needed to be successful!
Rebecca Eisenberg says
I'm so honored!! And I'm so proud of you — congrats on your successful burger buns! 🙂
Susie says
Worked perfectly and it wasn't too difficult at all. Perfect amount of sweetness without it being a dessert bun. We used them to make smash burgers and it was an excellent pairing. Thanks so much!
Lorna Easley says
Made these and I love the squishy buns. Grandkids approved.
Debbie says
Absolutely amazing, delicious with burgers and a bacon, egg and cheese breakfast sandwich. No recipe has disappointed! Thank you
Kearston says
The most delicious buns & so easy to make. The recipe and directions were easy to read, follow and the photos were helpful for any “tricky” steps.
Rebecca Eisenberg says
Yay, I’m thrilled you enjoy the recipe! Happy baking!
Samantha Franceschi says
Absolutely delicious! I had trouble getting the windowpane to happen, but nonetheless fantastic. I used everything bagel seasoning on top of my buns and utilized it as a bun for a pulled pork sandwich
Nicole S says
Absolute perfection! The step by step instructions were key. Thank you for never missing a detail
Rebecca Eisenberg says
So glad you liked the burger buns!! Keep on baking!
Cassie B. says
Your method always gives me the best results with brioche - I am so glad I found you on instagram! These rolls turn out so reliably well!
Rebecca Eisenberg says
I'm so glad you like them!!
Samantha Franceschi says
Made these for Father’s Day a few weeks ago and they were an absolute smash with everyone! They are absolutely delicious and worth the effort for sure. I sprinkled everything bagel seasoning on top and that was the icing on the cake.
Helene Montini says
My first attempt doesn’t look great but I’m hoping they taste good. I will definitely try them again.
Rebecca Eisenberg says
Shaping brioche can take some getting used to! Definitely good to try it again — the more you do it the better they’ll look! Happy baking!
Bubba The Baker says
This is my third time making these buns and they are awesome. The entire family loves them and perfers them over any store bought buns.
I've made them once using the suggested sesame seeds, once using dehydrated chopped onions (available in the spice isle) and one time using poppy seeds.
They have been excellent regardless of the topping used.
We will never go back to store bought buns now that this recipe is in my repertoire.
Thank you.
Linda says
Divine rolls! Worth the time it takes to make them. Great instructions. Only problem is that now my husband will expect them every time we have burgers!
Rebecca Eisenberg says
So glad you and your husband enjoyed! You gotta show him how to make them so next time he can help and really appreciate the work you put into them! 🙂
Wendy L Holt says
Can you break it down to Cups/tsp. Roughly?
Rebecca Eisenberg says
lol no
Jenny says
These were so easy to make, especially with such thorough instructions. And they are so, so very good!
Rachel Carter says
Hi! I just found your website and absolutely love it! I have been trying to bake bread very unsuccessfully and just made 2 of your recipes with ease! Plus, I love the small size recipes. It's just my husband and I, so there's no more waste and if I make a mistake, I'm not losing as much product. The breads are just delicious too! Much better and cheaper than store bought!
Lauren says
First time trying these buns and they were perfect! A bit hard to get window pain before the butter, but they still turned out really well. I love the details in the instructions too
Deb Enigl says
Was on an internet hunt for small-batch bread recipes as I am in a small household, just hubby and me. I have certainly done a scale-down of a full bread recipe but found that does not necessarily guarantee success. Then I came across your website and love your small-batch recipes. Your site was instrumental in me trying brioche burger buns for the first time. Appreciate your well described steps, pics, video and hints for making these buns a success – they came out picture perfect! So tasty, soft, great crumb, and yet sturdy enough for a grilled smash burger with all the toppings. Hubby LOVED them and requested we buy no more store-bought buns. I must agree, LOL I will be trying many more of your small batch recipes (and not only the breads). Thank you!
Rachel says
Can I put this into a loaf pan and make brioche bread as is?
I made the buns they were great! The tip with flouring the butter pieces helped a lot.
Rebecca Eisenberg says
Absolutely! This is actually a burger bun version of my brioche loaf recipe, so you might as well just follow that one 😛
Alina says
Worth the time - delicious homemade buns for burgers!
Rebecca Eisenberg says
So glad you liked them Alina!