
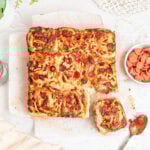
Made with fluffy bread, heaps of adorable mini pepperoni, swirls of pizza sauce, and grated mozzarella cheese that is gooey inside and crispy on top, these pizza pinwheels are fun to make and even more fun to eat. Serve them up for lunchtime, snack time, or as a game day or award show night appetizer.

I love making this recipe because it's so easy to customize with your favorite pizza toppings, and pizza pinwheels are freezer-friendly, too! I've got all the step-by-step instructions and photos you need to make the perfect pizza pinwheels plus some other topping suggestions and instructions for freezing and defrosting in the blog post below!
5-STAR READER REVIEW
“EXACTLY WHAT I WANTED THEM TO BE! It's unusual to have your first attempt at a recipe look exactly like the photo, but it happened with these! Recipe was easy to follow, buns were light and fluffy, I am looking forward to making these again! As always, the hardest part is patiently waiting for them to cool when they come out of the oven”
—Liz
About This Recipe: Pepperoni Pizza Pinwheels
A lot of recipes for pizza pinwheels use pizza dough as the base dough, but I wanted to make sure these were super fluffy and pizza dough just isn't built that way.
I decided to use my white sandwich bread dough as the base for these pinwheels because of how soft and fluffy it is. In the theme of keeping things quick, easy, and straightforward, the sauce is my 5-minute no-cook pizza sauce. It's basically a dressed-up 6 ounce can of tomato sauce. And yes, if you prefer to use a store-bought pizza sauce, that's fine too.
It might look like the sauce has disappeared when you cut into the rolls after baking, but it's still there, I swear. The sauce absorbs into the dough as it bakes, taking on that flavor and moisture to make the rolls super soft and gooey in the middle!
You can leave the pepperoni out to make them vegetarian, or substitute them with your favorite vegetable pizza toppings like mushrooms, broccoli, green peppers, or onions!

Ingredient Notes
Here are the ingredients that you'll need to make these cheesy pizza pinwheels! See recipe card (at the end of the blog post) for quantities.

No Cook Pizza Sauce - A can of unsalted tomato sauce, oregano, basil, garlic, and a pinch of salt. Easy peasy!
Mozzarella Cheese - As always, I recommend using a low-moisture, whole milk mozzarella cheese that you grate yourself. This will give you the best melt.
Pepperoni - I used mini pepperoni, which I was able to find at my local grocery store. If you can't find mini pepperoni, just cut regular pepperoni into quarters or sixths instead.
Making the Dough
This recipe follows a pretty standard bread dough making process.
- Whisk the dry ingredients — flour, salt, yeast — together.
- Add the wet ingredients — water, oil, honey — to the dry ingredients.
- Mix until the dough comes together in one mass on the dough hook.
- Knead until the dough is smooth, elastic, and slightly tacky to the touch, about 5 minutes.
Psst! If you want more detailed step-by-step photos and troubleshooting for this bread dough (like how to knead it by hand), check out my soft sandwich bread recipe post! It's exactly the same base dough.

There's enough yeast in this dough that it will still rise in the fridge, but it may not dramatically double in size. Cold dough is easier to shape and handle, so doing this first rise in the fridge will make it easier to shape the pizza pinwheels.
This dough will be fine in the fridge for up to 2 or even 3 hours, so don't worry if you don't get to it exactly an hour later.
While the dough is in the fridge, make the no-cook pizza sauce and grate the mozzarella cheese so they're both ready to go when the dough is. If the cheese is too soft to grate, freeze it for 15-20 minutes first. Then pop the grated cheese back in the fridge until you need it.
Assembly Can Get A Bit Messy...
Make sure you have a nice clean work surface and some paper towels (or my favorite ugly, boring kitchen towels) handy before you get started.
Prep your baking pan in advance and make sure you have the cheese grated, toppings ready, and the sauce made before you begin rolling your dough.

Pat the dough into a rough rectangle shape, tugging and smushing a little at the corners to help form right angles.

Roll the dough into an approximately 10x18" rectangle. Dust with flour and lift as needed to prevent sticking.
Lifting the edges of the dough in between rolls also lets the dough to shrink back slightly. You want the dough to be at that 10x18" size when it's relaxed and doesn't shrink back when you release it.

Spread three-quarters of the pizza sauce across the dough all the way to the edges. Leave ½" at the top clear.

Top the dough with grated mozzarella cheese and mini pepperoni, making sure to get all the way to the edges.
Now, it's time to roll. Start from the bottom and carefully roll the dough up into a coil.

Finish by rolling the dough so that the seam side — that open, un-sauced edge — is underneath the log.
Rolling the dough up and cutting the dough into rolls is a messy process. Embrace it and approach it with confidence; it will all work out in the end, I promise.

Use a sharp serrated knife in a careful sawing motion to divide the log into three equal pieces.

Then cut each third into thirds. Use a sawing motion to avoid squishing the spiral.
Carefully arrange the pizza pinwheels in three rows of three in an 8" baking pan lined with parchment paper.
Top the rolls with dollops of the remaining pizza sauce, mozzarella cheese, and mini pepperoni.


Bake until the cheese is well browned on top, then remove the pan from the oven and carefully lift the pizza pinwheels from the pan and onto a cooling rack. This allows steam to escape and air to circulate around them so they don't get soggy.

Let the pizza pinwheels cool a little bit before you begin tearing them apart. The cheese and sauce inside are very hot and you don't want to burn your fingertips with the steam that escapes!
I used an 8x8" square pan
This recipe is scaled to bake in a 8x8" square cake pan, though it will also work well in a 9x9" square pan.

USA Pan Square Baking Pan (8")
Dimensions: 8x8x2.25". Square aluminized steel baking pan with sharp right-angle corners and rippled surface for increased airflow.
As always, I recommend using a metal pan rather than glass, ceramic, silicone, or stoneware. If you're using a glass pan, you may need to adjust the baking time and temperature!
Pizza Pinwheel Variations
Just like pizzas, there are so many different sauce, cheese, and topping combinations you can use to make these pizza pinwheels instead of red sauce and pepperoni.
- Simplify: Instead of dried basil and oregano, add 1 teaspoon Burlap & Barrel Pizza Party blend or other pizza seasoning blend, like King Arthur Baking Company's Pizza Seasoning.
- Supreme: Replace the pepperoni with crumbled sausage, diced mushrooms, green peppers, olives, bacon, ham, or other pizza toppings.
- Sweet and spicy: Drizzle the baked pizza pinwheels with hot honey for a little bit of heat.
- Super savory: Use the sauce from my chicken marsala pizza with shredded chicken, fontina cheese, and fresh oregano in your pizza pinwheels.
- Pesto: Use your favorite pesto sauce with sausage crumbles and mozzarella.
- Spicy: Add ¼ teaspoon crushed red pepper flakes to the pizza sauce. Use spicy pepperoni instead of mini pepperoni.

Practical Tips and Recipe Notes
- If it's very humid where you live, hold back about 25 grams of water at the start. If the dough looks or feels dry, drizzle it in 1 teaspoon water at a time during the mixing stage.
- If you're using active dry yeast, no need to adjust the amount of yeast, just mix the yeast with the warm water and let it sit for 5 minutes to become foamy before adding to the dough.
- If you don't have parchment paper just make sure to grease the pan well.
- If using a serrated knife to cut the rolls doesn't work for you, you can also use unflavored, unwaxed dental floss. Slide it under the roll, then cross the ends and pull to tighten the loop, cutting through the roll.
- Having trouble figuring out where to cut or tear the baked pizza rolls apart? Flip the whole thing over and cut from the bottom — it's much easier to see their edges that way!
💭 Have More Baking Questions?
I've rounded up answers to common baking questions and how-to guides, including:
- Ingredient swaps and FAQs
- Why my recipes are written in grams and not cups
- How to quickly bring eggs and butter to room temperature
- Ingredients I use (salt, flour, yeast, etc.)
- Step-by-step guides for bread and baking techniques
See my baking techniques & troubleshooting guide and ingredient swaps and FAQs for more!
TL;DR — Recipe Summary
- Mix the dough ingredients together until a sticky, cohesive dough forms.
- Knead the dough until it is smooth, elastic, and slightly tacky.
- Shape the dough into a ball, place in a lightly greased bowl, cover and rest until doubled in size.
- Deflate the dough, roll into a rectangle. Top with pizza sauce, mozzarella, and mini pepperoni.
- Roll it up and cut into 9 rolls. Arrange the rolls in a square baking dish. Top with the remaining pizza sauce, mozzarella, and pepperoni. Cover and rise for 1 hour.
- Bake for 40-45 minutes at 350°F.
- Transfer to a rack to cool slightly before tearing apart.
📖 Recipe
EXTRA Cheesy Pizza Pinwheels with Mini Pepperoni
Recipe Notes
- If you're using active dry yeast, mix it with the warm water and let it sit for 5 minutes to become foamy before adding the water to the dough.
- If it's very humid where you live, I recommend holding back about 25 grams of water to start. If it looks or feels like the dough needs it, drizzle it in 1 teaspoon at a time during the mixing stage.
- If it's very cold where you live, your dough may rise more slowly; it's okay if it needs an extra 15-45 minutes to rise.
- Pizza pinwheels are best enjoyed within 24 hours of baking. Once cool, wrap well and store in the fridge for up to 5 days. These pizza pinwheels freeze and defrost really well!
- To freeze, cut the cooled rolls apart and place in a large airtight bag with as much air pressed out as possible. To prevent freezer burn, wrap each roll in plastic wrap before placing in the bag. To reheat from frozen, microwave pizza pinwheels for 40-45 seconds or place in a 350°F oven for 15-20 minutes.
Ingredients
- 400 grams all-purpose flour
- 8 grams salt
- 7 grams instant yeast (see notes for active dry yeast)
- 236 grams warm water (90°F)
- 20 grams olive oil
- 8 grams honey
No-Cook Pizza Sauce
- 6 ounces tomato sauce
- 1 clove garlic
- ½ teaspoon dried basil
- ½ teaspoon dried oregano
- ½ teaspoon salt (use 2X diamond crystal kosher salt)
Toppings
- 226 grams low-moisture, whole milk mozzarella cheese (8 ounces, grated)
- ½ cup mini pepperoni (or chopped up pepperoni)
Instructions
- Mix. Mix the flour, salt, and yeast together in the bowl of your stand mixer. Add warm water, honey, and olive oil. Mix with the dough hook, pausing to scrape down the sides of the bowl as needed, until the dough comes together in a shaggy mass on the dough hook and clears the sides of the bowl.
- Knead. Increase the speed to low-medium and knead for 3-5 minutes until the dough is soft, smooth, and elastic. The dough may cling slightly to the walls of the bowl but should pull away cleanly.
- Rise. Tuck the edges of the dough under to create a ball of dough with a smooth top. Place in a lightly greased bowl, cover, and place in the fridge to rise for 1 hour.
- Make the sauce and grate the cheese. In a small bowl whisk together all the ingredients for the sauce. Grate the mozzarella cheese and set it aside (in the fridge if needed) until you need it.
- Shape. Turn the dough out onto a lightly floured work surface and press it into a loose square shape. Use a rolling pin to roll the dough out until it's about 10x18", dusting with flour as needed to prevent sticking. Periodically lift the dough to release tension — it will shrink back slightly. Then resume rolling.
- Fill. Use the back of a spoon to spread about three-quarters of the pizza sauce all over the dough, leaving a ½" strip at one short end clean. Reserve the remaining pizza sauce for later. Top the pizza sauce with about three-quarters of the grated mozzarella cheese and mini pepperonis.
- Roll and cut. Starting with one of the short ends, roll the dough rectangle into a log. Use a sharp knife to divide the log into thirds, then divide each third into thirds. It will get messy, don't worry about it. Place the pizza pinwheels in a parchment-lined 8" square or greased round pan.
- Rise again. Top the pizza pinwheels with dollops of the remaining pizza sauce and mozzarella cheese, then finish with more mini pepperonis. Cover the pan loosely with plastic wrap, then let rest somewhere warm for 1 hour until the rolls are nice and puffy looking.
During the final 30 minutes of the rise time, preheat the oven to 350°F.
- Bake. Bake in the center of a 350°F oven for 40-45 minutes, or until an internal temperature of 195°-200°F for doneness.
- Cool. Use the parchment paper to carefully lift the pizza pinwheels out of the pan and onto a wire rack to cool slightly before serving.
Kat says
I was watching for this recipe to come out before camping season 'cause I thought they'd make a great portable snack, and they did! The bread is fluffy and there is indeed enough sauce going on to make each bite feel like a good one. The centre pieces are obviously a little more saucy, so next time I'll probably focus more of the drizzle on the outside. They're such a fun way to have pizza buns, and we enjoyed these even 2 days after they were baked and stored in a cooler. I found the recipe easy to follow and the process was entirely manageable; I had actually made traditional pizza buns a month earlier and found these pinwheels easier and quicker. Will absolutely make these again for future camping trips. Wonderful, thanks!
Liz says
EXACTLY WHAT I WANTED THEM TO BE! It's unusual to have your first attempt at a recipe look exactly like the photo, but it happened with these! Recipe was easy to follow, buns were light and fluffy, I am looking forward to making these again! As always, the hardest part is patiently waiting for them to cool when they come out of the oven
Hannah says
After his first two bites, my fiancé requested I make this for his birthday dinner. 10 out of 10!
Rebecca Eisenberg says
I can't think of any higher compliment! I'm so glad you and he enjoyed these. 🙂
Dawn says
Can these be frozen?
Rebecca Eisenberg says
Yep!
Khen says
Hi chef , thanx for an amazing recipe, will surely try this week. My only question is , I love the texture of bread flour, if iam using BF instead of APF, what should be the quantity of water , as BF will make my dough little dry ?
Rebecca Eisenberg says
I haven’t tested it with bread flour so I can’t tell you, you’ll have to just add more water gradually and see how it turns out! Happy experimenting!