
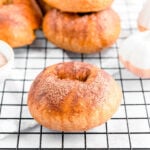
Serve these warm, cinnamon sugar homemade pumpkin bagels toasted with butter or a hearty whipped maple homemade cream cheese. They're so perfect for fall!

As with all the bagel recipes on my site, these cinnamon sugar pumpkin bagels are a riff on my popular quick and easy plain bagel recipe. To make these pumpkin bagels, I've replaced some of the water with pumpkin puree and have adde a blend of fall spices to make the pumpkin flavor shine.
Topping them off is a light dusting of cinnamon sugar which adds a hint of sweetness that is so perfect with the warm, savory pumpkin bagel flavor. You can even use this homemade pumpkin bagel recipe to make adorable homemade mini bagels; a full batch of dough will make 15 mini bagels!
🥘 Ingredient notes
Here's what you'll need to make this homemade pumpkin bagel recipe! See recipe card (at the end of the post) for ingredient quantities!

Bread flour - While you can use all-purpose flour for these pumpkin bagels, you'll get much better results from using bread flour. Bread flour has a higher protein content and gives you smoother, stretchier dough and chewier bagels.
Pumpkin puree - Make sure you're using 100% pumpkin puree, not pumpkin pie filling. Sometimes the cans look alike! I tested these with Wegman's store brand pumpkin puree. Different pumpkin purees do have different moisture content, which is why the autolyse step is so important. Giving the flour time to absorb as much water from the puree as possible before you start mixing will allow you to more accurately assess if it actually needs more water in the mixing process.
Pumpkin spice - You can use a store bought pumpkin spice blend or use the specific measurements of cinnamon, ginger, cloves, allspice, and nutmeg I've included in the recipe. Always grate whole nutmeg fresh for maximum flavor.
Cinnamon sugar - I prefer store-bought cinnamon sugar blends because they tend to be finer than if you make your own, but it's really your preference.
🔪 Instructions
Once you have your ingredients prepped, the first step is to autolyse the flour, yeast, pumpkin puree, and water. Don't be scared by the fancy terminology, this is super simple, I promise.
Autolyse is a technique more commonly used in artisanal breads. It gives the starches in the flour time to hydrate and start building structure in your dough before you incorporate anything, like salt, that can slow gluten development and absorb water. (Note: Many people don't include yeast in their autolyse, but its okay here!)
And while the term autolyse might sound fancy, don't let that intimidate you. All you're doing is mixing the flour, yeast, and water/pumpkin mixture together into a rough shaggy dough (see photo below). Then cover it and let rest for 10 minutes.

While the dough rests, mix together the salt, brown sugar, and pumpkin spices with 1 teaspoon warm water. The water helps start dissolving the sugar and salt so they incorporate neatly into the dough.
Pour the sugar-salt-spice over the dough and attach the dough hook. Mix with the dough hook on low-medium speed until the dough comes together.
Once the dough clears the sides of the bowl, increase the speed to medium and knead until it's smooth, elastic, and slightly tacky to the touch. It shouldn't be sticky. If the dough seems wet or sticks to your hands, briefly knead in an additional tablespoon of flour.

Shape the dough into a ball, and let it rest in a lightly greased bowl, covered, in a warm spot (72°-75°F) until just about doubled in size.
TIP: If your kitchen runs cold, put the bowl in your OFF oven with the oven light on. This gives the yeast a nice warm environment to work in.
Roll-And-Poke Bagel Shaping Method
Divide the dough into equal portions on an unfloured surface. If you're combining a few pieces together to make a portion, stack the smaller pieces on top of the bigger pieces. Tuck the edges up so the dough is smooth against the counter with a seam pinched together on top. Repeat until the dough ball feels fairly tight. Don't tear the dough, just stretch it.
Then, flip the dough over so the seam side is down against the counter. Cup your hand around the dough and slide it toward you. The dough will take on an oval shape. Rotate it 90 degrees and repeat to turn the oval into a round circle.
(Or, cup your hand around the dough with your pinkie-side flush against an unfloured counter and your thumb and forefinger making an O- or C-like shape above the dough. Move your hand in quick circles without picking your pinkie off the counter, and the dough will quickly shape itself into a nice smooth ball of dough.)


![[gif] a thumb pokes a hole through the bottom of a round ball of dough](https://thepracticalkitchen.com/wp-content/uploads/2019/08/How-to-Shape-a-Bagel-4.gif)
![[gif] two thumbs through the hole in the bagel dough rotating it and gentle stretching it](https://thepracticalkitchen.com/wp-content/uploads/2019/08/How-to-Shape-a-Bagel-5.gif)
![[gif] a fully stretched out round of bagel dough](https://thepracticalkitchen.com/wp-content/uploads/2019/08/How-to-Shape-a-Bagel-6.gif)
Once the dough has been shaped into balls, coat your hands in flour and stick a thumb through the bottom seam of the dough. Slide your other thumb in and gently squeeze and stretch, rotating the dough through your hands until the bagel hole is at least the same width as the sides of the bagel if not bigger.
You may want to repeat the stretching process again before boiling to keep the hole from closing up in the oven.
♨️ Boiling and baking
Boiling the bagels gelatinizes the outside crust and gives your bagels their classic shiny, chewy crust. If you don't boil them, they're not bagels!
Boil bagels in a shallow, high-sided pan for about 1 minute per side, then remove to the parchment or silicone mat lined sheet pan you plan to bake them on.
If you're using the cinnamon sugar topping (and you should), there's no need for an egg wash. The gelatinized crust is sticky enough. To get a stripey pattern, move your hand back and forth in a quick zig-zag over the bagels as you sprinkle the cinnamon sugar.
If you're skipping the cinnamon sugar blend, brush the bagels with egg wash before baking to get a gorgeous, shiny crust.
Bake the pumpkin bagels for 20 minutes at 425°F. Let them cool slightly, then move to a wire rack to finish cooling.

💭 Practical tips and recipe notes
- This recipe is in weight measurements because measuring baking ingredients by weight is more accurate and you'll get better results from the recipe. Because of the pumpkin puree it's super important that you get the ratios of water and flour just right! Kitchen scales are super affordable and a worthy addition to your kitchen. <<Read more in my website FAQ!>>
- Resist adding water to your pumpkin bagel dough unless you absolutely need to. Bagel dough is low hydration by design and if you add too much you'll end up with an airy interior with lots of big air pockets.
- When shaping pumpkin bagels, if the dough fights you or feels like it's tearing rather than stretching, cover it and let it rest. Even just one minute of resting can give the gluten strands some time to relax and get used to their new shape so you can continue stretching them without them breaking.
- For more savory pumpkin bagels, skip the cinnamon sugar; brush the pumpkin bagels with egg wash and top with green pumpkin seeds!
- My other quick bagel recipes don't incorporate an autolyse step. I've added it to this homemade pumpkin bagel recipe since it takes the flour longer to absorb the moisture from the thick pumpkin puree. A quick 10 minute rest will make your bagel dough so much easier to work with. You're also less likely to need additional water in the mixing stage.
- A lot of people don't include yeast in an autolyse step, but it's okay to do so here!

💭 Have More Baking Questions?
I've rounded up answers to common baking questions and how-to guides, including:
- Ingredient swaps and FAQs
- Why my recipes are written in grams and not cups
- How to quickly bring eggs and butter to room temperature
- Ingredients I use (salt, flour, yeast, etc.)
- Step-by-step guides for bread and baking techniques
See my baking techniques & troubleshooting guide and ingredient swaps and FAQs for more!
📖 Recipe
Chewy Cinnamon Sugar Pumpkin Bagels
Recipe Notes
- Individual spices can be adjusted to taste — omit or reduce ones you don’t like. Or, use 2 tablespoons store-bought pumpkin pie spice to keep it simple.
- Make ahead: Reduce yeast by half, cover shaped bagels with a damp paper towel, and let rest in the fridge overnight (8-12 hours). Boil and bake in the morning!
- For larger bagel holes, stretch again immediately before boiling.
- If measuring by weight, you need 7 grams of salt, regardless of salt brand. If measuring salt by volume, use half as much of any other brand of salt (including other brands of kosher salt).
Ingredients
- 500 grams bread flour
- 200 grams warm water
- 100 grams pumpkin puree
- 6 grams diamond crystal kosher salt (2 teaspoons, but use 1 teaspoon if using any other brand or type of salt)
- 2 tablespoons brown sugar
- 2 teaspoons instant yeast
- 1 teaspoon ground cinnamon
- 1 teaspoon ground ginger
- ½ teaspoon cloves
- ¼ teaspoon allspice
- ⅛ teaspoon whole nutmeg (freshly grated, always!)
- 2 tablespoons cinnamon sugar (for topping)
Instructions
- Autolyse. In the bowl of a stand mixer, combine flour and yeast. In a separate container, mix together warm water and pumpkin puree until no lumps remain. Add pumpkin mixture to flour and mix with a spatula or dough whisk until dough is shaggy and quite messy. Cover and let rest 10 minutes.
- While the dough rests, combine brown sugar, salt, and pumpkin spices. Stir in 1 teaspoon water, just until hydrated.
- Mix dough. After 10 minutes, pour spice mixture over the dough. Attach the dough hook and mix on low-medium speed until dough comes together. Be patient; this can take 3-5 minutes.After 3 minutes if the dough still looks very dry, add ½ teaspoon water directly onto any dry bits and continue mixing. Repeat only if absolutely needed; It's better to have a bagel dough that's too dry than too wet!
- Knead dough. Increase speed to medium and knead for 3-4 minutes. Dough should clear the sides of the bowl and be smooth, elastic, and slightly tacky to the touch. If the dough seems sticky or wet, add 1 tablespoon flour and knead briefly to incorporate. Repeat if needed.
- Rise. Shape the dough into a ball and place in a lightly greased bowl. Let rest for 1 hour, covered, in a warm spot until roughly doubled in size.
- Deflate. Gently punch down the dough to deflate. Cover and let rest 10 minutes.
- Preheat your oven to 425°F and bring a large, high-sided skillet filled with at least 3 inches of water to a boil.
- Shape dough balls. Divide the dough into eighths (using a kitchen scale for precision) and shape each piece into a ball.Gently flatten the piece of dough against a clean work surface, then tuck the edges up into the middle, pinching them together to form a smooth surface on the underside of the dough. Flip the dough over, cup your hand around it, pinkie against the counter, and drag your hand towards your body. Rotate the dough 90 degrees and repeat as needed.Cover your shaped dough balls with a damp paper towel and let rest 10 minutes.
- Poke holes. Dust your hands well with flour. Flip the first dough ball you shaped over and push your thumb through the seam at the bottom and out the other side. Slide your other thumb in next to it. Rotate the dough through your hands, gently squeezing as you go, to stretch it out. Stretch, don't tear. The hole should be at least the same width as the sides of the bagel. Arrange bagels on a lined sheet pan to rest while you shape the rest.
- Boil. Boil bagels 60 seconds per side. If they stick to the bottom of the skillet, use a wire spider or slotted spoon to gently loosen them — the bagels should float. Place boiled bagels back on the sheet pan when they're done.
- Dust the boiled bagels with cinnamon sugar. To get tiger stripes move your hand back and forth in a quick zig-zag motion.
- Bake. Bake for 20 minutes at 425°F. Let cool slightly on baking sheet, then transfer to wire rack to finish cooling.
Video
This recipe was originally published on 10/22/2019.
Laura says
I am truly craft-impaired, so the wreath part didn't work out for me, but holy heck I loved these, even in normal bagel shape. I used the leftover canned pumpkin for muffins hehe
Nicole says
Made these with some leftover pumpkin puree from Thanksgiving's pumpkin cinnamon rolls, and they turned out great! Surprisingly easy to make and delicious with some honey cream cheese (I was out of maple syrup). I used the Trader Joe's brand puree and didn't end up needing any extra water.
Riley says
What would the conversions of grams to cups be? I don't have a scale to measure grams. Thanks
Rebecca Eisenberg says
I don’t know. I developed the recipe using weight conversions as it’s much more accurate than using cups. Even using an online conversion calculator wouldn’t give you accurate info as different online calculators use different amounts to mean “1 cup.” Kitchen scales are very inexpensive and will make you a much better baker — I recommend picking one up if you’d like to give this a try!
Bella says
I tried this recipe and loved it! If I wanted to make bigger (but fewer, like four instead of eight) bagels using this recipe, would the bake time change at all? Any tips on how to know if they’re fully baked?
Rebecca Eisenberg says
The baking time might change by a couple minutes, if that. Try adding 3-5 mins to the baking time. And you can always temp check the bagels for doneness. You’re aiming for around 200F!
Jason says
AMAZING!!!!!!great flavor that isn't overpowering
Val says
Wow! I made two batches of these Pumpkin Bagels to share with family and friends. We inhaled them and the bagels earned rave reviews from our friends. The bagels were so easy to assemble with the perfect step-by-step tutorial. I am already planning to make two more batches to share with more friends! Thank you, Rebecca for yet another great recipe!
Kat says
Absolutely wonderful texture and taste. It's fall, y'all!
Evita Kay says
Bagels turned out amazing! Will be making again
Celeste says
Made these last year and had to save this recipe to make again this year! They are so so yummy!! I paired it with homemade brown sugar pumpkin cream cheese! Delicious!
SherryinChicago says
Yummy nice pumpkin flavored bagels! I wanted smalller or mini bagels so I did 12 instead of 8 and could do maybe 16 next time. I boiled and then baked for 15 minutes with egg wash but no cinnamon sugar as we prefer a more savory bagel in the morning.