
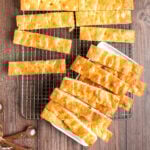
Speed and flavor combine Wonder Twins-style in this version of thin and crispy Ligurian focaccia bread that you can whip out of the oven 2 hours after you first think about making it. It's quick, easy and uses simple ingredients. Slice it into breadsticks or serve it with a bit of charcuterie and whipped homemade goat cheese as a snack.

Focaccia is one of my favorite bread types of all time. And Ligurian focaccia, with its unique saltwater brine (!!!) and thin, crispy texture, is one of my favorite easy snacking breads. Perfect for slicing into slabs or breadsticks for dipping in my best tomato and herb olive oil bread dip!
It's also a great recipe for beginner bakers, as there's no complicated kneading or shaping required! And if you end up with leftover focaccia, you can always turn it into these crunchy homemade focaccia croutons!
This is a Beginner-Friendly Focaccia — and it's FAST too!
When I first got into bread making, I fell in love with King Arthur Baking Company's trusty "No-Fuss Focaccia" recipe. It's an exceptional beginner's focaccia recipe because there's no kneading required and it has a short rise time. It bakes up thick and fluffy, perfect for making sandwiches.
I didn't think I needed another focaccia recipe in my life. But then, in the "Fat" episode of Netflix's "Salt, Fat, Acid, Heat," host and chef Samin Nosrat visited Liguria, Italy and learned how to make their regional variation of focaccia: Ligurian Focaccia. It's a thin-and-crispy focaccia that has a long, slow rise and a unique saltwater brine poured over the dough before baking. It's great cut into breadsticks or for snacking. I fell in love with that focaccia too.
Both are relatively simple versions of focaccia bread, and there are reasons to use either one — depending on how much time you have, what kind of pan you want to use, how much bread you want to make, or what techniques you want to try.

As much as I loved the more intense flavor and thin and crispy texture of Ligurian focaccia and the ease and speed of King Arthur's thick, fluffy no-fuss focaccia, I'm a recipe developer at heart. I wanted the best of both worlds.
So I took the things I loved about each recipe and married them into the focaccia recipe you'll find here. I took the speediness of the No-Fuss Focaccia and combined it with the thin, crispy texture and saltwater brine of Ligurian Focaccia to create a focaccia that's somewhere between the two, flavor-wise.
The best part? It clocks in at just around 2 hours start to finish. And it's SO easy to make.
Ingredient Notes
Here are all the ingredients you'll need to make this speedy Ligurian focaccia. I've included some notes below for ingredients you'll want to be sure you get right. See recipe card (at the end of the blog post) for ingredient quantities.

Salt: Focaccia is a SALTY bread. I use Diamond Crystal Kosher Salt which is half as salty as other brands and has larger, airier crystals that dissolve quickly in water which makes it ideal for the saltwater brine. I do recommend measuring your salt by weight—you can use any type of salt you like in that case. But if you're measuring by volume (teaspoons, etc.) and using a different brand of salt, even a different brand of kosher salt, cut the amount of salt in half.
Olive Oil: Focaccia is also an OILY bread. Any olive oil you like will work in this recipe but having tried several varieties in my test baking, I recommend sticking with a mild flavored olive oil. You will definitely taste the oil here so pick one with a flavor you like.
Honey: Honey provides the sugars necessary for the yeast to eat and for the dough to brown. It's a fairly small amount so while I do recommend using honey from a reputable company, you're not really going to taste the honey here.
Use your stand mixer to make the dough
As far as bread recipes go, you'd be hard pressed to find anything that comes together faster than this. You basically beat all the ingredients together with the paddle attachment of your mixer for 60 seconds. That's it! That's the whole thing!


Pro-Tip: Start the mixer on low, gradually increasing the speed as the water absorbs into the flour. This will happen fairly quickly, about 20 seconds. Once you're not at risk of flour clouds spraying everywhere, bump the speed to medium. Start the 60 second timer once it reaches medium speed.
Once the dough is mixed, you'll also want to make your saltwater brine and set it aside for later. Even though you don't need to use it for over an hour, this will help ensure the salt has time to fully dissolve.
Double-greasing the pan helps prevent sticking
First spray the pan with non-stick spray, then drizzle a tablespoon of olive oil across the surface. This is a tip straight from King Arthur's original No-Fuss Focaccia recipe — the non-stick spray prevents sticking. But the added olive oil makes the bottom of the focaccia extra crispy.
Scrape the sticky dough out of the bowl and into the center of the sheet pan. When you first scrape the dough into your sheet pan, you might start to worry you haven't made enough dough or that something has gone horribly wrong. Have no fear! This is normal.


You aren't trying to get it to fill the pan, and you're not dimpling it yet, just running flat fingertips over the surface to loosely stretch it in the direction you want it to move as it continues rising and spreading out in the pan during the next rise.
When you come back at the end rise time, the dough will be a little bit puffy and have filled out the pan a bit more. It may not reach all the way to the edges, that's fine.

Drizzle a little more olive oil over the top of the dough, coat your fingers in even more olive oil, and then press the pads of your fingers into the dough, spreading them out when they hit the pan.
If there are any thin spots in the dough or corners the dough hasn't reached yet, dimpling is the time to forcefully push the dough into those areas.


Pinch it together to patch thin spots, and push it outwards into the corners of the pan if it hasn't gotten there yet. Don't worry if the dough tears a little; it will be just fine.
The Saltwater Brine
Once the dough is suitably dimpled, you guessed it, drizzle with more olive oil. Then pour the saltwater brine evenly over the dough.
What does the saltwater brine do for a Ligurian focaccia?
"In the case of the Ligurian focaccia, the brine acts as a protective layer for the top of the focaccia, limiting its browning potential in the first part of cooking. Once all the water has evaporated, only the oil is left, and browning takes place - in some cases, the focaccia won’t brown at all in certain areas; the bread is almost poached in a salt water. SO. GOOD."
Nicola Lamb, Kitchen Projects #85 Ligurian Focaccia


Cover the dough and let it rest on top of or near your preheating oven. Moving the pan to a very warm spot for this final rise encourages the yeast to get to work. This will help the dough rise as much as possible before it bakes.
Don't poke or handle the dough once the brine goes on — it's quite a bit of water and you don't want it to begin dissolving the flour or breaking up the starches in the dough.
At the end of the final rise, the foccacia will be noticeably puffy and the dimples will have closed slightly. The dough should be barely reaching the top edge of the sheet pan.
Traditional Ligurian focaccia has deeply dimpled fingertip-sized pockets across the surface of the dough even after baking. In my version, the dimples will close up into deliciously salty fissures running through the bread.

Yes, You Can Add Lots of Toppings
In addition to the saltwater brine, I do recommend a generous sprinkle of flaky sea salt right before baking. The saltwater brine adds flavor but isn't overly salty. Sprinkle the flaky salt on top right before you put the focaccia in the oven so the salt holds its crystal shape and doesn't dissolve into the brine.
You can also get pretty creative with your Ligurian focaccia toppings! With it's flat texture and large surface area, this is a great focaccia for making focaccia artwork.
If you're topping the focaccia with anything heavy or dense like cherry tomatoes, garlic cloves, onions, olives, or peppers, you'll want to place them during the dimpling and brining stage, before the final rise. This way the dough rises around them and holds them in place as they bake.

As soon as the focaccia comes out of the oven, drizzle it with more olive oil and let it soak in.
Let the focaccia cool in the pan for about 10 minutes, then slide a spatula underneath to release any stuck bits and slide the focaccia out of the pan and onto a wire rack to finish cooling. Letting air circulate as it cools prevents it from getting soggy in the pan!
Practical Tips and Recipe Notes
- Honey provides the sugars necessary for the yeast to eat and for the dough to brown. It's a fairly small amount so, you're not really going to taste the honey here. If you don't have honey, sugar works just fine.
- Use oiled or damp hands when handling this Ligurian focaccia dough to prevent the dough from sticking to you.
- Instant yeast is sometimes also called "rapid rise" yeast. Active dry yeast will also work, your dough may just rise a bit slower.
- This focaccia is SO GOOD dipped in my fabulous tomato-herb olive oil bread dip.
💭 Have More Baking Questions?
I've rounded up answers to common baking questions and how-to guides, including:
- Ingredient swaps and FAQs
- Why my recipes are written in grams and not cups
- How to quickly bring eggs and butter to room temperature
- Ingredients I use (salt, flour, yeast, etc.)
- Step-by-step guides for bread and baking techniques
See my baking techniques & troubleshooting guide and ingredient swaps and FAQs for more!
📖 Recipe
2 Hour Ligurian Focaccia - Thin & Crispy!
Recipe Notes
- If you’re topping your focaccia with anything dense, like whole tomatoes, garlic cloves, peppers, etc. add them right after the saltwater brine, before the final 30-minute rise.
- Because focaccia is so salty, it's best enjoyed same-day. The salt draws moisture out of the dough which causes focaccia to dry out fairly quickly. If you do need to store focaccia, an airtight container like a large plastic bag works well. It will stay good for maybe two days. By day 3 it will be noticeably drier and significantly staler. The good news? Day-old focaccia is perfect for making homemade croutons!
Ingredients
THE DOUGH
- 550 grams all-purpose flour
- 12 grams diamond crystal kosher salt
- 7 grams instant yeast (2¼ teaspoons, 1 packet)
- 400 grams warm water (90°F)
- 40 grams olive oil
- 10 grams honey
For the pan, brine, and finishing
- 80 grams water
- 8 grams diamond crystal kosher salt
- cooking spray
- ¼ cup olive oil (divided)
- 1 tablespoon flaky sea salt
Instructions
- Spray an 18x13" sheet pan with cooking spray, then drizzle 1 tablespoon olive oil across the bottom. Tilt the pan to spread the oil around so it coats the entire tray.
- In a small bowl, prepare the saltwater brine by whisking the salt into the water until it dissolves. Set aside.
- Combine flour, salt, and yeast in the bowl of a stand mixer fitted with the paddle attachment. Mix on low speed for about 30 seconds just to incorporate.
- Pour warm water (90°F), honey, and olive oil into the center of the dry ingredients. Mix on low speed for 30 seconds to hydrate the flour, then increase to medium speed and set a timer for 60 seconds. Let it do its thing. The dough will cling to the walls of the bowl as the beater whips it around.
- Scoop the sticky dough into the center of the prepared pan using a bowl scraper. Drizzle a tablespoon of olive oil across the dough. Rub some oil on your fingers and use flat fingers and gentle pressure to start encouraging the dough to stretch outward in the pan as it rests. The dough will not fill out the pan yet. Cover the pan and rest for 1 hour.
- Preheat your oven to 450°F degrees, with a rack in the center position. Drizzle another tablespoon of olive oil across the surface of the dough. Coat your fingertips with oil and dimple the dough by pressing the pads of your fingers down, spreading them out when they hit the bottom of the pan. This is your chance to spread the dough into all the corners and edges of the pan.
- Drizzle another tablespoon olive oil over the surface of the dough. Pour the brine over the surface of the dough. Carefully tilt the pan if needed to help it spread out into the dimples. Cover and let rest on top of or near the preheating oven while the oven preheats for 30 minutes, or until the focaccia is noticeably puffy and the dimples have closed up slightly.
- Right before baking, sprinkle the surface with flaky salt or any other herbs and seasonings you like. Bake for 20-22 minutes at 450°F degrees until golden brown on top, rotating the pan halfway through. Drizzle immediately with one tablespoon olive oil after removing from the oven.
- Let cool in the pan for 10 minutes, then transfer to a rack to finish cooling. Focaccia is best enjoyed same-day or within 24 hours of baking.
Millie says
This focaccia turned out so well! I followed this recipe to the T, and wow what a beauty. This loaf was finished in just a few hours. I will be making this again and trying out more fun herbs and toppings! Thanks for the recipe 🙂
Rebecca says
So glad you loved it!!!
Mindy says
I made this recipe and it turned out perfectly! My family loved it and is already asking that I make it again. Clear recipe and simple to follow.
Paola says
Hello!
What if I don’t have a mixer? How long do I have to mix it by hand?
Thank you 🤗
Rebecca Eisenberg says
Unfortunately this one can't be made by hand — try my overnight focaccia instead! That one is designed to be made without a mixer.
Alison M says
Made it today. Exceptional!
And it became paninis for dinner!
Hailey says
This recipe was so easy for a huge payoff! I used active dry yeast and baked it in a 9x13 pan and the focaccia turned out so deliciously.
Ceejay says
I've been following you for a while, and I tried your baguette recipe when I made pasta and it was a hit! I was going to do that again when I was planning to make soup for dinner, but thought maybe I'd try a different recipe. I found this and WOW! I thought the salt brine was going to over power it but it's just right 👌. Crunchy yet soft, perfect for dipping and sopping up the last bits of soup. And it was all done in 2 hours! Our tummies thank you 😍😋
Sage says
Thank you for your wonderful recipes. I was always intimated by baking. I started making breads because your recipes are so detailed and easy! I’ve made this recipe 2x and everyone loved it.
Laura L Pepin says
My oven is too small for a 9x18 pan, but I still want a thin foccacia. Can I halve the recipe and use a 9x13 pan?
Rebecca Eisenberg says
Yep! That should work. It may not reach all of the edges/corners of the pan but that’s okay. Focaccia can be a little freeform sometimes!
Liz says
Easy to follow with a delicious result! I think I may have a new favorite style of focaccia!
Rebecca Eisenberg says
Oh I'm so glad to hear that! Enjoy!
Sylvia says
Love, love, love this recipe. Delicious and super easy to make. I multiply the recipe by 1.5 for an 18 x 13 pan. Focaccia is a bit thicker and amazing for sandwiches and paninis! Amazing flavor in 2 hours, can’t be beat!
nicole says
this was so good and SO easy! ive made it twice in the last 2 weeks, each time turned out perfectly. i really appreciate that its a same day bake, because i always forget i want to have bread until the day of XD the instructions were clear and straightforward, and i like that the water temp is listed right in the instructions so i dont have to go back and hunt for it, A+ for my scatterbrain. i feel like this is a super beginner friendly bread, and its amazing that it comes together so quickly.
the first time i made this half topped with salt and half with pantry pesto and it was a perfect combo! this time i did just salt, so we could switch up the flavors as we used it up. it made excellent dipping bread for roasted tomatoes, a fab sandwich, and went great with vodka sauce pasta. im going to try making some into the crouton recipe for later this week, i love that its so versatile that theres no worry about wasting! definitely going into the saved recipes, and i think itll be fun to try all the different way to top and flavor it.
Joanne says
This turned out to be absolutely delicious. I was a little worried because the dough was much wetter than any I have ever worked with. I wondered if I had mixed up the ingredient amounts (I will never know). However, I persevered and kept on with each step. (What’s the worst that can happen?!) It was super easy to spread out in the pan. I didn’t have time to let it cool the required 10 minutes, so I slipped it out of the pan and onto a rack very quickly. I had to leave for about an hour, and when I got back I couldn’t resist cutting a small piece for my husband and me. Light and airy and scrumptious! Thank you for this quick and easy recipe. It was so nice not to have to plan ahead.
Rebecca Eisenberg says
I'm so glad you liked it!
Jill says
This was so quick & easy! I've made the original several times and have always been slightly annoyed with how fussy the process of blooming the yeast in the honey mixture is. Love how you've streamlined the process!
Pam says
Just a question. The post and equipment list mention a 9x13” pan but the instructions say 18” x 13” pan. Which do you recommend?
Rebecca Eisenberg says
That's an error, I'll go in and correct that now. Thanks for letting me know! And to answer your question, technically you can make it in either one, but for it to be thin and crispy you'll want an 18x13" pan!