A cross between oatmeal cookies and fudge squares, these chewy chocolate revel bars are the perfect, practical dessert for a feeding crowd. This recipe fills a whole sheet pan and makes 60+ bars that freeze well so you can enjoy some now and save some for later too!
For a small batch version of this dessert treat check out my small batch revel bars recipe!

Revel bars are the perfect last minute low-effort, big-batch cookie recipe for last minute bake sales, potlucks, office parties, school events, and more. (If you're worried about nut allergies, just leave out the nuts!)
They're the perfect for when you need something to bring at the last minute, but they're also so good you'll plan ahead to make them again as soon as your last batch is gone.
About Revel Bars // Why You Should Make Them
Chewy chocolate revel bars (sometimes called "chantilly bars" or "chocolate oatmeal bars") are fudgy oatmeal cookie bars cut into a unique diamond shape.
They are rustic yet elegant, rich and chewy with a thick layer of nutty chocolate fudge running through the middle. No matter where you bring them, you'll have at least one person asking for the recipe.
If you're the kind of person who loves getting compliments, this is the dessert for you.

My dad has been making chocolate revel bars for as long as I can remember. They are a legendary dessert in my family, that one treat everyone is always hoping shows up at the next party or family event.
As a kid, I remember watching, transfixed, as he efficiently flattened fistfuls of oatmeal cookie dough into the bottom of a sheet pan, the shiny chocolate fudge spreading to every corner with a few deft swipes of a spatula, and the rest of the oatmeal dough chunking down across the shiny chocolate surface with satisfying little thuds.
Mostly I remember the way people's eyelids drifted closed and their quiet mmms of approval with every bite.
Not only are these chocolate revel bars wildly popular, they're also incredibly practical: The recipe comes together in under an hour and uses primarily shelf-stable ingredients (butter and eggs excepted).
My dad still keeps a can of sweetened condensed milk, chocolate chips, and quick rolled oats in the pantry just in case. And I now do the same.
The recipe originally came from Better Homes and Gardens' All-Time Favorite Cake & Cookie Recipes book (see below). The recipe is currently on the BHG website, but it's slightly different from the one in the book.
I've updated the recipe a bit for you, providing weight measurements for accuracy as well as some other small changes to some of the dough ratios and flavors.

Ingredient Notes
Here are the ingredients you'll need to make these chocolate revel bars! See recipe card (at the end) for quantities.

- Quick Cooking Rolled Oats - You must use QUICK COOKING and ROLLED oats. If the front of the oats package doesn't say both QUICK COOKING and ROLLED oats, check the ingredients list, it will say "rolled oats." Buying the wrong type of oats is the number one mistake people make with this recipe; make sure you get the right ones! Old fashioned oats will not work (see FAQ for what to do if you bought them by mistake!). Steel cut oats will not work and there is no way to adapt the recipe to use them.
- All Purpose Flour - Just your regular all-purpose flour! Nothing fancy.
- Brown Sugar - Brown sugar adds moisture and chewiness to these revel bars. You can use light or dark brown sugar, both are fine here.
- Unsalted Butter - I use American-style not European butter (e.g. Kerrygold) but both types should work just fine here. If you prefer to use salted butter, just cut the amount of salt in the dough in half.
- Large Eggs - Standard large eggs.
- Walnuts - Measure the walnuts after chopping them (or buy them pre-chopped). Walnuts are optional but recommended — they add a lot of bulk to the fudge filling!
- Chocolate Chips - I've made revel bars using chocolate chips, bar chocolate, dark chocolate, semi sweet chocolate, vegan chocolate, etc. All of them will work. I find my favorite version is made with semi-sweet chocolate chips, but you can absolutely sub in other types of chocolate if that's what you prefer!
- Cinnamon - My addition to the recipe! I think the cinnamon really brings out the gorgeous nutty flavors of the oatmeal. If you're not a big fan of cinnamon you can leave it out entirely or cut the amount in half.
- Vanilla - You'll need some for the dough and some for the fudge filling, so make sure you've got a full bottle to work with!
- Baking Soda - This is what allows the cookie dough to puff up in the oven. Make sure your baking soda is fresh; it expires and loses potency after about 6 months.
- Salt - I use Diamond Crystal Kosher Salt which half as salty as other brands. If you're using a different brand of salt, even a different brand of kosher salt, cut the amount of salt in half.
- Sweetened Condensed Milk - This is not the same thing as evaporated milk! Make sure you're using the right thing.
🍽 Mise en place (aka "the setup")
Mise en place is a French culinary term which literally translates to "putting in place."
It basically means: Measure all your ingredients and make sure you have all the right tools and equipment ready to go when you need them before you start working.
This can make a huge difference in a) how enjoyable you find the baking and cooking process and b) the success of your recipe!
Here's the mise en place you'll need for this recipe:
- Soften the butter. Take the butter out of the fridge an hour before you plan to start baking. It should be soft enough that you can easily press a finger into it, but not so soft that it's melty or greasy looking. Need to soften butter quickly? Microwave the wrapped sticks 3-4 seconds per side in the microwave.
- Bring eggs to room temperature. Remove the eggs from the fridge an hour before you plan to start baking. Need to warm them up quickly? Submerge in hot tap water for 5-10 minutes.
How to Make Revel Bars
I'm not actually sure you're ready for just how simple this recipe is. Are you ready? Are you sure? Okay, let's go.
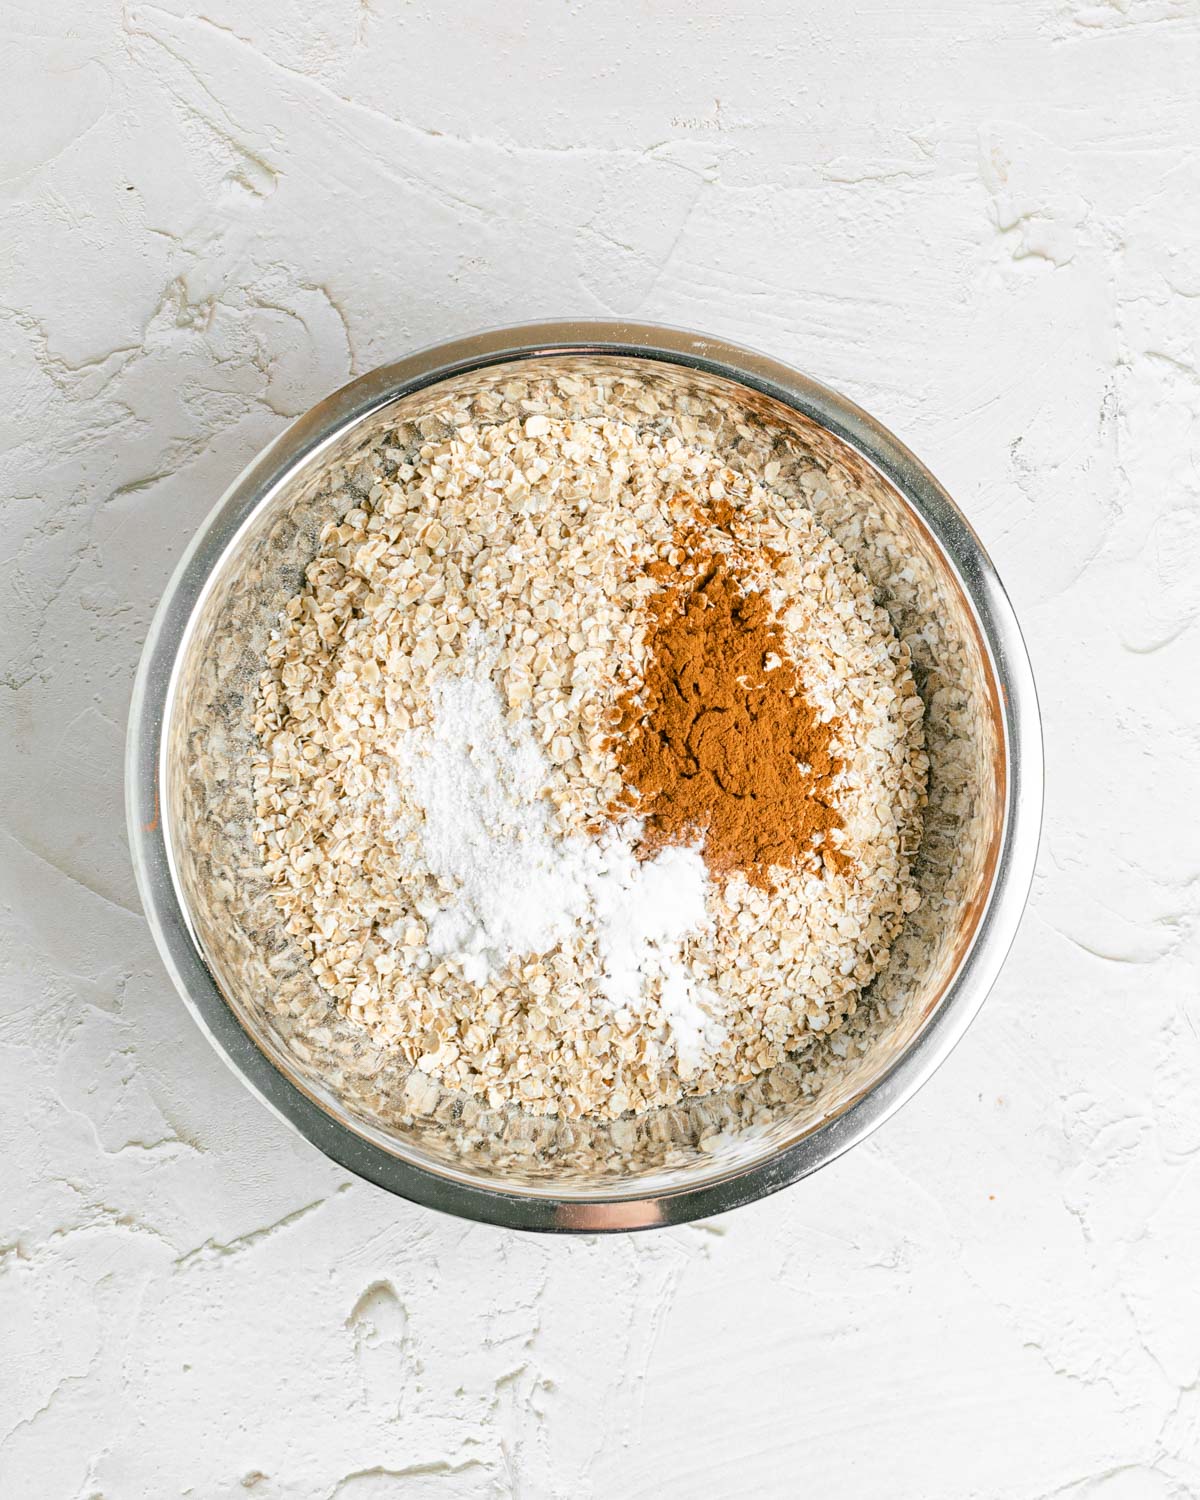
First, mix your dry ingredients in a bowl and set them aside. Having them already mixed will help you move faster later.
Then, beat the softened butter and brown sugar together for at least 5 minutes at medium speed, pausing to scrape down the bowl a few times in between. This is the step most people never do long enough — you want the butter and sugar to be light and fluffy, don't rush it!
Scrape the bowl down, then add the eggs one at a time, giving them at least 60 seconds to incorporate at medium speed and scraping down the bowl again after each one. Add the vanilla at the same time as the second egg.
Then, with the mixer running on the lowest possible speed, add the dry ingredients approximately one cup at a time. Scrape down the mixer as needed, and stop the mixer as soon as everything is mixed together and no streaky bits of flour are visible in the bowl.
Set the cookie dough mixture aside while you make the fudge filling.
For the fudge filling, melt the chocolate chips, butter, and sweetened-condensed milk together in a heavy-bottomed sauce pan. Then, take it off the heat and stir in the vanilla (mandatory) and finely chopped walnuts (optional).

FWIW, I used a too small pot when I shot this photo. I recommend using a pot that's at least 2 quarts in size!
If the fudge cools down at all before you need to spread it out, you can always put it back on the heat and stir it again to loosen it back up.
Assembling Chocolate Revel Bars
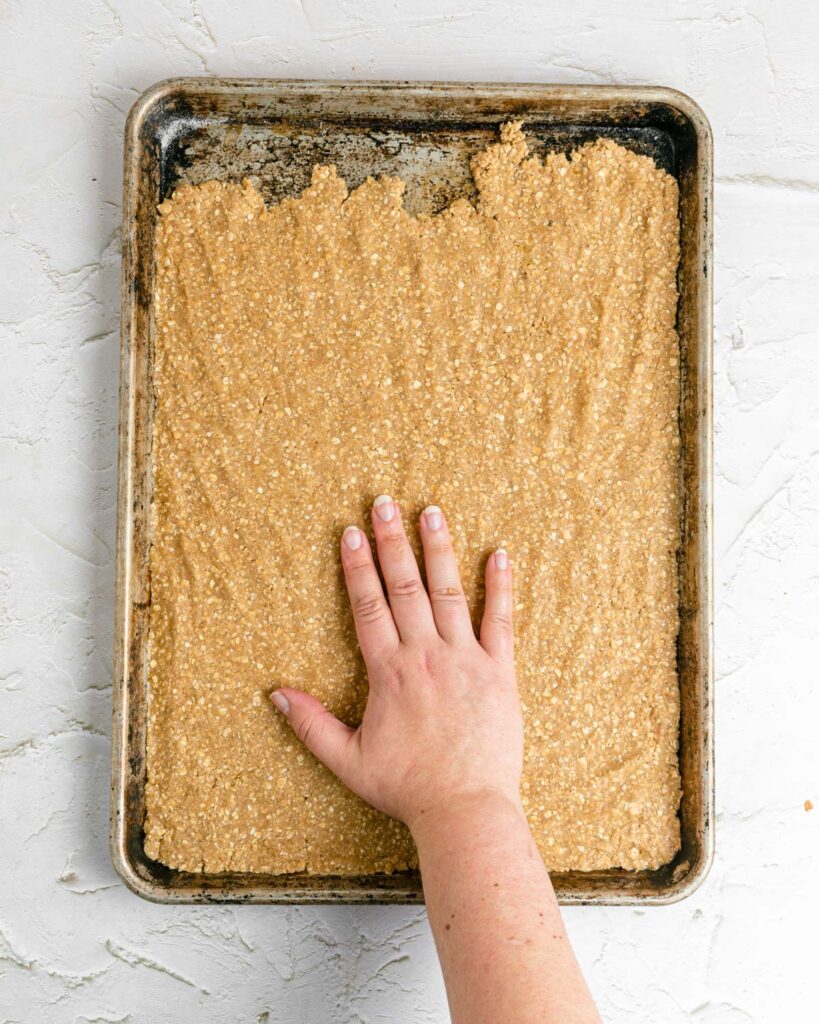
This is where you get your hands dirty. Press about two-thirds of the dough into an even layer in a lightly greased sheet pan.
Press very firmly, you want about ⅛" thick layer across the bottom — you can usually spread the dough a lot more than you think you can!
TIP: If the dough is sticking to your hands, spritz them lightly with non-stick spray or dampen them with water. You don't want soaking wet hands, just lightly damp, so the dough doesn't stick to you.
Finish by going around the edges of the pan flattening down the lip that forms so that the oatmeal dough is completely flat across the bottom. You don't want it to have a rim or crust at the edges.

Then pour the melted chocolate fudge overtop, spreading it into all the corners and edges of the pan.
Finally, use your hands to tear the remaining one third of the oatmeal mixture into chunks and dot them all over the surface of the chocolate. Mix up the sizes, some big chunks, some little chunks.
Bake your revel bars for 25-30 minutes at 350F. The fudge will puff up a little and develop a shiny crust on top, and the oatmeal chunks on top will take on just the very slightest hint of browning on top.


Cutting Diamond Cookie Bars
Better Homes and Gardens says to cut your Chocolate Revel Bars into rectangles, so I'm not sure where my dad got the idea to cut them into diamonds. He can't remember, either. But... I honestly can't imagine eating them any other way.
These are dense, rich, chewy, lumpy bars, and there's just something elegant about the diamond-like shape that just makes them feel fancy.

To get the diamond shape, you'll first cut straight vertical lines parallel to the long side of your cookie sheet
Aim for about 7 vertical lines, about 1½ inches apart. It will feel like this is too close together, but trust the process. You always need them to be just a little closer together than you think, since the length of the bars comes from the diagonal shape.
TIP: Use a sharp knife, and run it under very hot water (and dry it off) before slicing. The fudge gets sticky as it cools and a hot knife makes it easier to cut. You may need to wipe your knife off with a hot towel or under hot water a few times while cutting.

Once you've cut the vertical lines, cut the diagonal lines. You can start by cutting one long diagonal from corner to corner to get the right angle, but then the diagonal lines should be about 1½-2 inches apart from each other.
I find it helps to cut the middle line, then cut all the lines below it, then rotate the pan 180 degrees and finishing the diagonal cuts.
Don't worry too much about getting them perfectly uniform — you're going to have some irregularity no matter what. That's half the fun!

A Note on Different Pan Sizes
The original revel bars recipe calls for a 15x10" sheet pan, which is a bit of an unusual size. So if you have one of those, I definitely recommend using it!
If you don't have one of those, you can use a standard 13x18" sheet pan (also called a half sheet pan), which also works just fine. Just make sure you're really pressing the dough into a very thin layer in the bottom of the pan so it all fits.
You can also use two 8x8" or 9x9" square pans to make these revel bars.
And yes, I do have a recipe for small batch revel bars which bake in a quarter sheet pan if you're interested in that!
Practical Tips & Recipe Notes
- Can you make these dairy-free using sweetened condensed coconut milk? You can but I don't recommend it. When you use sweetened condensed coconut milk, the fudge filling will collapse and flatten out rather than staying risen and filling in the gaps between the oatmeal mounds on top once it cools. I've heard from people who've tried this swap who say the bars still taste great and they still love them, but if you don't need to make the swap, I recommend sticking with the recipe as written!
- If you accidentally bought old-fashioned rolled oats, you'll need to pulse them several times in a food processor to break down the tough outer shell. You'll also need to let the cookie dough sit for at least 2 hours or overnight before assembling your revel bars — this gives the oats time to absorb enough moisture from the dough so they're chewy and not tough!
💭 Have More Baking Questions?
I've rounded up answers to common baking questions and how-to guides, including:
- Ingredient swaps and FAQs
- Why my recipes are written in grams and not cups
- How to quickly bring eggs and butter to room temperature
- Ingredients I use (salt, flour, yeast, etc.)
- Step-by-step guides for bread and baking techniques
See my baking techniques & troubleshooting guide and ingredient swaps and FAQs for more!
📖 Recipe

Chewy Chocolate Revel Bars
Recipe Notes
- Use a sharp knife, and run it under very hot water (and dry it off) before slicing. The fudge gets sticky as it cools and a hot knife makes it easier to cut. You may need to wipe your knife off with a hot towel or under hot water a few times while cutting. Sometimes a serrated knife works better, but it's really up to you!
- If the fudge cools at all before you need to pour it, return it to low heat and stir until it is melty and loose again.
- If you accidentally bought old fashioned oats, pulse them in a food processor or blender several times before using. Let the cookie dough sit for at least an hour or overnight before assembling your revel bars to give the tough oats time to soften.
- To freeze, cut the bars apart and place them in a large airtight bag or container. Be gentle putting them in so they don't break or squish into each other. If you're worried about them sticking together as they freeze, you can arrange them on sheet pans in the freezer with space between each bar for about an hour, then transfer the bars to a bag or container once they're less sticky.
Ingredients
oatmeal cookie mixture
- 300 grams quick-cooking rolled oats
- 300 grams all-purpose flour
- 227 grams unsalted butter (1 cup, at room temperature)
- 300 grams brown sugar (1½ cups packed, light or dark)
- 2 large eggs
- 2 teaspoons cinnamon
- 2 teaspoons vanilla
- 1 teaspoon baking soda
- ½ teaspoon diamond crystal kosher salt (use half as much of any other brand)
chocolate fudge
- 14 oz sweetened condensed milk (1 can)
- 340 grams semi-sweet chocolate chips (2 cups)
- 2 tablespoons unsalted butter
- ½ teaspoon diamond crystal kosher salt (use half as much of any other brand)
- 1 cup chopped walnuts
- 2 teaspoons vanilla
Instructions
- Preheat oven to 350°F degrees. Combine dry ingredients (except brown sugar) in a large bowl. Set aside.
- Cream softened butter using the paddle attachment on your mixer approximately 30-60 seconds on medium speed until light and fluffy. Scrape down the bowl, add brown sugar and beat on medium speed for 5 minutes, pausing to scrape down the bowl several times, until light and fluffy.
- Add in eggs one at a time, adding the vanilla with the second egg. Beat for a minute after adding each one and scraping down the bowl after the egg has incorporated.
- With the mixer on low speed, add the dry ingredients 1 cup at a time. Scrape down the bowl as needed. Stop the mixer as soon as no dry streaks of flour remain in the bowl.
- Lightly grease a sheet pan with non-stick spray or a paper towel with a bit of cooking oil on it.
- Use your hands to firmly press about ⅔ of the oatmeal mixture into a very thin even layer at the bottom of the pan, making sure to get into all four corners. Use a small offset spatula to prevent a lip from forming at the edges of the pan.
- Make fudge filling. In a small, heavy-bottomed saucepan over medium-low heat, stir together sweetened condensed milk, chocolate chips, salt, and butter. Continue stirring until no lumps left and remain and the chocolate is shiny and smooth. Adjust burner as needed, stirring frequently to prevent chocolate from burning. Turn off the heat, stir in walnuts and vanilla.
- Pour chocolate mixture across the surface of the oatmeal layer in the pan, using a spatula to gently push it into all the corners right to the edge of the sheet pan.
- Use your hands to tear, crumble, and pinch the remaining oatmeal cookie dough, dropping it in chunks across the chocolate fudge. Try to get some variety in size between chunks.
- Bake in 350°F oven for 25-30 minutes until lightly golden brown on top. The chocolate fudge will have bubbled up slightly, rising to the lip of the sheet pan.
- Let the tray cool completely before cutting into diamonds. To get the diamond shape: cut 7 straight lines lengthwise down the sheet tray about 1½" apart, then cut across those lines in a diagonal, starting with a corner-to-corner cut to make it easier to replicate the correct angle as you make the rest of your cuts. The diagonal cuts should be about 1½-2″ apart.
- The bars can be a bit tricky and stubborn to remove from the pan. I recommend starting with the odd-shaped edge pieces and then working your way toward the center.
Betsy says
Ok, I made these the other day, and they were DELICIOUS! I love them, and they were a big hit with my friends too. I will definitely be making these again. Thank you for the recipe!
Amanda says
I was not very happy with how this came out, but I think part of my disappointment was that I expected them to be a lot easier than they were. If I made them again, I would try reducing the brown sugar in the cookie mixture as the dessert as a whole is way too sweet and rich. Also, I would try lining my baking sheet with parchment paper. If it worked and I could lift the whole thing out when it was time to cut it would make the cutting process easier and I wouldn't have to worry about damaging the sheet. It definitely makes a lot. If you aren't planning to take these to a big get together, save the recipe for another time. I gave some away, am freezing some, and still have more than I want due to how sweet they are. I wanted to love this recipe, but I think it's riding off of nostalgia rather than actually being good.
Rebecca says
I'm sorry to hear they weren't to your liking, but I appreciate you trying the recipe and leaving your thoughts. I definitely always plan to freeze at least half of mine if I don't have a big get together planned, because they do make a lot. And if I do have a big get together (though those happen less often, these days) people usually love them so much they fight over who gets to take some home. 🙂 Thank you for noting that people who prefer less sweetness may want to reduce the amount of sugar!
Meg G says
I made these for a baby shower and they were such a hit! They are absolutely delicious. Next time I will weigh out the cookie dough to really pull a third out before flattening it. I used Pam for Baking and they came out very easily. Thanks for the helpful tips on this one, especially the knife one: it was so helpful.
Patricia Sullivan says
could you suggest a substitute for condensed milk for those who are lactose intolerant? could you use just lactose free milk / almond milk?
Rebecca says
I haven't ever tried subbing a lactose-free milk in — you definitely can't just use milk, sweetened condensed milk is a much different consistency and behaves much differently in baking. I did a quick google search and there are some lactose-free, vegan alternatives out there but they're a little more complicated to make
(https://www.godairyfree.org/recipes/instant-dairy-free-sweetened-condensed-milk) but it also looks like some brands make a coconut milk alternative which should work if you can find it (https://store.veganessentials.com/natures-charm-condensed-coconut-milk-p4767.aspx)! Let me know if you try making it with an alternative — would love to update the recipe with your results!
Elizabeth kelley says
This reply is way too late but you can easily make your own condensed milk (Google it) and just use Lactose free milk I stead of regular.
Hailey says
i have made these several times and each time seems more delicious than the last. can’t say i’ve had anything quite like it but the delicate cinnamon oatmeal cookie balances out the richness of the chocolate so well! two things i wouldn’t have paired together with really compliment each other! i’m a nurse and have brought these to work twice and love watching people circle back for another after biting into their first piece. thanks so much for sharing this recipe!
Rebecca says
I’m so glad you like them, and that they’re bringing such joy to your colleagues! 🙂
Clarissa says
Im planning to make this today but i dont have a scale. How many cups is 300g of flour?
Rebecca says
1 3/4 cups + 2 TBSP. You can google these conversions for almost any ingredient, but measuring flour in cups is very imprecise and I can’t guarantee you’ll get perfect results! I definitely recommend getting a $10 kitchen scale for baking. It makes such a difference!
Loida says
Hi! I've got a bit of a situation with my revel bars. The chocolate layer boiled while baking, thereby covering the oatmeal slabs and leaving hollow spaces from where the chocolate was before. It looks like it's been eaten bu big worms 🙈 what did i do wrong? 😭
Rebecca says
Hi there! I'm... really not sure what went wrong here. Did you follow the recipe exactly or did you make any recipe swaps? Is it possible you used evaporated milk instead of sweetened condensed milk?
Nicole says
So good! I made a half-batch in a quarter sheet-pan and it worked perfectly! I did scratch the bottom of my pan with my knife while cutting, so next time I'd probably aim to line with parchment paper and then take out/cut on a cutting board to avoid that.
Janna says
These were such a hit!!! I am gluten-free and lactose-free so I had to make a lot of substitutions. These were so easy to make and super yummy. My substitutions caused the chocolate to stay gooey instead of setting, but they’re still so good. I love making Rebecca’s recipes because she’s thought of EVERYTHING and has such extensive guidance!
subs:
- King Arthur Baking gluten-free measure-for-measure flour
- Green Valley Creamery lactose-free butter
- Nature’s Charm condensed coconut milk
- Bob’s Red Mill GF oats
- Enjoy Life Foods vegan chocolate chips
Bekah says
Made these for a fundraiser and they were so good! Plus the big batch was perfect for feeding lots of guests. I will definitely make again the next time I need a dessert for a big group.
Julie says
I made these for the first time for a potluck yesterday, and they were a hit! I had multiple requests for the recipe already.
The only things I did differently was use pecans instead of walnuts, and parchment to protect my baking sheet.
They're so chewing a delicious with a cup of tea on a dreary afternoon too!
Melissa says
Oh my! Me and my kid made this today and my goodness, they are delicious. We will be making this one again for sure!
The recipe was easy to follow, and turned out wonderful.
Stephanie says
These were a big hit! Thank you for sharing. The family is a huge fan of peanut butter. Curious on how we could incorporate. Any thoughts or suggestions would be appreciated.
Rebecca Eisenberg says
I would consider adding melting peanut butter into the chocolate filling mixture or melt some peanut butter and drizzle it all over the fudge layer before you add the remaining cookie dough on top of the bars!
April says
Made these with butterscotch chips in place of the chocolate (my chocolate chips were called for!), and they turned out great! These are a keeper recipe. Thank you.
Mike says
I was skeptical at first, but these came out great! I used was paper and a round glass to spread dough. Relatively easy to make, thanks for the recipe and the easy to follow directions/video.
Else says
I tried this recipe for our easter brunch. Of course I didn't read your warning and made the whole recipe and had way too much 😂 I took half of the batch to the office and they were gone before I knew it. Everybody loved them. They were quite easy to make.