
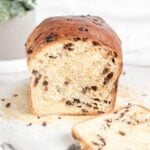
Get ready to fall in love with this gorgeous loaf of chocolate chip brioche bread! I've taken my favorite brioche recipe and stuffed it with as many mini chocolate chips as it could handle... and then added a few more just because.
Chocolate chip brioche bread is perfect for breakfast, dessert, or a sweet snack. So, so good sliced and toasted with homemade butter but is extra special when used to make French toast!

If you're new to bread making, don't be intimidated by brioche. This recipe uses my beginner-friendly brioche loaf as a base, with added chocolate chips and a slightly different shaping method.
You'll need a stand mixer with a dough hook, but I've got all the detailed step-by-step tips, tricks, and visuals you need to feel confident making this enriched dough! You can do this!
PS - Thanks so much to my volunteer recipe testers who gave me such great feedback while I was developing this chocolate chip brioche recipe!
5-STAR READER REVIEW
“A year ago, I couldn't cook, let alone bake bread, but I started following your recipes. Every single recipe has turned out better than I could have imagined, and this one is no different. It turned out perfect! I made French toast with the loaf, and it was delightful! Thank you!!!!!!”
—Nat
Making My Chocolate Chip Brioche Recipe
Getting the smooth, buttery brioche dough to accept the chocolate chips was the biggest challenge in developing this recipe. If you try to add the chocolate chips to the dough too early, the slippery gluten network will spit them back out at you as the butter is incorporated.
The second biggest challenge was figuring out how to get the chocolate chips to be distributed evenly throughout the loaf! I didn't want a swirl of chocolate chips, I wanted them everywhere in the dough.
It took me about 15 test loaves and 30 volunteer recipe testers to finally settle on the best method for getting the chocolate chips to stay put. It involves stretching the dough out and folding the chocolate chips inside between alternating layers of dough.
It's not as complicated as it sounds, I swear. I've got a ton of visuals and step-by-step instructions in the blog post before you get to the recipe card at the end, so if you're new to brioche I recommend reading through before you start baking!
That said, no two loaves will ever be exactly the same. Some loaves may have the chocolate chips more evenly distributed than others. But brioche is a pretty forgiving dough once you get to the shaping stage — you can always do some gentle smushing and pushing or re-rolling to get the chocolate chips where they need to be.
Ingredient Notes
Here's what you'll need to make this sweet chocolate chip brioche bread! See recipe card for quantities.

Mini Chocolate Chips - Mini chocolate chips are your best option for this brioche bread! You'll get more chocolate scattered throughout the bread, and they're easier to knead into the dough.
Milk - I use whole milk because the fat content is an important part of this enriched dough. If you use a reduced-fat or skim milk, you may find the dough is too sticky to knead and shape!
CInstant Yeast - Instant yeast is sometimes also called "rapid rise," "quick rise," or "bread machine" yeast. See "substituting active dry yeast" below for how to substitute active dry yeast.
Vanilla Bean Paste - I like the concentrated flavor of a vanilla bean paste, but vanilla extract or the seeds from one vanilla bean pod will also work!
🍽 Mise en place (aka "the setup")
Mise en place is a French culinary term that literally translates to "putting in place."
It basically means: Measure all your ingredients and make sure you have all the right tools and equipment ready to go when you need them before you start working.
This can make a huge difference in a) how enjoyable you find the baking and cooking process and b) the success of your recipe!
Here's the mise en place you'll need before you begin this recipe:
- Soften the butter - The best way to soften butter to room temperature is to leave it out for 1-3 hours (overnight if it’s very cold in your kitchen). But if you don't remember to do that, you can microwave the wrapped stick of butter for 4-5 seconds per side.
- Warm the Milk - Microwave the milk in 10-15 second bursts in the microwave until it is warm to the touch but not hot (90°F).
- Bring the egg to room temperature - Submerge the egg in very hot water for 5-10 minutes.
How to Make Brioche Bread Dough
The dough for these brioche dinner rolls follows the basic brioche dough process. First you mix the dry ingredients, then add the wet ingredients and knead until smooth. Then you gradually add the softened butter one tablespoon at a time and knead again until the dough passes the windowpane test — it will be soft, smooth, and elastic.
The butter is added after the dough has already been mixed and kneaded once because if you include it from the start, it will coat the flour and other ingredients and make it harder for them to absorb the milk and eggs.
I've gone into detail with step-by-step photos for the process of making brioche in my brioche bread recipe, so head over there if you're new to making brioche!You'll follow that exact same recipe process up through the end of the first rise for this chocolate chip loaf.


You're asking the gluten network to incorporate quite a lot of fat each time you add a new chunk of butter — be patient! At the end of each mixing stage, the dough will be slightly tacky to the touch, but should clear the sides of the bowl.
Once you pass the windowpane test a second time, then it's time to add the mini chocolate chips.
Adding Chocolate Chips to Brioche
Brioche has such a dense, tough gluten network that if you try to mix the chocolate chips in with the dough hook, the dough will spit them back out at you.
And once it's done doing that, the heat from the dough (which is warm from the friction of kneading) will start melting the chips into the dough. No thanks!
So to add the mini chocolate chips you're going to plop the dough on a clean countertop and stretch it out into a big square-ish or oval-ish shape and then fold the mini chocolate chips into the dough in batches.


From here you can either gather the four corners into the center to seal the chocolate chips inside the ball of dough OR you can roll the dough up into a little log and join the two ends of the log together to form a little ball.

Whatever your approach is, the idea is to create layers of dough between layers of mini chocolate chips so that the mini chocolate chips are evenly distributed throughout the dough.
Okay, I'm going to level with you. There's no one right way to incorporate the mini chocolate chips. Basically you're creating layers of dough between layers of mini chocolate chips. You can do this by folding the dough in halves or in thirds or quarters. You can add the mini chocolate chips in two layers or three layers, between every fold or just some folds, whatever makes sense to you.


Lightly grease the mixer bowl and place the dough back inside. Cover it, and let it rest in a warm spot until it just about doubles in size. If your kitchen is cold, it may need more time.
You'll know the dough is properly proofed when you press a lightly floured finger into the dough, and the indentation fills back in slowly and not all the way. If it fills back in quickly and completely, let it keep rising for another 30-60 minutes.
Proofing, Shaping, and Baking
Dust your countertop lightly with flour, then flatten or roll the dough into a circle or oval about an inch or so thick. It should be about the width of the long edge of your 9x5" loaf pan on one side.
If one side of the dough has more chocolate chips in it than the other, shape the loaf so that the chocolate chips are on the inside of the loaf instead of on the outside.
Fold the two sides in slightly if needed to get straight edges, then gently roll the dough into a log shape. Try not to create too much tension — you don’t want to tear it. A loose roll is fine.

NOTE: This is a very stretchy dough and it's tempting to make a really tight log of dough. Keep the roll fairly loose without too much tension in it.
Place the log of dough in a greased loaf pan. I like to line my pan with a parchment paper sling to make it easy to lift out, but this is optional. You loaf may not fill out the whole width or length of the pan just yet. That's okay.
Cover the pan and let the chocolate chip brioche loaf rise at room temperature for 1-2 hours until the dough just about reaches the top of the pan and has almost filled in the pan.


Towards the end of the dough rising time, preheat the oven and prepare the egg wash. Brush the top of the loaf all over with the egg wash, then bake at 350°F for 40-45 minutes or to an internal temperature of 200°F.

The chocolate chip brioche loaf will be quite darkened and burnished brown on top when it's done. If you're worried about it getting too dark, you can tent it with foil during the final 10-15 minutes of baking.
Let it cool in the pan for 15-20 minutes, then remove to a rack to finish cooling completely.

USA Pan Bakeware Aluminized Steel Loaf Pan, 1 Pound
Dimensions: 8.5 x 4.5 x 2.75. Durable construction with corrugated surface for optimal airflow. Non-stick finish is PTFE, PFOA and BPA free.
Important: Brioche and Temperature
Temperature is one of the main factors in determining how quickly or slowly your dough rises (proofs). This includes the temperature of ingredients in your dough, as well as the ambient temperature of the room where you are leaving your dough to rise.
- Warm temperatures increase yeast activity. They also cause the butter in the dough to melt which can make the dough super sticky.
- Cooler temperatures slow yeast activity. They also help the butter in the dough firm up and make it easier to shape and handle.
In baking, "room temperature" is generally somewhere around 70-75°F.
Depending on the temperature of your kitchen, and the temperature of your milk and egg, your dough may rise faster or slower, and your dough may reach windowpane stage faster or slower.
Due to the extra weight of the butter on the gluten network. Don't worry if your dough needs up to an extra hour of time to rise, especially if your kitchen is cold.
In the case of brioche dough, which has a lot of butter in it, warmer temperatures (even just the warmth from your hands) makes the dough sticker and harder to handle. Dust the dough lightly with flour as needed to prevent sticking. Or pop the dough in the fridge for 10-15 minutes to help the butter firm up before shaping.
Just because your dough isn’t ready at the time estimates given in the recipe, that doesn’t mean it's not working — there might be other temperature factors affecting how quickly or slowly it gets there!
Getting the dough to reach the right stages and look and feel right is more important than nailing the timing.

You Really Should Use a Stand Mixer
You really should use a stand mixer with a dough hook to make this recipe. You cannot make brioche with a hand mixer. And it's possible but very hard to make by hand. I don't recommend it.
If you have a KitchenAid mixer with the tilt head and the bowl that screws in at the base, the motor may struggle with this dough — keep a close eye on it. You may need to hold the bowl in place to make sure it doesn’t unscrew during the kneading process.
If you have a bowl-lift model, still keep an eye on it the whole time it's mixing and kneading. You don't want the mixer to walk itself off the counter!
If your mixer’s motor feels like it’s overheating, you can pause for 5 minutes and then resume mixing.
KitchenAid's official recommendation is to not use the dough hook on speeds higher than 2, so go at a speed you feel comfortable with. This is unrealistic for brioche, in my opinion. I have always used my machine at higher speeds, but if you don't want to go above speed 2, just know the mixing and kneading steps will work, they'll just take a lot longer.
For more on using KitchenAid mixers to knead bread dough, including the recommendation to not use the dough hook on speeds higher than 2, check out bread making expert Andrew Janjigian's WordLoaf issue "All Mixed Up (Part 1)."
Practical Tips & Recipe Notes
- Cold Proofing - You can give this chocolate chip brioche a long slow rise in the fridge before or after shaping it. The dough will be fine in the fridge for up to three days! You do need to let it fully come to room temperature before shaping or baking, however. This can take a couple to several hours. If your dough is cold when you bake it, it may need a longer baking time.
- If you don't reach a perfect windowpane before adding the butter and it's been at least 10 minutes of kneading that's okay — you can go ahead and start adding butter. It won't be a technically perfect brioche, but it will still be delicious!
- If the butter chunks are struggling to incorporate, lightly dust in ¼ teaspoon of flour — it will help the butter cling to the dough. Resist adding more flour unless absolutely needed!
- Some of my recipe testers said their dough doubled in size in an hour, others said it took closer to two hours. Be patient!
- Once you add the chocolate chips, you want to handle the dough as little as possible. The heat from your hands and the friction of kneading will make them melt, and you don't want that!
- When you flatten the dough and roll it into a log, look at how the chocolate chips are distributed within the dough — see if you can flatten or roll it in a way that helps evenly spread the chocolate chips throughout the loaf!
- If your brioche looks like it tore along the top or side of the pan in the oven then it was likely underproofed. During baking, the crust sets in place on the outside before the dough has finished expanding, causing a torn texture along one or both sides of the loaf around the rim of the pan. Don't worry — it will still be delicious!
💭 Have More Baking Questions?
I've rounded up answers to common baking questions and how-to guides, including:
- Ingredient swaps and FAQs
- Why my recipes are written in grams and not cups
- How to quickly bring eggs and butter to room temperature
- Ingredients I use (salt, flour, yeast, etc.)
- Step-by-step guides for bread and baking techniques
See my baking techniques & troubleshooting guide and ingredient swaps and FAQs for more!
TL;DR — Recipe Summary
- Mix dry ingredients. Mix wet ingredients. Pour wet ingredients into dry ingredients. Use dough hook to mix until combined in a shaggy dough.
- Knead until windowpane stage is reached, adjusting dough as needed.
- Add room temperature butter 1 tablespoon at a time until incorporated.
- Knead until windowpane stage is reached again.
- Stretch the dough out and fold in the mini chocolate chips. Knead into a ball.
- Cover and rest the dough for 1 hour or until doubled.
- Shape the dough into a loaf, place in a greased loaf pan. Cover and rest 1-2 hours.
- Bake for 40-45 minutes at 350°F. Let cool briefly in the pan, then transfer to cooling rack.
📖 Recipe
Buttery Chocolate Chip Brioche Bread
Recipe Notes
- For a long cold rise, the dough can be refrigerated for up to 3 days before or after shaping. Remove from the fridge and allow to come to room temperature before shaping or baking. This loaf is best baked from room temperature.
- If you don't reach a perfect windowpane before adding the butter and it's been at least 10 minutes of kneading that's okay — you can go ahead and start adding butter. It won't be a technically perfect brioche, but it will still be delicious!
- Once you add the chocolate chips, handle the dough as little as possible. The heat from your hands will make them melt, and you don't want that!
- Look at how the chocolate chips are distributed in the dough during the shaping process — you can use the way you roll the dough to make sure they're not all on one side of the loaf.
- If using active dry yeast use 7.5 grams (round down to 7 grams if you don't have a jeweler's scale). Mix with the warm milk before adding to the dough instead of adding it to the dry ingredients.
Ingredients
For the Dough
- 350 grams all-purpose flour
- 6 grams instant yeast
- 7 grams diamond crystal kosher salt
- 150 grams whole milk (90°F)
- 1 large egg (room temperature)
- 42 grams honey
- 1 teaspoon vanilla bean paste
- 84 grams Very soft room temperature unsalted butter (6 tablespoons)
- 125 grams mini chocolate chips
Egg Wash
- 1 large egg
- 1 teaspoon whole milk
- ⅛ teaspoon salt
Instructions
- Mix the dough. Combine flour, salt, and yeast the bowl of a stand mixer fitted with a dough hook. In a separate bowl, whisk together warm milk, honey, egg, and vanilla. Pour the wet ingredients into the dry ingredients. Mix on low speed (KitchenAid speed 2-3) until the dough comes together in a shaggy messy ball on the dough hook, about 3-5 minutes. The dough will look dry at first, but will hydrate as it mixes. Be patient!
- Knead the dough. Increase speed to medium (KitchenAid speed 4) and knead until the dough passes the windowpane test, about 7-10 minutes. If the dough hasn't reached windowpane after about 7 minutes, drizzle in an additional ½ teaspoon milk while kneading, then cover and rest for 5-10 minutes. Knead 2-3 minutes more. It should get there!
- Add the butter 1 tablespoon at a time. With the mixer running on medium (KitchenAid speed 4), add the butter one tablespoon at a time. Let each piece fully incorporate before adding more. The dough will look like it is falling apart each time you add more butter, but it will come back together. Pause the mixer to gather the dough around the hook or scrape the butter down into the bowl occasionally as needed. This can take 10-15 minutes. Be patient!
- Knead the dough again. Increase speed to medium-high (KitchenAid speed 5-6) and knead until the dough is smooth, shiny, and passes the windowpane test again, about 5 minutes.
- Stretch out the dough. Plop the dough out on to a clean countertop. Press it flat with your hands, then gently stretch or roll the dough into a large square shape about 12 inches by 12 inches in size or bigger. Don't worry about it being perfect. Just stretch it out as best you can.
- Fold in the chocolate chips. Sprinkle about half the mini chocolate chips on the top half of the square of dough. Then fold the bottom half up to seal the mini chocolate chips inside. You'll now have one long rectangle. Sprinkle half remaining chips on the left half of the new clean dough surface. Fold the right side over to seal the mini chocolate chips inside, making a square of dough. Gently smush it down, then sprinkle the remaining mini chocolate chips over the new clean dough surface. Roll the dough up into a log or old all the corners into the center and pinch them together to seal the chocolate chips inside.
- Knead. Knead the dough briefly against the counter to help evenly distribute the mini chocolate chips inside and shape the dough into a ball.
- Cover and rise. Place the dough ball in a lightly greased bowl or container. Cover and let rise 1 hour at room temperature (72-75°F) until just about doubled in size. If not doubled after an hour, let it rise an additional 30-60 minutes until doubled. When you push a finger into it, the indentation should fill back slowly and incompletely.
Assembly and Shaping
- Deflate the dough. Turn dough out onto a clean, lightly floured work surface. Use your hands to gently deflate the dough.
- Shape the brioche loaf. Stretch or roll the dough into a rectangle about an inch thick. One side of it should be about 9 inches long, the same length as your loaf pan. Fold the two sides in an inch or two as needed to get straight edges, then gently roll the dough up into a log. Place it in a greased 9x5" loaf pan. It may not fill out the pan just yet, that's okay.
- Final Rise. Cover and let rise at room temperature for 1-2 hours or until the dough has almost filled out the pan. When you press a finger into the dough it should feel soft, springy, and airy and the indentation should fill back in slowly but not completely.
Baking
- Towards the end of the dough rising, preheat the oven to 350°F. Whisk together egg, milk, and salt to make the egg wash.
- Egg wash. Brush the top of the dough with egg wash. Then bake for 40-45 minutes until deeply dark golden brown on top and an internal temperature of 190°F. Check the loaf after 30 minutes; If the top appears to be browning too much, tent a sheet of aluminum foil over the top.
- Cool. Let cool slightly in the pan, then remove to a rack to finish cooling completely.
Debbie says
Hi!! Just a question…what if I have no vanilla bean paste~can I substitute vanilla extract?? Thank you!🌷
Rebecca Eisenberg says
Hi Debbie! I answered this in the ingredient notes, writing: "I like the concentrated flavor of a vanilla bean paste, but vanilla extract or the seeds from one vanilla bean pod will also work!" ;-P You'll be just fine!
Debbie says
Thank you! Gonna give it a go for grandkids next weekend....yummy! Have a wonderful weekend and thanks for your inspiration - 😉
Rebecca Eisenberg says
Enjoy!!! I hope your grandkids love it.
Kate Walker says
Do you think you could shape this into mini brioche rolls and bake? My son loves the ones we buy but I’d like to make them and I think they would be easier to freeze in smaller portions
Bani says
I don’t have honey but I do have maple syrup. Do you think that would work? Thanks in advance!
Rebecca Eisenberg says
I haven't tested this so can't say for sure. I know they might seem similar, but their chemical properties are actually quite different. I do think it will work, but you probably don't need quite as much maple syrup as honey; try using 25-30 grams of maple syrup instead of 40 grams of honey! You may need to add more milk or water during the mixing stage if the dough seems overly dry, but it should work! Let me know how it turns out!
Carolina Navarro says
Can u use this recipe with different fillings? For example, replacing the chocolate chip with some Parmesan cheese.?
Rebecca Eisenberg says
You can certainly swap the chocolate chips out for something else, however for something savory like Parmesan cheese I’d recommend using my plain brioche loaf recipe which doesn’t have vanilla in it and has slightly less honey. I haven’t tested adding cheese to it, but instead of folding it in like you do the chocolate chips, grated parmesan cheese is delicate enough to incorporate during the mixing stage along with the other dry ingredients!
Nat says
A year ago, I couldn't cook, let alone bake bread, but I started following your recipes. Every single recipe has turned out better than I could have imagined, and this one is no different. It turned out perfect! I made French toast with the loaf, and it was delightful! Thank you!!!!!!
Rebecca Eisenberg says
I'm so proud of you!! Keep on cooking and baking!