
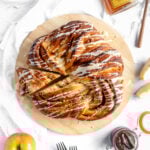
Just in time for Rosh Hashanah, this round, braided apples and honey babka is packed full of apple butter and drizzled with a honey icing.
Traditionally, on Rosh Hashanah (the Jewish new year) you dip apples in honey, and eat a round homemade challah bread to symbolize the start of a new calendar cycle. This round coiled apples and honey babka combines all three of those things in one sticky, ooey-gooey, sweet dessert bread.
Whether you're kicking off the new year or just want to really wow your friends at brunch, your search for the perfect recipe ends here. This apples and honey round babka is it.

The filling for this apples and honey babka is super simple — a store-bought apple butter slightly dressed up with a bit of honey and cinnamon. Finely minced apples add a nice bit of sweetness and crunch.
Honestly, the trickiest part of the whole babka-making process is the twisting and coiling when it comes time to shape. Fair warning: Things will get messy. (But less messy than the original version of this recipe did!).
I do recommend knowing what plate or serving platter you want to use before you start baking, because once you take this apples and honey babka out of the oven you really don't want to have to move it too much. If you're particularly mess-averse, I did include instructions for how to bake this in a loaf pan instead of as a spiral.

The base dough for this babka is a riff on my soft brioche loaf with some added fall spices and has a few hour-long rising periods and needs to cool completely before you add the honey drizzle, so I recommend making this over a two day period.
Shape and bake the dough one day, let it cool overnight, then add the icing drizzle shortly before serving. You can rush it a bit, but if you have the time to space it out, you should.
Apples and honey babka ingredient notes
Here's what you'll need to make this apples and honey babka! See recipe card (at the end of the post) for quantities.

- Nutmeg - Whole nutmeg freshly grated on a microplane zester is always best. I get my whole nutmeg Spicewalla where a small tin will last you literally for years.
- Milk - Whole milk works best — the fat content is an important part of this enriched dough. If you use a reduced fat or skim milk, you may find the dough is too sticky to knead and shape!
- Unsalted butter - You'll need one stick for the dough, and 1 tablespoon for the icing. Make sure the butter is at a true room temperature for both. Room temperature butter should be soft and spreadable, but not melted. You should be able to easily press a finger into it and make an indent. If you're using salted butter, cut the amount of the salt in the dough in half.
- Apple - A crisp, firm apple like a pink lady, Cosmic Crisp, honey crisp, or green apple works best. Avoid anything soft or mealy in texture like macintosh or red delicious.

how to make apples and honey babka
Babka dough is a brioche dough, which means it's enriched with butter, milk, and eggs. The butter is added last because it's a fat, and if you include it from the start, it will coat the flour and other ingredients and make it harder for them to absorb the milk.
- Mix the dough - Whisk the dry ingredients together, then whisk the wet ingredients together (except for the butter) and pour them into the dry ingredients. Mix everything together on low speed with a dough hook until you have a shaggy, messy ball in the bowl and there aren't any dry bits of flour left in the bottom.
- Knead the dough - Increase the speed and mix on medium until the dough passes the "windowpane test". You may need to slowly drizzle in an additional 1-2 teaspoons milk or dust in some flour to get the dough to be soft, smooth, and stretchy. If the dough hasn't reached windowpane after about 7 minutes, drizzle in an additional ¼ teaspoon milk at a time while kneading, giving it time to incorporate before adding more, then cover the dough and let it rest for 5-10 minutes. Knead 2-3 minutes more. It should get there!
- Add the butter - Add the soft, room temperature butter 1 tablespoon at a time, letting it fully incorporate between each addition. This can take another 7-10 minutes. Be patient.
- Knead the dough - Once all the butter has been added, knead the dough again on medium speed until it passes the "windowpane test" a second time.
What to expect when adding butter: Each time you add a new piece of butter, your dough will fall apart a little bit, it might slide around in the bowl or fall off the dough hook, but just let the mixer keep running and it will come back together. You're asking the gluten network to incorporate quite a lot of fat at this stage — be patient!
Place the dough in a lightly greased bowl, cover it, let it rise at room temperature until just about doubled in size. Depending on how cold or warm your kitchen is, and the temperature of the milk you used, this may happen quickly or may take a bit longer.
Once it has doubled in size, place it in the fridge for another 2 hours or even overnight to firm up the butter so the dough is easier to handle for shaping. Leave the dough in the fridge until you've got the filling prepped and are ready to start rolling and shaping your apples and honey babka.
Easy apple butter filling
Rolling, cutting, twisting, and shaping your babka dough is challenging enough — there's no point in overcomplicating it by also trying to make apple butter from scratch. Store-bought apple butter with a bit of cinnamon and honey is all you need for a great babka filling.

Assembling and shaping apples and honey babka
Clear off a nice big stretch of counter or table space. It's going to get messy, so don't do this on grandma's nice vintage dining table or whatever. Lightly dust your work surface with flour, then transfer the dough from the bowl to the countertop. Dust the top of the dough lightly with flour as well.
Deflate the chilled dough to knock any air out of it. Then gently stretch it dough into a rough rectangle shape, and use a rolling pin to roll it out into a 20" long rectangle about ¼" thick.
Tips for rolling dough:
- If the dough fights back or starts to tear, let it relax for 30 seconds and then keep going.
- Start with your rolling pin in the center of the dough and roll outwards, rather than trying to roll the pin across the entire length of dough with each pass.
- Use a bench scraper to square off the dough as you roll to help keep the rectangle shape.
- Dust on more flour or rotate and flip the dough as needed to prevent it from sticking and keep an even thickness.
![[gif] using a bench scraper to straighten the top of the dough](https://thepracticalkitchen.com/wp-content/uploads/2019/09/apples_and_honey_babka_1.gif)
![[gif] rolling the rectangle of dough from the center out](https://thepracticalkitchen.com/wp-content/uploads/2019/09/apples_and_honey_babka_2.gif)
It's okay if you don't have a perfect rectangle or if you end up with something a little bigger or are slightly off in your dimensions. The important measurement to achieve is that ¼" thickness. Once you shape the babka, it still has to rise one more time, and the dough will almost double in size. So if you start with dough that's ½" thick... well, you get the idea.
Spread your apple-butter filling across the surface of the dough leaving one long edge bare. Once you've got a thin, even layer of apple butter, sprinkle on your minced apples (and optional walnuts) trying to distribute them as evenly as possible.
To roll the babka: Start with one of the bottom corners and begin rolling it up, moving across the long side of the dough from one side to the other. Roll tightly, trying not to trap any air bubbles inside. Repeat until your dough rectangle is rolled into a log. This will get easier as you go.
![[gif] start by rolling the dough up from the bottom](https://thepracticalkitchen.com/wp-content/uploads/2019/09/apples_and_honey_babka_3.gif)
![[gif] roll the dough forward into a tight spiral log, trying not to trap any air bubbles inside](https://thepracticalkitchen.com/wp-content/uploads/2019/09/apples_and_honey_babka_4.gif)
Once you roll the dough into a log, place it on a sheet pan and chill it in the fridge for 10-20 minutes before cutting and twisting. The dough warms up quite a bit while you're rolling it and the next step is MUCH easier and less messy if the dough is chilled. (The recipe will still work if you skip this step, but do so at your peril!)
Take a knife or a metal bench scraper with a sharp edge and cut lengthwise down the middle of the rolled dough log. You're creating two long thin strips, revealing all the layers inside. Yes, you're right, it will get messy. How'd you guess?
Turn the two strips so that the inside layers are facing up. Starting in the middle, cross one strip over the other to form an X shape. Continue crossing the two strips of dough over each other until one half of the dough is twisted. Repeat this process with the other half of the dough strips so you have a fully twisted rope of babka.
![[gif] use a bench scraper to split the log of dough lengthwise](https://thepracticalkitchen.com/wp-content/uploads/2019/09/apples_and_honey_babka_5.gif)
![[gif] turn the two halves face up in an X shape](https://thepracticalkitchen.com/wp-content/uploads/2019/09/apples_and_honey_babka_6.gif)
![[gif] repeat the twist on the other side of the X](https://thepracticalkitchen.com/wp-content/uploads/2019/09/apples_and_honey_babka_7.gif)
![[gif] twist the two halves of the dough log together with the insides facing up](https://thepracticalkitchen.com/wp-content/uploads/2019/09/apples_and_honey_babka_8.gif)
Why start twisting from the middle? It's a lot easier to pick up and cross shorter pieces of dough over each other. If you started at one end of the dough, you'd be trying to handle almost 20" of gooey, apple-butter filled dough at once. This way you can work in easier, less stressful, smaller sections.
Bend one end of the babka twist in toward itself. Then wrap the other end of the twisted babka rope around the folded bit to create the spiral. Tuck the end underneath the coiled dough. The babka will seem lopsided at this point, but that's okay — it'll settle down during the final rise.
![[gif] coil one end of the twisted babka rope in toward itself, tucking the ends under](https://thepracticalkitchen.com/wp-content/uploads/2019/09/apples_and_honey_babka_9.gif)
![[gif] coil the twisted babka into a spiral shape, tucking the end under](https://thepracticalkitchen.com/wp-content/uploads/2019/09/apples_and_honey_babka_10.gif)
Cover the coiled babka loosely with plastic wrap and let it rest while you scrub all the ooey-gooey apple butter filling off your hands and wipe down your counters.
During this time, the babka should nearly double in size — it will grow outwards as well as upwards as it rests. When you poke it gently with a finger it should seem airy and light and spring back slightly. That's how you know its ready to bake.

Finish with a simple honey icing drizzle
Let your babka cool completely before you drizzle it with the honey icing. If the dough is hot or warm, the icing will melt and slide off the dough. To drizzle it, use a fork or even the whisk you used to mix the icing to drag long ropes of it across the babka in a zig-zag shape.
To move the babka off the cooling rack and onto your serving platter be confident, move quickly, and don't let it see the fear in your eyes. Another option is to cut it in half, in quarters, or wedges/slices, and then move it onto the serving tray.

Practical Tips & Recipe Notes
- Baking ahead: You can make this up to two days ahead of time! Wait to do the honey icing drizzle until right before you serve it. Keep it wrapped in plastic until you're ready to serve.
- Struggling to incorporate the butter? Butter is slippery and when you're trying to add a lot of it into a well-kneaded dough with a strong gluten network, the first thing it does is coat the entire outside of the dough. This makes it quite slippery and the dough hook might have trouble picking it up. Usually if you just let it go it will snag the dough again on its own, but if it's really having trouble you can pause the mixer and use a spatula or your hands to fold the dough around the hook again.
💭 Have More Baking Questions?
I've rounded up answers to common baking questions and how-to guides, including:
- Ingredient swaps and FAQs
- Why my recipes are written in grams and not cups
- How to quickly bring eggs and butter to room temperature
- Ingredients I use (salt, flour, yeast, etc.)
- Step-by-step guides for bread and baking techniques
See my baking techniques & troubleshooting guide and ingredient swaps and FAQs for more!
📖 Recipe
Apples and Honey Round Babka
Recipe Notes
- If your kitchen is quite cool, you may want to move the dough into a warmer spot in your house (laundry room, near a warm oven, etc.). This will give the yeast a nice, warm environment to get to work.
- You can make the apple butter filling a few days in advance and store it in the fridge until you're ready to use it.
- Wrap well in plastic wrap and store at room temperature for 4-5 days.
- To freeze: Wrap well in plastic wrap, place inside a larger bag with as much air pressed out as possible. Defrost on the counter. Warm in a 350°F oven for 10-15 minutes if desired. The icing drizzle doesn't store super well, you may want to do the icing drizzle just before serving.
Ingredients
babka dough
- 420 grams all-purpose flour (3½ cups, loosely packed)
- 6 grams instant yeast (2 tsp)
- 5 grams diamond crystal kosher salt
- ¼ teaspoons nutmeg (freshly grated)
- ½ teaspoons cinnamon
- 168 grams whole milk (½ cup + 2 tablespoon + 1 teaspoon)
- 2 large eggs (room temperature)
- 50 grams honey
- 113 grams unsalted butter (8 tablespoons, room temp)
apple butter filling
- ¾ cup apple butter (unsweetened preferred)
- 3 tablespoon honey
- 1 teaspoons cinnamon
- ½ cup finely diced apple
- lemon juice (tossed with the apples)
- ¼ cup chopped walnuts (optional)
honey icing drizzle
- 1 tablespoon unsalted butter (room temp)
- 3 tablespoon honey
- ⅓ cup powdered sugar
- 2 teaspoons milk
Instructions
The babka dough
- Mix the dough. Combine flour, salt, yeast, cinnamon, and nutmeg in the bowl of a stand mixer fitted with a dough hook. Whisk milk, eggs, and honey together in a separate bowl or liquid measuring cup, then pour into the center of the dry ingredients.Mix on medium-low until the dough comes together on the dough hook, about 2-3 minutes.
- Knead the dough. Increase speed to medium and knead until the dough passes the windowpane test, about 3-4 minutes.
- Add the butter 1 tablespoon at a time. With the mixer running on medium to medium-high, begin adding butter slowly. Let each piece of butter fully incorporate before adding the next. This can take 7-10 minutes. Be patient.
- Knead the dough again. Once all of the butter has been added, increase speed to medium-high and knead until the dough is smooth, shiny, and passes the windowpane test.
- Cover and rise. Shape the dough into a ball and place it in a lightly greased bowl or container. Cover and let rise 1 hour at room temperature (72-75°F) then 2 hours or overnight in the fridge. The dough should double in size during the first hour, but may triple or quadruple in size in the fridge.
The apple butter filling
- Make the filling. Mix apple butter, honey, and cinnamon together in a small bowl. Mince your apples and set them aside in another small bowl, tossed with a bit of lemon juice to prevent browning. If you’re planning on adding walnuts, chop them and set them aside in another bowl.
Assembly and shaping
- Deflate the dough. Remove the dough from the fridge and turn it out onto a lightly floured surface. Use your hands or a rolling pin to deflate the dough, pushing all the air out of it.
- Roll the dough into a long rectangle. Gently stretch the dough into a rectangle shape and use a rolling pin to roll it out to a 20" long rectangle about ¼″ thick. The long side of the dough should face you. If the dough resists rolling at any point, let it rest for 30 seconds and then resume.
- Add the filling. Spread the apple butter filling across the surface of the dough in a thin layer, leaving a ½″ border along the top 20" long edge.Evenly sprinkle your minced apples (and walnuts) across the apple butter.
- Roll it up. Roll the dough up into a 20" long log. This is easiest if you start on one side folding the bottom edge up at one corner, then working your way across to the other.Repeat until the whole dough rectangle is rolled up like a log. Try to get the roll as tight as possible.
- Chill the rolled log. Transfer the dough log to a sheet pan, cover, and chill for 1-2 hours. You can skip this step, but the rest of the process will be a lot easier if you don't.
- Make the twist. Use a metal bench scraper or a sharp knife to split the log of dough lengthwise into two 20" long strips. Turn the two halves outward so the gooey inner layers face up. Cross one strand over the other to form an X shape. Work from the center out down one side, crossing the two ropes over each other, then repeat with the other half of the X, to form a long twist of dough.
- Coil the twist. Line sheet pan with a silicone mat or parchment paper. Pick up the twisted dough and quickly place one end in the center of the sheet tray. Coil the rest of the dough around it, keeping the open side of the twist facing up. Tuck the end of the twist under the dough to hold it in place. It will look lopsided, that's okay.
- Rise one last time. Cover the babka with plastic wrap and rest for another 1-1½ hours. The dough layers should double in size, and the babka will be slightly puffy.
- Bake the babka. Near the end of the rising time, pre-heat the oven to 375°F. Bake the babka for 30 minutes, uncovered, then loosely drape a sheet of aluminum foil over the top of it and bake for an additional 10-15 minutes. When it's done, a thermometer inserted into the dough will read 190°F. But if you don’t have a thermometer, err on the side of the longer bake.
- Cool completely. Let the finished babka cool on the sheet pan before transferring it to a cooling rack OR directly to the serving tray you plan to use.
The honey icing drizzle
- Whisk butter and honey in a slightly larger mixing bowl than you think you’ll need, beating vigorously until light in color.
- Add powdered sugar, and whisk vigorously until incorporated, then whisk in milk until well combined and no lumps remain.
- When the babka is completely cool, use the whisk or a fork to drizzle the icing in a large zig-zag.
UPDATED 8/2021 — I've given this recipe a fairly massive post-pastry school update. I retested the recipe and reworked the dough to make it MUCH simpler, easier, and less messy to handle, shot all new photos, simplified the filling, and added a lot more info and a more robust FAQ section. How's that for a shanah tovah?
Monica says
I've made this babka twice now, and it's wonderful! The most recent time, I went ahead and made my own apple butter (using the BA recipe). I've made it before and it's very simple to do, and we're all home in a pandemic anyway so it felt like a good time to try it, plus the commercial apple butter at my grocery store has HFCS and isn't my favorite. I may have over-reduced the apple butter slightly, but it still worked wonderfully for the filling, and I found it actually didn't release nearly as much extra liquid during the second proofing. I highly recommend trying it! And if starting from scratch is too much, it still might be worth it to reduce a commercial unsweetened applesauce for a half hour or so in the oven to get that apple butter texture.
Thanks again for this recipe, it was a wonderful Rosh Hashanah breakfast for our family.
Rebecca says
This is so lovely to hear!!! I love that you made your own apple butter too! I’m definitely going to have to try that sometime — esp if it means it doesn’t get quite so oozey in the second proofing. L’shana tova!
Jesse says
Delicious!
Amy says
This is my favorite dough recipe. I love the original recipe but there is so much more you can do with it. Sometimes I roll it out, add chocolate chips, roll it up half way to make to 2 skinny logs, cut it into 2-inch pieces, rise and let bake for mini chocolate chip rolls.
Amy Rae says
Absolutely LOVE this babka! I'm celebrating my first Rosh Hashanah with my boyfriend and his family and when I asked what he wanted me to learn to make he said BREAD! My first try I forgot to test my yeast and did the thing I always do and thought "I can fudge the recipe a little." Terrible idea. Total disaster. Second time through I followed the directions to a T and it was PERFECT! Absolutely amazing. Chilling the dough before making the twist makes it a breeze! Definitely recommend investing in a thermometer if you don't have one, my oven is pretty old and my bake time was little longer than the recipe called for to get the center done. Can't wait to make it again soon, and looking forward to trying some other options for filling in the future.
Ian says
This babka was the hit of Rosh Hashanah this year!
Dova Weinberger says
Hi! Does this freeze well? I would do the icing when I serve it. Thanks!
Rebecca Eisenberg says
Yes, it does!
Dova Weinberger says
Thank you! An early Shana Tova 🙂