
With a chewy golden crust and soft, airy interior, these ciabatta twisted breadsticks are the perfect combination of textures. The twisted shape doesn’t just look pretty — it also creates nooks and crannies inside the breadsticks that make them perfect for soaking up my best-ever spaghetti sauce and popular tomato-herb olive oil bread dip.
Make these homemade breadsticks the same day for warm-from-the-oven breadsticks ready in under 3 hours!

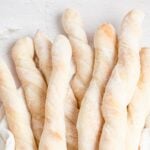
This homemade breadsticks recipe will make about 10-12 ciabatta breadsticks about 11-13" long. They're pretty big! We are absolutely living for a chunky breadstick moment here.
5 star reader review
“I have made these multiple times with the seasoned olive oil dip, they are both amazing! Both super easy and delicious recipes!”
—Kristi P.
About These Ciabatta Breadsticks
I used a slightly smaller (and slightly faster) version of my popular soft-baked ciabatta bread recipe to make these ciabatta breadsticks. No fancy flours or specialty ingredients needed, and the recipe clocks in at just under 3 hours, with a lot of hands-off resting time.
Basically, if you've made my full size ciabatta recipe before, this will be very familiar to you! To make these soft breadsticks, I reduced the amount of water in that recipe to make the dough a little easier to cut and shape.

The fun, twisted shape of these ciabatta breadsticks is by far my favorite thing about them. I think you're going to love it about them too!
Ciabatta dough is very bubbly and airy, and twisting them before baking compresses the gluten structure, helping control the way they bake. This ensures you don't end up with any sneaky giant pockets of air hiding inside. It also gives these soft breadsticks a nice chewy texture, and makes them fun to pull apart into pieces for dunking in dips or seasoned oils!
Ingredient Notes
Here are the ingredients that you'll need to make these ciabatta breadsticks. See recipe card (at the end of the post) for ingredient quantities.

Instructions
Once you mix the breadstick dough together, there's four 15-minute resting periods and one 45-minute resting period, so the amount of active work time is minimal.
I like to use a square Cambro container for mixing and folding this ciabatta dough — it helps train the dough to hold a square shape which makes it easier to cut later on. You can absolutely use a large mixing bowl instead.
To mix the dough, whisk the dry ingredients together, then add the warm water and olive oil.


Scrape any excess flour or dough off the sides of the bowl, and gather the sticky dough together at the bottom of the bowl.
Resting and Coil Folding (Bulk Fermentation)
After the dough has been mixed, it's time to let it rest for a total of 1 hour and 45 minutes. During the first hour, you're going to periodically build strength and structure into the dough using a technique called folding.
You can do coil folds (like in my soft ciabatta recipe), or stretch-and-folds (like in my overnight focaccia recipe), whichever is easier for you.
Don't feel overwhelmed by this — it's basically a 1 hour and 45 minute resting period period, with folds every 15 minutes just for the first hour. That's four sets of folds total. Then 45 minutes where you don't have to do anything but remember to preheat the oven. Lucky you!
Here's what that looks like:
- Mix the dough. Rest 15 minutes.
- First set of folds. Rest 15 minutes.
- Second set of folds. Rest 15 minutes.
- Third set of folds. Rest 15 minutes.
- Fourth set of folds. Rest 45 minutes.
TIP: To keep track of which set of folds you're on, put a small bowl with four candies, crackers, or snacks in it. Eat one each time you do a set of folds. It's like a reward.

The first hour starts immediately after mixing the dough. The dough will rest for 15 minutes, and then you'll do the first set of folds. Each "set" of folds consists of four coil folds OR four stretch-and-folds.
On the first fold, the dough will be relaxed and easier to stretch. By the final fold in each set, it won't stretch it quite as much. That means the gluten network is getting stronger. Each time you do a set of folds the dough will feel smoother and stronger.
After the final set of folds, cover the bucket and let the dough rest for 45 minutes. At this point you want the dough to develop some nice air bubbles. The dough may not quite double in size, but it should look airy at the end of this resting period.
Cutting and Twisting Ciabatta Breadsticks
Preheat the oven during the 45-minute rest. These soft breadsticks don't need any time to rest after you cut them, so the oven should be ready to go when they are!
Dust the top of the breadstick dough in the bowl with flour so it doesn't stick to the bowl as you tip it out. Then turn the dough out of the bowl and onto a generously floured surface so that the sticky, un-floured side is facing up.
Dust the sticky top side of the dough lightly with flour too. Use flat hands to gently smooth the ciabatta into a large rectangle.

Gently lift and stretch the edges and corners if you need to (a metal bench scraper can be helpful here!), but don't try to force the dough, you don't want to deflate it too much.
Use a sharp knife or bench scraper in an up-and-down motion to make your cuts (don't try to slide the blade along the counter or the sticky dough will stick to it), and leave the sticky cut edges facing open. Dust lightly with flour only if needed.


Use very little pressure when you do the twist, the dough is very soft and airy and you don't want to flatten it! You can also use one hand to gently hold one end in place and use the other hand to lift and twist the dough.
TIP: When you lift the homemade breadsticks onto the sheet pan, do not lift from the two ends or gravity will stretch them out. Bring the sheet pan as close as you can so you don't have to move them very far. Gently scrunch the two ends together so you're supporting most of its weight in your hands, then move your hands apart as you deposit the breadstick on the sheet pan.
![[gif] two hands lifting a twisted breadstick off the wooden counter.](https://thepracticalkitchen.com/wp-content/uploads/2023/05/ciabatta-breadsticks-01.gif)
![[gif] two hands putting a ciabatta breadstick on a parchment lined sheet pan.](https://thepracticalkitchen.com/wp-content/uploads/2023/05/ciabatta-breadsticks-02.gif)
Do you need to do the twist? Nope! Skip it and you'll end up with airier, thicker ciabatta breadsticks. You could even bake tear-apart ciabatta breadsticks by cutting the dough directly on the parchment lined baking sheet you'll bake them on and not separating the breadsticks from one anoher before you bake them. You may need to add 2-3 minutes to the bake time if you go this route.
Baking Ciabatta Breadsticks
Depending on how soft or crunchy you want your breadsticks to be, I've provided two different baking times. When the ciabatta breadsticks are done they will be lightly golden brown in the spots peeking out between the floury stripes.
Right out of the oven, the ciabatta breadsticks will feel hard to the touch. That's normal. They will soften as they cool.

Let the soft ciabatta breadsticks cool for at least 10 minutes before eating them. You can let them cool on the sheet pan or transfer them to a cooling rack, either is fine.
Adding Other Flavors
If you want to customize the flavor of your homemade breadsticks, go for it! You just want to make sure they don't disrupt the structure of the dough.
The simplest way to do this is to simply sprinkle the twisted breadsticks with your favorite seeds or cheeses right before baking. This works for things like sesame seeds, poppyseeds, everything bagel seasoning, flaky salt, cheddar or parmesan cheese, etc.
The second easiest way to change the flavor of your homemade ciabatta breadsticks is to replace the olive oil with an infused olive oil or other oil with a flavor you like. Garlic oil, scallion oil, sesame oil, etc. are all good options here!
If you want to add a lightweight ingredient like herbs or spices, you can mix up to 1½ teaspoons into the olive oil and add them directly to the dough.
To incorporate heavier, denser ingredients like finely chopped olives, peppers, roasted garlic cloves or garlic confit, or coarsely grated cheese, you can add up to 55 grams (20% by baker's percentage) during during the third set of folds when the dough is strong enough to support them. To do this, sprinkle the ingredients over the surface of the dough and do 4-6 stretch-and-folds to seal them inside.

Practical Tips and Recipe Notes
- An overnight rise: If you want to bake these ciabatta breadsticks the next day, you can pop the dough in the fridge immediately after finishing the coil folds. Shape and bake them the next day.
- Ambient temperature and dough rising: Room temperature is generally considered to be around 70°-72°F. If your dough is rising slowly and your kitchen is cold, find somewhere warmer to put your dough during the resting period. If your kitchen is very warm, your dough might be ready to cut into breadsticks after 30 minutes instead of 45 minutes! Pay attention to the dough and adjust as needed.
- A note on oven temperature: Most ovens do not run true to temperature! In my past three apartments my ovens were off from anywhere to 50° to 20° and all of them would tell me they were at the right temperature 15 minutes before they actually were. Baking at the right temperature is crucial. Use an oven thermometer to make sure your oven is accurate!
- If the dough seems too wet, my first piece of advice is to just keep going with the recipe. This is a wet dough and many of my recipe testers told me they thought their dough was too wet when it was actually just right. If your dough is SO wet that on the second set of folds it doesn't feel any stronger and is tearing in half every time you try to lift it, then you can dust in a tiny amount of flour. But really try to avoid adding in more flour during the folding stage unless you absolutely need to.
💭 Have More Baking Questions?
I've rounded up answers to common baking questions and how-to guides, including:
- Ingredient swaps and FAQs
- Why my recipes are written in grams and not cups
- How to quickly bring eggs and butter to room temperature
- Ingredients I use (salt, flour, yeast, etc.)
- Step-by-step guides for bread and baking techniques
See my baking techniques & troubleshooting guide and ingredient swaps and FAQs for more!


TL;DR — Recipe Summary
- Stir dry ingredients, add wet ingredients, and mix to form a sticky dough.
- Cover and rest for 1 hour with coil folds every 15 minutes.
- Cover and rest for 45 minutes undisturbed.
- Turn the dough out, dust the top with flour, stretch and cut into ½-inch strips. Twist them and place on a parchment lined baking sheet.
- Bake for 11-13 minutes at 450°F until light golden brown. Bake for 14-16 minutes for crispier breadsticks.
📖 Recipe
Quick & Easy Twisted Ciabatta Breadsticks For Dipping
Recipe Notes
- Resist adding flour to the dough during the folding stages. If your dough is still tearing in half on the second set of folds, you can dust in a little as needed. This is a wet, sticky dough by design — use damp or lightly oiled hands to keep it from sticking to you instead.
- Measure by weight for best results.
- If using active dry yeast, increase to 4 grams. Mix the yeast into the warm water before adding it to the dough.
- Ciabatta breadsticks are best within 24-48 hours of baking. Store them in an airtight container or plastic bag at room temperature with a paper towel in it to absorb moisture. As always, do not refrigerate bread. They will begin to lose their airy texture after about 2 days, but can be easily revived by toasting them lightly or popping it in a 350°F oven for a few minutes.
- These ciabatta breadsticks freeze beautifully. I usually just toss them in a plastic bag and freeze them, but if you want to do it "right" and avoid freezer burn, bundle them in plastic wrap before putting them in a bag in the freezer. To reheat ciabatta breadsticks from frozen, place them on a sheet pan in a 350°F oven for about 5-7 minutes. No need to defrost them first.
Ingredients
- 275 grams all purpose flour (plus more for dusting during shaping)
- 8 grams diamond crystal kosher salt
- 3 grams instant yeast (1 teaspoon)
- 220 grams warm water (80°F)
- 16 grams extra virgin olive oil
Instructions
- Mix. In a large bowl, whisk together flour, salt, and instant yeast. Make a well in the middle of the dry ingredients; pour the warm water and olive oil into it. Mix the dough until it comes together in a messy ball with no dry patches of flour hiding inside. Scrape down the walls of the bowl, gathering the dough together.
- Bulk Fermentation. Cover the bowl and let the dough rest for 1 hour, with folds every 15 minutes. Then let the dough rest for 45 minutes.
- Towards the end of the 45 minutes, preheat the oven to 450°F. Line a sheet pan with parchment paper and set it aside.
- Stretch. Dust your counter well with flour, then dust the top of the dough with flour too. Tip the dough out of the bowl and onto the counter. Dust the top side of the dough with flour and use flat fingers with gentle pressure to stretch and smooth the dough into a rectangle approximately 10" tall and 15" wide. Use a bench scraper to get more flour underneath and lift the dough to stretch it if it's sticking.
- Cut. Dust the sticky top side of the dough lightly with flour again. Cut the dough into one inch strips (you should get about 10 of them!). Cut in in an up and down motion so the dough doesn't stick to your blade. Dust in more flour or wipe the blade as needed to prevent sticking.
- Twist. Twist each dough strip on the counter by rolling each end in opposite directions. Use gentle pressure to avoid flattening them. Transfer the breadsticks to the parchment lined sheet pan. TIP: Support each breadstick from the middle when you lift or move them so they don't stretch out!
- Bake for 11-13 minutes for soft breadsticks or 14-16 minutes for crispy breadsticks. They will be lightly golden brown in the spaces between the floury stripes. Even soft-baked ciabatta breadsticks will seem very hard and crusty when they first come out of the oven, but they will soften as they cool
Dan Donovan says
Excellent my first try! Added some finely diced rosemary and quite pleased. Shared, along with your dipping sauce, at a neighborhood cookout to rave reviews - I shared credit with you. Thank you.
another good, easy to follow recipe. Good bread doesn't have to be intimidating .
Kristi P says
I have made these multiple times with the seasoned olive oil dip, they are both amazing! Both super easy and delicious recipes!
Holly says
Fantastic recipe. I made this after first making the small batch, then big batch, and now breadsticks. So easy, you don’t even need to break out the stand mixer. I used active dry yeast and missed the note last time about mixing it with water instead of dry, but got it on these. Breadsticks were a hit and perfect dippers for creamy vegetable soup.
Crystal Torres says
Made them for Easter!! They were easy to make and a hit with the family!! Will definitely make again
Rebecca Eisenberg says
Oh I'm so glad you enjoyed them! Happy Easter!
Megan says
I love these, and so fun to make! Made them for a basketball watch party and they were a huge hit
Alina says
Im a bread addict and im not ashamed to say it..theese are..just WOW.... Brushed half of them( right of the oven while hot) with garlic butter and sprinkeled grated parmesan , had the rest with a olive oil dip..Thank You.
Rebecca Eisenberg says
Ooooh brushing with garlic butter and grated parmesan is such a smart move! Glad you liked them!
PattyT says
These are phenomenal! Woke up with just an idea - by noon, a tray of golden delicious breadsticks. So well explained with pictures and tips.
I should have known they'd be good because I already use your recipes for soft ciabatta, and brioche burger buns.
THANK YOU!
Already planning a second batch using an overnight fridge rise.
Julie says
Made this recipe exactly as written, they turned out the same as the picture and were very tasty indeed.
Danuse says
Yes you are the best!!! I finally enjoyed baking breads! As European (in Florida) I love how easy, simple and good they are. New subscriber here !!!
Danuse says
OMG making them 4th time today! My family favorite.
Rebecca Eisenberg says
Thanks for being here! happy baking!
Lynda says
Can I use the dough strips to make a braided loaf instead of bread sticks?
Rebecca Eisenberg says
Absolutely! It might change the bake time slightly but it should work. Let me know how it turns out!
Carol says
Made these for the first time today. Won’t be the last time! Easy and tasty!