
First of all, let me just say: these Chex Mix chicken tenders are NOT a gimmick. They are A+ top of the line juicy, tender, crunchy, crisp, super flavorful chicken tenders. They just also happen to taste like Chex Mix, thanks to my simple DIY Chex Mix seasoning blend.

About This Recipe
During early pandemic lockdowns, my husband got really into making Homemade Chex Mix. He made a half a dozen or so huge batches of it. He perfected the art. Some people got into sourdough recipes. He got into Chex Mix. I certainly was not complaining. In fact, I joined his fervor and ended up making a recipe for Chex Mix popcorn.
Then we started wondering what else we could Chex Mix. That's right, "Chex Mix" is a verb now.
Chex Mix seasoning is simple: Worcestershire sauce, seasoned salt, onion powder, garlic powder, and that's pretty much it . It's great on pretzels and bagel chips and corn/rice cereal sure, but those flavors are just as easily adapted for use on savory non-snack foods like chicken.
Knowing that corn flakes are often used to help add crunch to fried chicken, we decided that using a breading of crushed Chex cereal was the way to go. But we didn't just want Chex-crusted chicken tenders. We wanted Chex Mix chicken tenders.
We also didn't want these Chex Mix chicken tenders to be a gimmick. It would be easy to crush or grind up some Chex Mix and use it as breading and call it a day.
That's not what we were after. We wanted high quality, well-made, juicy, crispy, tender, flavorful, crunchy A+ top of the line chicken tenders. Chicken tenders that were so good they were worth the effort. So that's what we set out to make.

"But Rebeccaaaaa, what do they taste like?" If no one told you these were Chex Mix chicken tenders, I'm not sure you'd bite in and immediately go, "Egads my dear, these chicken tenders taste of Chex Mix!" (You do say "egads," right?). And this makes sense; as previously noted, Chex Mix flavors are ridiculously common in savory cooking.
You're far more likely to bite in and have a niggling feeling that there's some familiar flavor combo happening that you have great affection for, but can't quite place.
The great secret of Chex Mix is that the Worcestershire sauce is what ties it all together. And when you dunk these in the Worcestershire-and-mayo dipping sauce, that familiar combination of flavors is undeniably Chex Mix.
Like I said. These Chex Mix chicken tenders are not a gimmick. They're really good, super crispy, juicy and flavorful chicken tenders. They just happen to get their flavor profile from the same seasonings that make Chex Mix one of the all-time greatest snack foods.
Notes from Recipe Testing
The best fried chicken we've ever made came from J. Kenji Lopez-Alt's The Food Lab cookbook.
His recipe calls for soaking the chicken in a buttermilk brine prior to breading and frying to keep the chicken juicy. So we whipped up a buttermilk brine infused with Worcestershire sauce and a blend of Chex Mix seasonings and let our chicken tenders soak for several hours.
Every single layer of flavor added to these chicken tenders is infused with Chex Mix seasoning, from the brine to the breading, to the dipping sauce.
Once brined, the chicken tenders are double-breaded in a mixture of crushed Chex cereal, flour, and corn starch mixed with seasoned salt, onion and garlic powders, and paprika.

Instead of deep frying, we used our 10" Lodge cast iron (frying is one of the best ways to season a cast iron!) and did a shallow fry in an inch or two of canola oil.
Because these are boneless fried chicken tenders, they only take about 3-4 minutes per side.
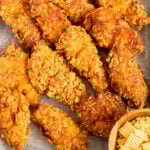
They came out so gorgeously crispy and crunchy and perfectly golden brown. And the geometric patterns from the crushed Chex cereal in the breading are just really fun, if I do say so myself.

Ingredient Notes
Here's the ingredients you'll need to make these Chex Mix chicken tenders! See the recipe card at the end of the post for quantities.

- Chicken - I use boneless, skinless chicken breasts for this recipe, but you could also use pre-cut chicken tenders, they just have a tendon in them which can be tricky to remove.
- Corn Chex - I find that corn Chex give a better crispy texture than the wheat Chex do.
- Buttermilk - To brine the chicken tenders.
- All Purpose Flour - This is used as part of the dredging mixture on the outside of the chicken tenders.
- Corn Starch - A bit of corn starch in with the dredging mixture helps the fried chicken tenders brown and get crispier than they would if you just used flour.
- Egg - Adding an egg to the brine allows it to be used in the dredging process later — the egg helps the dredging mixture stick to the chicken before frying.
- Worcestershire Sauce - The secret ingredient in Chex Mix! Don't skip this step or it won't taste like Chex Mix.
- Chex Mix Seasoning - Officially, "Original" Chex Mix seasoning is just seasoned salt, garlic powder, and onion powder. But I like to add a few extra spices to make a blend more reminiscent of "Bold" Chex Mix seasoning — smoked paprika, a pinch of cayenne, black pepper, and MSG. MSG is the secret ingredient in "Bold" Chex Mix and it gives these chicken tenders an unforgettable, undeniably Chex Mix flavor.
MSG? Really? Yep! Don't be scared of MSG (monosodium glutamate). It's a naturally occurring amino acid that is a wonderful low-sodium flavor enhancer. MSG has been the victim of a decades-long xenophobic smear campaign and it's time to turn that reputation around. For more on this, check out the work being done by Know MSG.
Seasoning & Brining
The first step is to make the Chex Mix seasoning. You'll use about half of it in the brine, and then the other half of it in the dredging mixture later on.
Mix the seasoned salt, garlic powder, onion powder, smoked paprika, cayenne (if using), black pepper, and MSG together in a small bowl or jar and set it aside.

Next, it's time to cut the chicken into pieces and brine them in the fridge. It's up to you how big or small you want your Chex Mix chicken tenders to be.
Aim for around 1 inch thick strips, and just remember that smaller pieces will cook faster later on.

Combine buttermilk, egg, Worcestershire sauce, and 2 tablespoons Chex Mix seasoning in a large resealable gallon bag.

Add the chicken tenders, seal the bag tightly, and shake it around until they're evenly coated. Refrigerate for 3 to 8 hours.
This brining process is crucial for making fried chicken tenders that are juicy and tender inside.
"Buttermilk’s most obvious benefit is in tenderizing meat. When used in meat marinades and brines, acids denature and unravel protein networks, which then reconnect, trapping water along the way and effectively giving you, along with salt, a one-two punch of moisture retention."
— Southern Kitchen
Letting the chicken sit in this Chex Mix buttermilk mixture gives the seasoning plenty of time to penetrate deep into the chicken, too.
Breading & Frying
Once brined, it's time to bread and fry our Chex Mix chicken tenders.
We tested a few different methods for breading the chicken to make sure the lovely golden brown crispy bits stay put when you bite in. Letting the breaded chicken tenders rest for 10 minutes before frying them is the key to preventing breading slippage. (Is that a term? It is now.)
Crush the Chex into pieces using a rolling pin or the bottom of a measuring cup.

Then, set up your breading station — you'll need two shallow bowls or baking dishes that you can use for dipping the chicken pieces in the liquid and dry mixtures. I use small rimmed eighth sheet pans, but round or square cake pans or shallow pasta bowls will also work.
- In one of the bowls, whisk together the flour, corn starch, crushed Chex cereal, and the remaining 2 tablespoons of Chex Mix seasoning.
- Into the other bowl or pan, open a corner of the bag with the chicken tenders and pour in as much of the excess brine as you can.
To make sure the Worcestershire flavor isn't left behind in the dredging (breading) process, you're going to use that leftover brine from the bag as the liquid to get the dry crunchy breading to stick to the chicken tenders.
Usually you'd use beaten eggs, but since there's an egg in the buttermilk brine, it works just fine.
TIP: Use one hand when handling the chicken in the dry ingredients and the other hand when handling the chicken in the wet ingredients. That way the flour won't stick to your fingers as you move the chicken tenders between pans. If you really don't like the feeling of flour fingers, you can use a fork to handle the chicken for these steps.

Pat the chicken tenders dry so the flour can stick to them. Use your wet hand to place the chicken tender in the dredging mixture and press it flat, then use your dry hand to scoop some of the dry mixture on top.
Flip the chicken tender over and use your dry hand to press it flat so it's coated on both sides.

Use your dry hand to pick the chicken tender up and place it in the liquid brining mixture.
Then use your wet hand to flip it over so it's coated on both sides.
Don't let it hang out too long in the wet mixture, you don't want the flour to absorb too much.

Coat the chicken tender in a second layer of the dry breading mixture.
After the first dip in the dry breading mixture, the chicken tender will only have a thin layer of flour and corn starch clinging to it. It's on this second dip that it will pick up pieces of the crushed Chex cereal too.

Arrange the breaded chicken pieces on a sheet pan or cutting board and let them rest for 10 minutes before frying.
This resting period gives the flour a chance to absorb more of the liquid brine and allows the breading to stick to the chicken tenders so it doesn't go sliding off when you bite in.
While the chicken tenders are resting, fill a cast iron skillet with about 1 inch of neutral oil (peanut oil, canola oil, vegetable oil, etc.) and begin heating it over medium heat.
Don't fill your pan too high — the level will rise when you add the chicken tenders and you don't want it to bubble over.
If you have an instant read thermometer, you're aiming for a temp of around 350°F. The temperature will drop each time you add a new batch of chicken, so you'll want to check the oil temp periodically and adjust as needed to try to maintain that temp.
If you don't have an instant read thermometer, you can use a chopstick or wooden spoon to at least check when the oil is ready for the first batch. Wood is naturally porous and always has some water trapped in it. Dip the end of the chopstick in the oil. If you see lots of rapid, vigorous bubbling around the tip, the oil is ready for frying.

Fry the chicken tenders in batches of 4-6, depending on how many can fit in your pan at once. Don't overcrowd the pan.
To prevent hot oil from splashing on you, hold the chicken tender vertically and gently lower it in away from you, so the top part is facing away from your body when you let go.
Fry them for 3-4 minutes per side, adjusting the temperature of the oil as needed if they're browning too fast or too slow.
If you're using an instant read thermometer, the chicken tenders can be removed from the oil when they reach 160°-165°F. The safe temperature for chicken is 165°F, but there will be some carryover cooking as they rest.

Remove the chicken tenders to a sheet pan lined with paper towels and a cooling rack. You'll want to pat them dry with a paper towel or flip them at least once as they rest to prevent oil pooling on top.
That's it, that's how you make Chex Mix chicken tenders! Let them cool just a bit before eating so you don't burn yourself. Otherwise go ahead and dig in!
Deep Frying Tips for Beginners
- Use a sturdy, heavy bottom pot for your frying. I use my 10.25" Lodge cast iron pan, but any cast iron pan will work well. Stainless steel pans will also work, though they don't retain heat quite as well as cast iron does.
- For frying chicken you want your oil around 350°F. It can be a bit hard to measure this in a shallow pan, but if you have an instant read thermometer, check the oil periodically and adjust your burners as needed. Every time you add new chicken the temperature will drop slightly, so just keep checking and adjusting so the breading doesn't burn.
- DON'T WALK AWAY! Hot oil looks a lot like cold oil, it doesn't start bubbling and boiling like water does. It will start bubbling once you add the chicken tenders. You might need a higher burner temp than you think to get it to the right temp, but once it's at temp you'll likely only need the burner on low-to-medium to maintain the right heat while frying.
- Use metal tongs or slotted spoon to transfer your food in and out of the hot oil without splashing yourself.
- Dispose of your oil properly — don't pour it down the drain. Use a funnel to transfer the oil (once cool) back to the bottle it came in, then throw out the sealed container. There are great tips for how to reuse oil to reduce waste here.

Lodge 10.25" Cast Iron Skillet
A 10.25" raw cast iron pan ideal for searing and frying that will last you a lifetime. Did you know frying food is one of the best ways to season your cast iron pans?
Practical Tips & Recipe Notes
- There is an egg in the binding mixture — instead of adding a third breading station for dipping the tenders in beaten egg AND the reserved brine, we simply mixed an egg right into the brine.
- Black pepper is not usually part of my homemade DIY Chex Mix seasoning blend, but since you'd normally season chicken with salt and pepper before cooking it, it made sense to just add it to the Chex Mix blend.
- When you bread the chicken in the dry and wet mixtures, use the "wet hand" and "dry hand" method so you don't end up with clumps of breading stuck to your hands. Use one hand to handle the chicken tenders in the wet mixture and the other hand to handle the chicken tenders in the dry mixture.
- Make sure the tenders are fully and thoroughly coated in the dry mixture. Press it firmly into the flour and crushed Chex on all sides. The first time you bread it, the chicken will likely only pick up the finer dry ingredients. Once it's taken a quick dip in the reserved brine the crushed Chex will cling a lot better during the second bread.
📖 Recipe
Chex Mix Chicken Tenders
Recipe Notes
- The 10 minute resting time is crucial for making sure the breading sticks to the chicken tenders post frying. If you skip this step you'll end up with breading that slides off the chicken when you bite in.
- The amount of oil you need depends on how big your skillet is!
- Make sure you dispose of the oil properly — use a funnel to pour the cooled oil into a large bottle and throw it away. Don't pour it down your sink.
Ingredients
- 2 lbs chicken breast (cut into 2" strips)
- 1½ quarts vegetable oil (or peanut oil, for frying)
Chex Mix Seasoning Blend
- 1½ tablespoons seasoned salt
- 2 teaspoons garlic powder
- 1½ teaspoons onion powder
- 1½ teaspoons smoked paprika
- ½ teaspoon cayenne (or red chile powder, optional)
- ½ teaspoon black pepper
- ½ teaspoon MSG
Buttermilk Brine
- 1 cup buttermilk
- 1 large egg
- 2 tablespoons Worcestershire sauce
- 2 tablespoons Chex Mix seasoning blend
Breading Mixture
- 1 cup flour
- ⅓ cup corn starch
- 1 cup crushed Chex corn cereal (2 cups whole Chex)
- 2 tablespoons Chex Mix seasoning blend
Dipping sauce
- ⅓ cup mayonnaise
- 2 tablespoon Worcestershire sauce
- ½ teaspoon sriracha
Instructions
Brine the chicken
- Cut the chicken into 1-2" strips. You should get about 6-7 strips from each chicken breast, and may end up with some awkwardly shaped strips. That's okay!
- Combine all the ingredients for the brine in a large gallon resealable bag.
- Add the chicken to the brine in the bag. Press out any air, and squeeze the chicken around so it's all evenly coated.
- Chill in the fridge for a minimum of 3 hours but no more than 8 hours.
Breading
- Scoop plain Chex cereal into a bag, seal tightly, and crush the Chex into pieces. Combine crushed Chex, flour, corn starch, and 2 tablespoons remaining Chex Mix seasoning blend in a wide, shallow bowl.
- Unseal one corner of the bag with the chicken and brine and pour the brine into a second wide, shallow bowl. Get as much of the liquid out as you can.
- Unseal and roll the top of the bag down. Pick one hand to be your "wet" hand and one hand to be your "dry" hand. (I find it's easiest to use my dominant hand as my "dry" hand and my non-dominant hand as my "wet" hand).
- Working with no more than 3 chicken strips at a time, pat the chicken dry with a paper towel. Then use your dry hand to lay it flat in the breading mixture and push some of the flour and Chex on top of it. Flip it over and press it flat in the breading mixture again. Make sure all sides are fully coated.
- Use your dry hand to pick the chicken strip up out of the flour and lay it down in the dish with the excess brine, being careful not to let your fingers touch the liquid. Then, use your wet hand to flip the chicken strip over and make sure it's fully coated, then pick it up, letting any excess liquid drip off, and lay it back in the breading.
- Use your dry hand to flip the tender over, pressing it into the dry mixture so that it's fully coated on all sides. Remove from the breading mixture to the cutting board and let rest for 10 minutes. Repeat until all chicken strips have been breaded and rested for 10 minutes.
Frying
- While the chicken tenders rest, begin heating about 1½" of vegetable oil in a large cast iron skillet over low-medium heat. Make sure to leave plenty of room for the oil to bubble up. Set up a cutting board to put your breaded chicken tenders on to rest before frying. Line a sheet pan with paper towels and a cooling rack. Set it aside near the stove.
- When the oil hits 350°F it's ready for frying. If you don't have a thermometer, dip the end of a wooden chopstick or wooden spoon in the oil — if you see lots of vigorous bubbles around it, the oil is ready.
- Work in batches to fry the chicken strips for 3-4 minutes per side (or until 160°-165°F internal temperature). Add more oil and adjust the temperature if needed between batches; there should be enough oil that it comes about halfway up the strips when they're laying flat in the skillet or submerges them completely.Remove the strips to the cooling rack and repeat until all the strips have been fried.
Dipping Sauce
- Combine mayonnaise, Worcestershire sauce, and Sriracha in a small bowl. Adjust proportions to taste.
Meghan O'Keefe says
This looks AMAZING.
knutaf says
I made these the other day and as the recipe states, they were absolutely delicious. I dropped a few notes on Twitter, but reposting them here by request.
Rebecca says
Thanks so much for sharing these tips for anyone who wants to try this recipe in the future! I'm glad you enjoyed the chicken tenders!
Brina says
A great fried chicken recipe, though I did run out of dredging mixture and brine. I recommend doubling both, since the ingredients are low cost enough that it won't be big stress or waste to do so. The flavors were wonderful!
Rebecca says
So glad you enjoyed!!
Ken says
Canola oil? MSG……. Yeah, Doritos and Mountain Dew both taste good too
Rebecca Eisenberg says
Tell me you don't like delicious food without telling me you don't like delicious food... (ps — this blog is a diet talk-free, and food shame-free zone so get outta here with your weird moralizing judgments about food). No one is forcing you to make this recipe. If it doesn't sound good to you, go find a different recipe.
Karen Cz says
These were absolutely phenomenal. Thanks for the recipe.