Learning how to make brown butter is a simple technique that will help you take your favorite recipes to the next level.

Brown butter is butter in which the milk solids separate and become browned or toasted. In cooking and baking this process of browning is called the Maillard reaction (although Modernist Cuisine is careful to note: "The important thing about the Maillard reaction isn’t the color, it’s the flavors and aromas. Indeed, it should be called 'the flavor reaction,' not the 'browning reaction.'").
The Maillard reaction is the same chemical reaction that happens when you sear steaks, fry chicken, and even when you make bread. You're basically cooking the milk solids in the butter until they turn brown.
In its melted state, butter that has been browned is a bright, golden yellow liquid with swirls of brown milk solid particles. When it softens to room temperature or even hardens to a solid in the fridge, it has a light brown color with flecks of dark brown milk solid particles.

Why use brown butter?
It's impossible not to love the nutty, toasted flavor and aroma of browned butter. It seriously smells amazing. It can be used exactly the same way you use regular butter in a recipe, only it adds more rich and complex flavors than plain butter does.
Brown butter is often used as a way to intensify the flavors in baked goods — adding a delicious nutty, buttery-ness to whatever you're making. The nutty, caramelized flavor pairs perfectly with the sweetness of the apple cider in my brown butter apple cider pound cake, for example.
You can also use it in brown butter pasta sauces, to butter popcorn (stick the popcorn in the oven at 250°F for 5 minutes after tossing it with the butter so it doesn't get soggy), with fish or vegetables, and so much more.
If you're new to brown butter, start with your favorite chocolate chunk cookie or pancake recipe and just swap the plain butter for browned.
If you're new to baking, start by adding it a boxed cake mix or the back-of-the-bag recipe on your fave brand of chocolate chips.
If you prefer savory dishes, try making this apple sage brown butter pasta with walnuts. Or use brown butter to make brown butter noodles with parmesan cheese; it's a childhood fave made a little fancier with just one extra step.

How to make brown butter
![[gif] melt squares of butter in shallow skillet](https://thepracticalkitchen.com/wp-content/uploads/2020/07/how_to_brown_butter_1.gif)
![[gif] keep stirring butter as it bubbles and the water boils away](https://thepracticalkitchen.com/wp-content/uploads/2020/07/how_to_brown_butter_2.gif)
![[gif] stir to move the bubbles out of the way and see the bowl milk particles on the bottom](https://thepracticalkitchen.com/wp-content/uploads/2020/07/how_to_brown_butter_3.gif)
![[gif] pour browned butter into heat safe container](https://thepracticalkitchen.com/wp-content/uploads/2020/07/how_to_brown_butter_4.gif)
Brown Butter Practical Tips & Recipe Notes
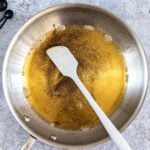
- Use a skillet with a white or light colored bottom so that you can clearly see when the milk solids begin to brown. If you use a dark non-stick pan the particles are harder to see through the bubbles and you risk burning them.
- It only takes about 5 minutes to make, and once you see the milk solids turning brown it's up to you how dark you want them. For lighter, more subtle flavors, pull the skillet off the heat as soon as you see those brown particles forming. For a darker, more intense flavor leave the pan on the heat a little longer. Of course, you'll want to make sure it doesn't burn. Don't stop stirring and don't walk away!
- Take the skillet off the heat a few seconds before the butter reaches the level of brownness you want. Even once you pull the skillet off the direct heat there is still residual heat on the bottom that will continue browning the butter. Make sure you have a heat-safe container or measuring cup standing by so you can pour the hot butter out of the skillet ASAP and stop the Maillard reaction in its tracks.
- For every ½ cup (8 tablespoon / 113g) of butter you brown you'll lose about 1 tablespoon (14g) of water content to evaporation. So if a recipe calls for 8 tablespoon butter and you want to use brown butter, you can add 1 tablespoon additional liquid to the recipe. OR you can make more brown butter than you need and just measure the right amount. When I'm feeling lazy I usually just add an extra 1-2 tablespoon of plain butter to the skillet for each ½ cup the recipe calls for. It's not super precise, but it gets the job done.
- If you think you might be using it a lot, make a big batch all at once. Store it in an airtight container in the fridge just like you would regular butter and you'll always have it on hand when you need it.
- If you're not planning to use it all at once, stir the butter a few times as it cools to room temperature and solidifies. The milk fat particles weigh more than the butter and will sink to the bottom of your container otherwise. And once the butter chills back to solid, good luck stirring!
- Make sure you plan enough extra time in a recipe for the butter to cool when adapting a recipe to use it. If it calls for solid butter, you'll want to make the browned butter at least an hour before you plan to use it to give it time to chill solid in the fridge.

📖 Recipe
how to make brown butter
Ingredients
- 8 tablespoon unsalted butter (½ cup or 1 stick)
Instructions
- Get out whichever heat-safe container you plan to transfer the brown butter to when it's done and set it next to the stove.
- Cut the stick of butter into chunks so that it melts evenly.
- Heat a skillet with stainless steel or light colored surface over medium heat. Don't wait for the skillet to get hot, add the chunks of butter immediately and stir them as they melt.
- Continue stirring as the butter melts and the water content begins to boil away. The butter will boil vigorously and the entire surface will become covered in bubbles. Keep stirring!
- Use the spatula to push the bubbles out of the way as you stir so you can see the butter particles dancing and swirling on the bottom of the skillet. When they start to brown it's up to you how dark you want the to get.
- For light brown butter, pull the skillet off the heat as soon as you see the slightest hint of brown. For dark brown butter, keep the skillet on the heat, stirring constantly, as the milk far particles take on a darker color.
- A few seconds before the butter reaches your desired level of darkness, pull the skillet off the heat and immediately transfer the butter into the heat-proof container you set aside in step 1.
- Stir the brown butter a few times as it cools to evenly distribute the milk fat particles. To chill the butter to solid, place it in the fridge for at least an hour. Stir several times in the first 20-30 minutes.
- Store like you would regular butter, in an airtight container in the fridge. Use in place of regular butter in any recipe.
Comments
No Comments