
Get ready to learn how to make creamy and fresh goat cheese at home. This detailed guide is full of tips and tricks, a list of tools, how-tos (and several don’t dos!) to help you successfully make homemade goat cheese using just 4 ingredients!
This creamy DIY goat cheese recipe is 100% worth the effort, and perfect for spreading on crispy crackers, homemade bread, or for crumbling over salads and more!

This post is your chance to learn from my mistakes: Don't buy a goat cheese-making kit when it's easier and cheaper to buy the ingredients and make your own goat cheese yourself. But what ingredients? And which tools? I've got you covered.
My Goat Cheese Struggle
The first time I made my own goat cheese it was a Disaster. Capital-D. I bought a kit from a now-defunct flash sale site, and it had been gathering dust in my pantry for almost 4 years.
But when I finally decided to make it, literally everything about the simple instructions (just 4 ingredients!!!!) felt impossible.
This was before I went to pastry school and long before I started developing recipes of my own. But I'm still annoyed by how poorly designed this goat cheese kit recipe was.
The gallon of goat milk was too big for my pot, the towel the kit came with was too small. I don't know how the recipe expected me to use my only two human hands to simultaneously tie a towel into a bag to strain the cheese while pouring it, and the little container the kit came with held a mere 6 ounces of finished cheese even though the recipe made a whopping 32 ounces.
And there, folks, is the reason I did not give up on making my own goat cheese.
I wanted ounces and ounces of homemade, fresh, creamy goats milk cheese.

Logs of goat cheese at the store can be expensive for the amount of cheese you get, which comes in that annoying plastic packaging that makes using every last bit a challenge.
So I took another look at the recipe trying to figure out just where I'd gone wrong.
My issues, it turned out, were entirely proportional. As in, related to the ridiculous proportions the recipe the kit came with had me use. There was no need to start with a gallon of goat milk.
The comically small towel and container the kit provided me with were in no way up to the task of producing the accompanying recipe. The "cheese salt" the kit came with? Regular kosher salt. The citric acid? You can buy it at most grocery stores or online.
The kit made everything so much harder than it needed to be.
So when I make goat cheese, I use a bigger dish towel, and a colander-over-a-bucket system for straining, and — most crucially — I cut the original recipe in half. It works beautifully.
And now, you too, will be able to transform a half-gallon of goat milk (~$10) into a completely reasonable 12-13 oz of creamy, delicious, homemade goat cheese.
Ingredient Notes
Here are the four ingredients you need when making goat cheese from goat milk. See recipe card (at the end) for quantities.

Goat Milk - This purple carton Meyenberg brand is the goat cheese I've most reliably been able to find in my grocery store. Even though most cheesemaking recipes recommend against using an ultra-pasteurized milk, it has reliably worked for me when making goat cheese from goat milk.
Citric Acid - The key ingredient that will encourage the goat milk to separate into curds and whey. Usually found with the canning supplies, though it can also sometimes be found near the instant pudding/jello mixes, spice aisle, or baking aisle. You can also order it online.
Flavorings (optional) - Any flavorings you'd like to add! Herbs, honey, garlic, jam, nuts, etc. You can mix them into the goat cheese or turn this into a goat cheese log recipe by rolling the goat cheese in them.
Can you use cow's milk to make goat cheese? Nope! If you want to use cow's milk, try making my homemade cream cheese instead. The process is very similar to what you see here, and a bit faster, too.
I'm partial to adding in a bit of honey to my goat cheese — I don't measure, I just add, mix, taste, and repeat until I'm satisfied. You can mix herbs, fruit, jam, nuts, seeds, or even balsamic vinegar right into the goat cheese.
- To get a swirly ribbon of honey, jam, or balsamic, put a layer of cheese down, then drizzle your preferred sauce on top, then another layer of cheese to fully cover the sauce. You can layer it inside a container, or use your hands to gently roll the cheese into a log, keeping the sticky sauce or flavor on the inside as much as possible.
- If you're using dried herbs or seeds, you can mix them into the cheese before rolling, but for a fancy finishing touch, sprinkle some on a clean cutting board and roll your shaped log through it to create a pretty crust.
- If you add any seeds to your goat cheese (like everything bagel seasoning), they will absorb moisture and are best added no more than 24 hours before serving.
Use a Good, Reliable Thermometer
A clip-on candy thermometer works well for making cream cheese, but I usually end up using a more reliable Thermapen instant-read thermometer to double-check, just in case the candy thermometer is moving a bit slow.
You'll also need a 3-6 quart pot made from a non-reactive metal (basically not copper or aluminum) that can hold at least a ½ gallon of milk deep enough for your thermometer to work. I usually use a 3-quart cast-iron enamel dutch oven, but a stainless steel sauce pot works just as well and heats up faster, too.
A thin, linen flour sack-style dish towel (like these chef-favorite kitchen towels) is perfect for straining the cheese. Do not use a terrycloth or textured towel. Cheesecloth works if you layer it up, but I find it's a bit too fiddly and flimsy even when I layer it. You do you!
The colander should be big enough to hold a half-gallon of milk and comfortably sit inside the bucket, without touching the bottom. A large wire mesh strainer will also work.
Making Goat Cheese, Step-by-Step
Before you begin, let the goat milk sit out for 30 minutes to speed up the separation process. The colder the goat milk is at the start, the longer it will take to reach the right temperature.

Pour the goat milk into the pot over medium heat.

Mix together the water and citric acid, stirring to dissolve.

Keep stirring until the goat milk reaches 185°F. The temperature will fluctuate as the hotter liquid from the bottom is introduced to the cooler liquid from the top, so keep an eye on the thermometer.
Depending on the type of pot you're using or what kinds of burners you have, this could take anywhere from 15-30 minutes.
As the goat milk heats up, curds will begin form — stirring frequently helps break them up so that they don't solidify before you're ready.
When you hit 185°F, stop stirring, remove the pot from the heat and let it sit for 15 minutes. You should be able to see some yellow-y slivers of whey breaking up the curds.

You are now ready to strain the curds (the part you want to eat!) from the whey (the liquid you should save to use when making bread!).
While the goat milk is separating off heat, set up your straining station. The colander goes inside the bucket, the towel goes inside the colander.

If your colander doesn't have handles, use chip clips or bag clips to secure the towel to the outer rim.
Slowly pour the goat cheese into the towel inside the colander so you can adjust the towel if you need to.
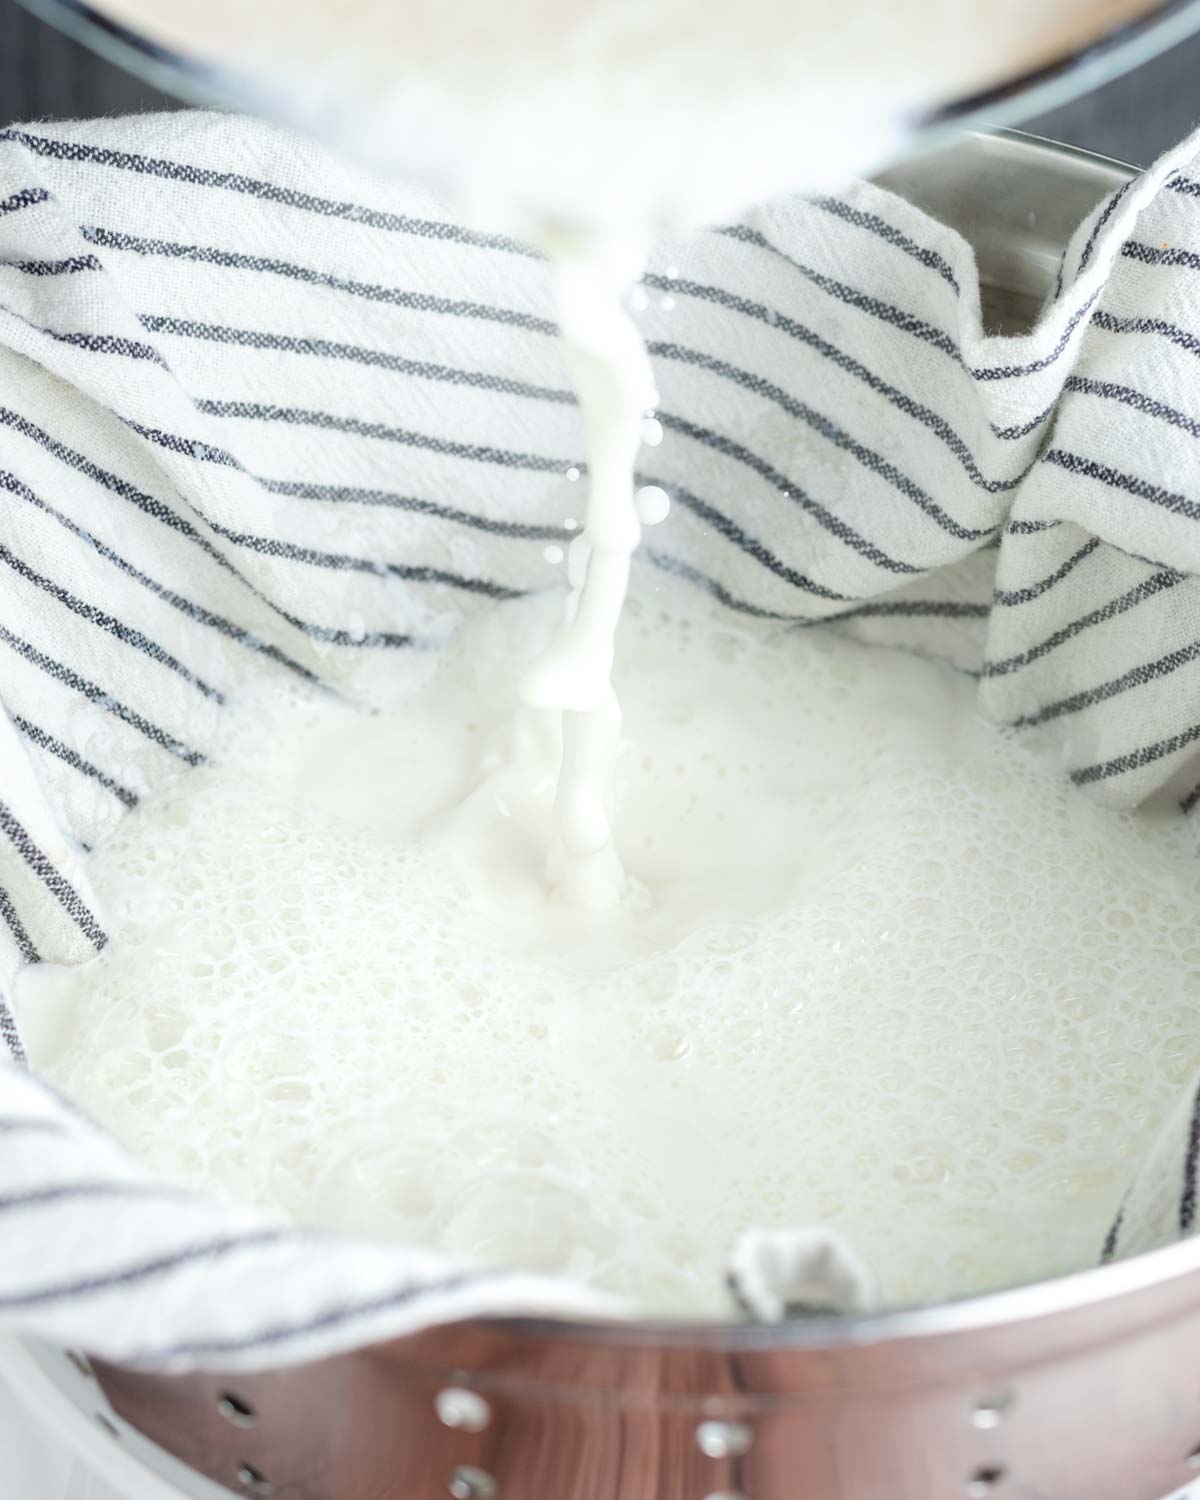
TIP: Pull the towel through the handles and either knot the edges or use the chip clips to hold it in place as best you can. Basically, just do your best to gather and tighten the top of the towel to create a bag shape so that the excess whey is pressed out.

After about an hour, scrape down the sides of the towel and gather the edges together.

Twist the towel so the cheese is gathered in a ball. Squeeze gently to press out extra whey.
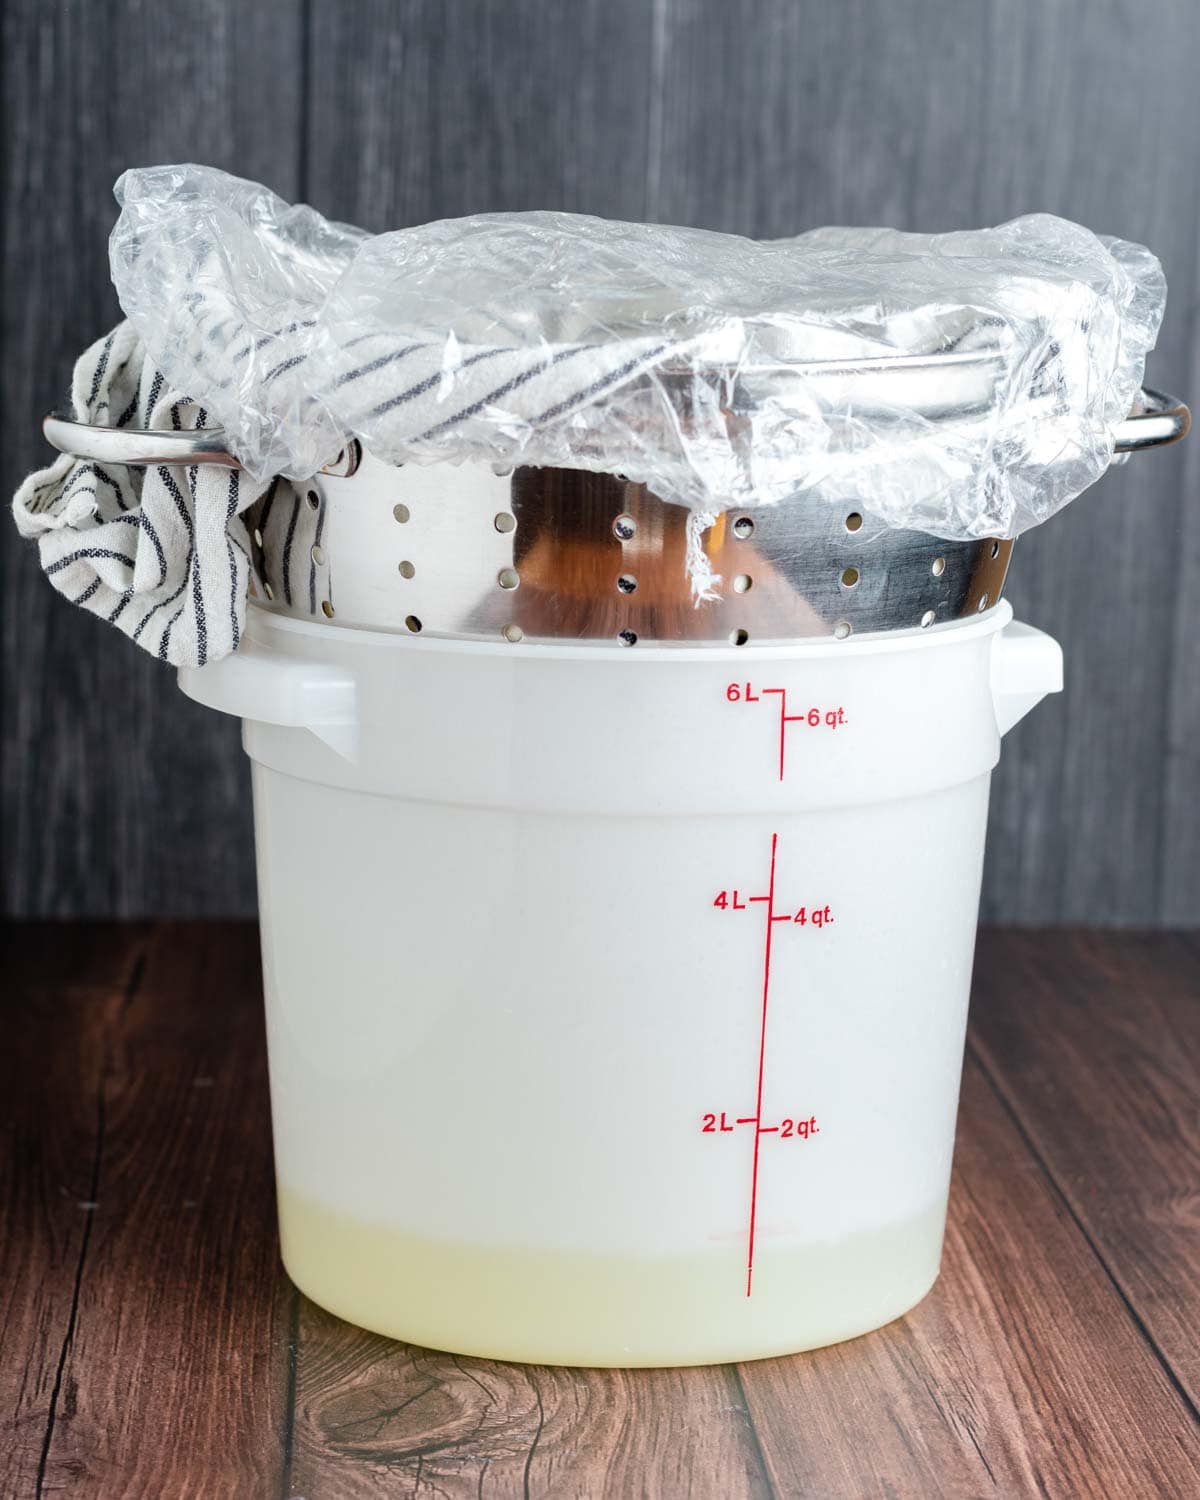
Thread the twisted end of the towel through the colander handle and let it continue straining that way, or clip the twisted towel to the edge of the colander to continue straining.
The longer you let the mixture strain, the firmer the goat cheese will be.
For a nice, spreadable cheese, strain for 2-4 hours. For a firmer goat's milk cheese that's easier to crumble, strain for 4-6 hours, or even up to 8. Squeeze the towel periodically to press out even more whey.
When the cheese is ready, scrape it out of the towel into a bowl. Add salt and any other flavors you want.

Rolling a Log of Goat Cheese is Fun and Fancy, Too!
To roll your homemade goat cheese into a log, you'll need to strain it for at least 6 hours. The more liquid you remove from the cheese, the firmer it will be and the easier it is to roll into a log.
To roll the goat cheese into a log, dollop it onto a cutting board and use clean hands to gently push and roll it until it forms a log. Don't press too hard, it will smear.
- If rolling it on a cutting board doesn't work, dollop the goat cheese onto a sheet of wax paper or plastic wrap and use that to help shape it into a log with less mess.
- Try chilling the goat cheese for 30 minutes before rolling it to give it a chance to firm up.
Wrap the goat cheese log in plastic wrap and twist the ends together tightly to store in the fridge. To slice goat cheese like a pro, freeze it for 5-10 minutes first.

BONUS: Using Whey to Make Bread
Save the whey when you strain the goat cheese curds! You can use whey instead of water (as a 1:1 replacement, no conversions needed) in any bread recipe to make that bread flavor really pop. It's hard to describe just what it does as a flavor, but it's like bread flavor, only... breadier. Bread squared.
I use it in my no knead dutch oven bread, rosemary parmesan bread, and cheddar jalapeno bread recipes all the time. Trust me — nothing is better than eating a slice of your own homemade whey bread, spread with goat cheese and topped with some sun-dried tomatoes, capers, bacon, or whatever other toppings you like.

📖 Recipe

How to Make Fresh Homemade Goat Cheese (Chèvre)
Recipe Notes
- Kept refrigerated, goat cheese will stay good for up to 3 weeks. Press plastic wrap against the surface of the cheese to keep it fresh.
- Goat cheese can be frozen in a log, wrapped in plastic inside a plastic bag, or in a container with a sheet of plastic wrap pressed against the surface for up to 6 months. Defrost overnight in the fridge.
- Goat cheese + homemade bagels is a winning combo.
Ingredients
- ½ gallon goat milk
- ¼ cup water
- 1 teaspoon citric acid (rounded tsp)
- 1 teaspoon diamond crystal kosher salt
Optional add-ins
- dried herbs
- honey
- sesame seeds
- ground nuts
- fruit jam
Instructions
- Combine citric acid and water in a measuring cup and stir to dissolve. Pour goat milk into large, non-reactive pot, with candy thermometer attached, over medium heat. Add water and citric acid mixture. Stir to combine.
- Continue stirring every few minutes until the mixture hits 185°F. This can take anywhere from 15-30 minutes, depending on your pot and burners.
- Meanwhile, set up your cheese-straining system. Line a large colander with a clean flour-sack dish cloth, and tuck the edges of the cloth through the handles of the colander. Put the colander inside of a 6 liter Cambro bucket. Optional: Use chip bag or binder clips to hold the towel in place.
- When the milk mixture reaches 185°F degrees, remove it from the heat, and let it stand for 15 minutes. It will begin to separate into curds and whey.
- Pour the goat milk into the towel-lined colander. If you have a smaller colander, you may need to pour in batches.
- Gather the towel tight through each handle of the colander to create as much of a taught, bag-like shape as you can, with the towel suspended inside the colander. Use the clips to hold the towel in place.
- After about an hour, scrape the goat cheese into the center of the towel in the colander. Gather the ends of the towel together and twist to form a bag with the goat cheese in it. Squeeze gently to express excess whey. Clip the bag to the side of the colander and let it continue straining. Periodically squeeze the bag to press out excess whey.
- For a creamy, spreadable goat cheese, let the mixture strain for 3-4 hours. For a firmer, more crumbly goat cheese that can be formed into a log, let the mixture strain for 5-6 hours, or even up to 8 hours.
- When the cheese has strained to your desired consistency, untwist the towel and scrape down the sides. Then transfer the cheese to a bowl.
- Add the salt to the cheese and mix to combine. Adjust salt to taste. If you’re making plain goat cheese, you’re done! Transfer the mixture to an air-tight container and refrigerate. If you’re adding flavors, mix them in now, then transfer to an air-tight container and refrigerate.
Goat Cheese Log Recipe
- Dollop the goat cheese onto a clean cutting board and gently push and roll it into a log shape. Don't apply too much pressure; use quick, decisive motions. If if is too sticky or messy to do this immediately, refrigerate the goat cheese for 30-60 minutes before rolling, or roll it using plastic wrap or wax paper.
Ruth says
So excited to try this!! Quick question - how exact does the ratio of milk:water:citric acid need to be? In Canada our milk comes in litres, so I’d need to buy two 1L cartons to get the 1.89L yield of a half gallon, and I’d love to just use both full cartons if possible rather than having 110ml left. Would be interested to hear your thoughts on what might work! Thanks!
Rebecca Eisenberg says
Unfortunately I haven’t tested this so I’m not sure! I would weigh one teaspoon of citric acid and then scale it up to be the right ratio to the goat milk. So if 1 teaspoon citric acid is 3 grams (I haven’t measured, I’m just estimating) and 1.89L goat milk weighs 1,968 grams, calculate the percentage increase by weight to go from 1.89L to 2L and then increase the citric acid by the same percentage! It’s a little complicated, but should work! Don’t worry about the precision of the sale measurement — that’s mostly just for flavor. You can start with 1 tsp and add more until it tastes how you like it. Hope this helps, good luck!
Ruth says
This is super helpful!!! Thank you for replying so quickly too! Will let you know how it goes 🙂
Kaitlin says
I’ve made this recipe twice! Thank you so much for all the detailed pictures I am a visual person and it helped to be able to follow along and see what you were saying. It has been a huge hit both times I’ve made it, and I am very excited to make more goat cheese to bring to family for Christmas ! Thank you for another amazing recipe
Rebecca Eisenberg says
The only thing better than making homemade goat cheese is when other people fall in love with making homemade goat cheese too! Hope your family enjoys it! Happy holidays!
karen marie says
"Vinegar or lemon can also be used in place of citric acid to encourage the curds and whey to separate when making cheese from goats milk. This is not one of those recipes."
That made me laugh.
As I'm a curious person, I googled goat cheese made with lemon juice to see what, if any, difference there is. Spruce Eats has you heat the goat milk, remove it from the heat, then add the lemon juice and wait for curds. Here you add the citric acid/water as the goat milk goes on the stove and everything is heated together, yes?
I love goat cheese.
Rebecca Eisenberg says
LOL I'm glad you found that funny. You're correct — this recipe you combine everything and heat it up together. Enjoy your cheese!
karen marie says
So weird that only today did I get notification of your reply.
Still haven't made goat cheese. Probably never will given I have a ready supply at an excellent price from Trader Joe's. I add it to all kinds of things. A couple tablespoons in mac and cheese is MWAH!
Dave says
Had a quart of TJ's goats mill expiring so decided to try your recipe. I also used lemon juice in place of citric acid, as I did not want to buy anything for the recipe and see how it come out. Will keep you posted. Thanks for the recipe!
Rebecca Eisenberg says
Do let me know how it turns out with the lemon juice! I'm so curious!
Agnes says
Do you mean you cannot use ultra pasteurized goat milk and lemon and/ or vinegar together to make goat cheese?
ie, it can be ultra pasteurized with citric acid, or pasteurized/ raw etc goats milk with lemon and/or vinegar- but there’s no way for ultra pasteurized goat milk plus lemon / vinegar to work ?
Rebecca Eisenberg says
I've only ever used ultrapasteurized goat milk with citric acid to make goat cheese. I've seen other recipes that use lemon or vinegar but I've never done it that way and I don't know the quantities you'd need. As I wrote, most cheesemakers don't recommend using ultrapasteurized goat milk to make goat cheese but it does work for me with the citric acid. If you try it with lemon or vingear, do let me know how it works! Good luck!
Izzy says
I tried this recipe using raw goats milk and it won't coagulate. Is there something different I need to do?
Rebecca Eisenberg says
I’ve never tried it with raw goat’s milk, so I’m not sure! I usually use an ultra pasteurized goat’s milk. You may need to use a recipe designed for raw milk.
Stephanie says
Unfortunately does not work with raw goats milk
Rebecca Eisenberg says
I'm sorry to hear that, thank you for sharing! I've never been able to find raw goats milk to test this.
Kelsey says
I used raw goats milk this evening and it worked fine; I was nervous about it not being pasteurized after reading comments but had no issue
Jess says
I second this—after the step where you let it strain for 1hr it was all dry and crumbly, all the moisture was gone.
Laurie says
I just made it with raw goats milk, and it's looking pretty good. 3 hours in.
Wick Lyons NY says
I just made recipe with raw goats milk, pressed on the curds to speed things up. Ended up much more like Ricotta than creamy goats cheese. Still good.
Rebecca Eisenberg says
Oh I'm so glad to hear it worked for you with raw goats milk (albeit with a slightly different texture)! I've never been able to find raw goat's milk to try it with. Happy cheese making!
Emily Foster says
Did not work with my raw goats milk. Very little curds.
Rebecca Eisenberg says
Thanks for giving it a try and reporting back! I've never been able to get my hands on raw goats milk to give it a try that way.
CAROL says
I did everything I thought was right following your recipe but the goats milk did not curdle. What did I do wrong?
Rebecca Eisenberg says
I'm sorry it didn't work for you! It's hard to know what went wrong without more detail — what kind of goat milk were you using? It's also possible you heated the milk too quickly or didn't get it quite hot enough. What kind of thermometer were you using?
I've only recently learned this and will update the post accordingly, but sometimes if it won't curdle you need to bring the temperature a little higher, closer to 195-200°F!
David S says
I made this recipe and the curds never separated. I used fresh milk, only 2 days old, and fresh bought citric acid. In an effort to get quit degrees after 45 minutes I increased heat. My milk boiled well before I got 185. Is my thermometer shot?
Rebecca Eisenberg says
When you say fresh milk do you mean raw goat milk or fresh as in newly bought? I can't speak to how this recipe works with raw goat's milk as I never use that. If your milk was boiling before 185°F then your thermometer is definitely shot — the boiling point for milk is 212°F. I would give this another try with a new thermometer!
David Strasburg says
I bought a new thermometer and tried again. It turned out much better. I did use raw milk. I found that I also needed more citric acid to get the curds forming.
Rebecca Eisenberg says
Ah yeah, I can't speak to how you may need to modify for raw milk — I never use it. Good to know for anyone who is curious that more citric acid may be necessary! Glad you got a thermometer that works now!
Jay says
I got a half gallon raw goat milk. Heated it to a boil, switched off the stove, added a mixture of juice from 2 lemons diluted with half cup of water into the milk and stirred and curds started separating from whey. Let stand for 5 mins and strained into a plain cloth laden colander and drain. Cheese came out so good. My first time making goat cheese. Yay!
Paul says
I just finished my first attempt using this recipe using raw milk from a friends goats and it turned out exactly as written.
Stephanie, re read the recipe. the milk does not have to be pasteurized!
David says
Adding this to my summer activity list. Wondering about using my instant pot's yogurt "boil" function - it heats milk up to ~180. Worth a try since that doesn't generate as much heat as my stove top.
Debby Hood says
Excited to try this recipe. I would like to add garlic to the final cheese. Would fresh minced garlic work and if so, how much would you suggest.
Rebecca Eisenberg says
I haven't tried garlic, but I would use garlic powder and start with maybe 1/4 or 1/2 teaspoon and go from there. Add gradually and mix it in until it tastes how you want! Enjoy!
Angelina says
Thank you for sharing your recipe and tips! I tried it with some raw goat milk that I bought from a farm stand down the street and it turned out perfectly!
*I don’t have a thermometer , but heated the milk slowly until it was just about to boil.
Also, I used 1 liter of milk and 3.5 tablespoons of lemon juice. The curds weren’t really forming after 15 minutes, so I added half a tablespoon of apple cider vinegar and that worked!
Shelly Heideman says
My cheese did not coagulate. Do I need more citric acid? How much is a rounded teaspoon?
Rebecca Eisenberg says
It's really hard to say what caused this — did you use the same goat milk brand that I did? Was it raw goat milk or pasteurized? Did you use a thermometer?
Shelly Heideman says
I used local produced goat milk that was pasteurized I used a thermometer. I just added some lemon juice🤞🏻thanks for the reply.