
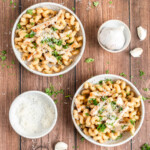
Garlic? Love. Parmesan? Love. Chicken? Love. Pasta? LOVE. This one-pan stovetop garlic parmesan chicken pasta uses just 7 simple ingredients to create a totally delicious and comforting dinner that you can get on the table quickly.
And since everything cooks in one pan on the stove top, you've got very few dishes to wash! You're welcome!

When you need an easy weeknight dinner that uses a lot of pantry staples, look no further than this one-pan garlic parmesan chicken pasta.
Longtime Practical Kitchen readers know that four of my favorite ingredients are garlic, parmesan cheese, chicken, and pasta. I don't know if these are the most common ingredients in your kitchen, but they are in mine.
If you've never made a one-skillet or one-pot pasta dish before, you're going to love this. You basically cook everything — including the pasta — all in one skillet on the stovetop. That's right, you don't even need to get out a separate pot to boil water for the pasta. It's pasta, risotto-style!
This one-pan pasta cooking method isn't just efficient, it also helps intensify the flavors in the pasta dish. Because the pasta cooks in the same pot you cook the chicken and garlic in, the pasta absorbs all those flavors as it cooks.
This garlic parmesan chicken pasta recipe is perfect if you're busy and need to make dinner quickly, or if you hate washing dishes, or just want to do a lot with as few ingredients as possible.

🥘 Ingredient Notes
Because there are so few ingredients in this recipe, I do recommend making the effort to use as many fresh ingredients as possible (except for the pasta). See recipe card for quantities.

- Pasta - I used Cavatappi (sometimes called Cellentani) pasta for this recipe because it's hearty enough to hold up to the rigorous stirring and boiling this recipe requires. I also just enjoy the "double elbow" twisted shape. You can use other boxed pasta shapes like rigatoni, gemelli, macaroni, penne, etc. Just avoid anything light or delicate — you're looking for a 9-12 minute "al dente" cook time!
- Chicken Breast - The first step of this recipe calls for slicing or pounding the chicken breast to about half an inch thick. You can also just buy thinly sliced chicken cutlets and use those. Adjust the cook time accordingly!
- Parmesan Cheese - I grate my own Parmesan cheese with a Microplane zester because the cheese melts best this way. If you're going to buy pre-grated parmesan, just don't get the shelf-stable powdered kind in the big canister, it tends to clump.
Not pictured: Water. You'll need enough water to just barely cover the pasta in the pan.
NOTE: Unfortunately this cooking method does not work with fresh or gourmet pasta. Fresh pasta cooks too quickly and is so starchy that it will break down in the water giving you more of a paste than a pasta water. Even dried fancy pastas tend to be a little too starchy to work really well here. It doesn't mean you can't use them, they just don't always hold up as well to the rigorous boiling and stirring as boxed pastas do.
🔪 Making a Quick Parmesan Chicken Pasta
The first step in making this garlic parmesan chicken pasta actually involves the third ingredient in this recipe's title: chicken.
Place the chicken breast on a cutting board and carefully slice it in half horizontally, with the knife parallel to the cutting board. Press the heel of your other hand down lightly on top of the chicken breast with your fingers flared up to keep them out of the way of the knife.
You're basically creating two chicken breast pieces each about half an inch thick.
If you prefer not to mess with all the slicing, you can instead pound the chicken breast to about half an inch thick with a meat tenderizing mallet.
Season the top sides of the chicken breast pieces with salt and pepper. Meanwhile, in a medium-sized saute pan or skillet with straight sides about 3" high, heat up the oil. If using stainless steel, heat the pan before adding the oil to prevent the chicken from sticking.

Place the chicken breasts in the oil seasoned side down, then season the tops with salt and pepper.

Cook the chicken until golden brown and cooked through (at least 160°F on an instant read thermometer).
Chicken is considered fully cooked at 165°F, but it will continue cooking as it rests. We're pulling it off the pan a little bit early so that it doesn't overcook!
Now we're going to use the same pan, without cleaning it out, to cook the aromatics and the pasta. Those brown bits on the bottom are called fond, and they are going to give the pasta SO much flavor.

Add a little more oil to the pan, then add the garlic and cook until lightly browned — about 30-60 seconds.

Add a splash of water, bring to a boil, and use a spatula to scrape the brown bits off the bottom of the pan.
Next, add the pasta to the pan along with salt, pepper, and just enough water to barely cover it. It's okay if some bits of pasta are sticking out above the water.
You can always add more water later if it needs it, so better to start out with slightly less than you think you need.
Increase the heat and keep an eye on the pan. As soon as the water starts to boil, set a timer for the "al dente" cook time on the pasta box.

Keep the water boiling for the entire cook time and stir frequently to keep the pasta from sticking to the bottom of the pan.
Different pasta varieties absorb water at different rates, and water will evaporate differently based on the size of your skillet. If the water seems to be boiling away too quickly, its okay to add a bit more.
The goal is for most of the water to have absorbed and evaporated by the time the timer goes off. The water that will be left in the skillet will be super starchy and perfect for making a silky smooth sauce!
TIP: Do a bite test to confirm the pasta is fully cooked before you add the cheese. Bite a noodle in half — if you can see a ring of uncooked pasta in the center, it needs a little more time to cook. Add a splash of water if needed and keep stirring until the pasta is cooked through. Repeat as needed.

When the timer goes off, reduce the heat to low and add the parmesan cheese all at once. Stir until it melts into a sauce.

Then add about half of the freshly minced parsley and give it a good stir to combine.
Remove from the heat, slice the chicken breast into strips and add it to the pasta. Stir to combine!

That's it! That's how you make this quick Parmesan chicken pasta. The whole process start-to-finish is about twenty minutes, and you've only used one pan!
Serve this pasta with chicken breast immediately, garnished with more parmesan cheese and the remaining parsley.
📋 Variations & Substitutions
- Vegetarian - Skip the chicken! You'll miss out on the flavor from the fond, but you could make up for it by sautéing some thinly sliced or chopped onions or leeks with the garlic before you add the pasta.
- Spicy - Add a pinch of red pepper flakes to the pan when you add the pasta. For more heat, add more red pepper flakes.

👪 Adjusting Number of Servings
This recipe uses 8 ounces of pasta and 1 pound chicken breast. That's enough for three very hungry people OR two moderately hungry people plus a small child (or to save as leftovers) OR or three or maybe four moderately hungry people who are eating this with side dishes.
If serving five or more, I recommend adding 4-6 ounces of pasta and ⅓-1/2 pounds of chicken, depending on how hungry everyone is.
The cooking process is the same no matter how much pasta or chicken you're using.
Just remember, the more crowded the pan is, the more water you'll need, and the longer it will take the water to absorb/evaporate!
🧀 Why is the Cheese Measured by Weight?
Finely grated parmesan cheese is very light and delicate. It's hard to measure accurately using cups because there's so much air in it.
If I told you 1 cup of parmesan and you use a denser, thicker grated parmesan, you'll have WAY too much cheese.
If you don't have a kitchen scale, I recommend adding the cheese ¼ cup at a time and stirring until it melts. When the sauce is as cheesy as you want and clings to the noodles, stop adding cheese.
👩🏻🍳 Practical Tips & Recipe Notes
- The size of your skillet matters a lot here. I recommend using a 10-inch high-sided skillet for this pasta with chicken breast. I'm using my All-Clad 3 Quart Saute Pan in these photos. A wider skillet means a shorter layer of pasta and lower level of water, which means the water will evaporate much more quickly and it will be harder to get the pasta submerged. If you try this method using a regular sauce pot, the water will be too deep to have evaporated by the time the pasta is done cooking.
- You do want to have a little bit of water left in the pan when there's a minute left on your timer and it's time to add the cheese. How much water? It should feel like you're stirring a very saucy pasta. Not so much that the noodles are swimming, but enough to be able to say "yeah, there's still some liquid in here."
- If there's too much water left in the pan when the timer goes off, crank the heat as high as it can go (if it's not there already) and stir really well — the more you stir, the faster the water will evaporate. If you truly have way too much water left, use a spoon, ladle, or turkey baster to remove some water from the pan.
📖 Recipe
One-Pot Garlic Parmesan Pasta with Chicken
Recipe Notes
- *Do not use fresh or gourmet pasta to make this recipe. Boxed dried pasta works best.
- **The internal temperature for doneness on chicken breast is 165°F, but the chicken will continue cooking as it rests. You can safely pull it off the heat early. But if you're particular about cooking chicken until it's done, let it go until it hits 165°F and then remove it from the pan to rest.
- Store any leftover garlic parmesan chicken pasta in an airtight container in the fridge for up to a week. To reheat, microwave in 30 second bursts, stirring in between, until warmed throughout.
- 8 ounces of pasta and 1 pound chicken breast is enough for two very hungry people OR two moderately hungry people plus a small child (or to save as leftovers) OR or three moderately hungry people who are eating this with side dishes. If serving four or more, I recommend adding 4-6 ounces of pasta and ⅓ lb chicken per person.
Ingredients
- 1 pounds chicken breast
- 8 oz gemelli pasta* (boxed pasta, not fancy/gourmet pastas)
- 2-3 tablespoons olive oil (divided)
- 1 tablespoon garlic (minced)
- ½ teaspoon diamond crystal kosher salt (plus more for seasoning the chicken)
- ¼ teaspoon black pepper (plus more for seasoning the chicken)
- 1.75 oz finely grated parmesan cheese (pre-grated is fine, just not the powdered stuff)
- ⅛ cup fresh parsley (finely chopped)
Instructions
- Pat chicken dry on a cutting board. Holding your knife so the blade is horizontal, butterfly the chicken breast into two thin slices. Season the top side of the chicken pieces with salt and pepper.
- Preheat high sided skillet over medium. Add cooking oil. When the oil ripples and coats the bottom of the pan, place the chicken seasoned side down in the pan. Season the top side of the chicken with salt and pepper. Increase the heat to medium-high and cook the chicken about 3-5 minutes per side until cooked through (at least 160°F** on an instant read thermometer). Then remove to a plate or clean cutting board to rest.
- Without cleaning out the pan, reduce the heat to low. Add the remaining cooking oil. Add the garlic and cook, stirring constantly, about 30-60 seconds until browned and slightly softened. NOTE: It will start to stick to the browned bits on the bottom of the pan. That's a good thing! Just don't let it burn.
- Add a splash of water, just enough to cover the bottom of the pan. Increase the heat to high and use a wooden spoon or spatula with a sturdy edge to scrape the browned bits on the bottom as the liquid begins to boil.
- Add the dried pasta, salt, and pepper to the pan and give them a quick stir. Then add just enough water to almost cover the pasta. It's okay if some of the noodles are sticking out above the water.
- When the water begins to boil, set a timer for the "al dente" time given on the pasta box. Keep the heat at high the whole time, stirring constantly as the water boils and the pasta cooks to prevent the pasta from sticking to the bottom of the pan. NOTE: Add water in very small amounts as needed (some pasta shapes absorb water more quickly than others).
- When there is about a minute left, and very little water remains in the pan, reduce the heat to low, add the parmesan cheese all at once and stir to melt the cheese into a creamy sauce. Remove from heat.
- Slice the chicken and add it back to the pan, along with half the chopped parsley. Stir to combine. Serve immediately, topped with the remaining chopped parsley and additional grated parmesan cheese.
Krista Golden says
I think you're missing the parsley! There's a space where it should be that just says "tablespoons".
Rebecca Eisenberg says
Aha, I was missing the parsley. It’s there now! That gap is actually the tablespoons from the ingredient above, something has gone weird with my recipe card format and it’s displaying on two lines… that I still need to fix. But the parsley is in for you now. Thanks for letting me know!
Janet says
This recipe was simple and I love that it's made in one pot. I would add more garlic and decrease the salt next time.
Rebecca Eisenberg says
So glad you liked it!
Vicky says
Super delicious and very easy! I might try throwing a veg in next time too. I subbed pea shoots for parsley and it was great!
Lu B. says
I'm on a roll making your recipes, Rebecca. This pasta dish was simple and delicious. Sometimes, I find garlic to be off-putting in general, so I left it out. The chicken was perfectly cooked and I, too, used gemelli as you did in the video. Perfect!
Sharon says
Didn't love this one, very little flavour. Quite bland, not sure why.
Rebecca Eisenberg says
I'm sorry to hear that! It may have been the garlic you used, or the type of parmesan cheese. Did you measure the freshly grated parmesan cheese by weight?
GE says
Mine was also very bland. I don't think there was enough garlic in it. I could not taste the Parmesan cheese, either. Next time I make it, I'll add the cheese atop the individual bowls of pasta, rather than stirring it in, and definitely add more garlic. I also think it would be better if it was a recipe that used an entire 1lb. box of pasta. I've revamped the recipe for next time, with these changes, at least doubling the ingredients.
Amir says
Just so good! The cheese blended in beautifully and this is definitely my new “busy weeknight” pasta.
Rebecca Eisenberg says
I'm so glad you liked it!! You should try some of my other one-pot pasta recipes next, too, I think you'll like them!
Becca says
This was delicious! I felt like it was garlic forward but not overpowering. One pan is the way to go for sure. Definitely get all the ingredients ready before you start cooking. It all goes pretty fast once you get going. I’ll make this again for sure!