Learn how to roast a whole garlic bulb and instantly level up your favorite dishes with a sweeter, mellower garlic flavor.
Roasting garlic is one of those things that sounds like so much more work than it is. In reality, it's a low-effort, high-reward process that transforms an ordinary garlic bulb into a mellower and sweeter spreadable, edible garlic paste.
Learn how to roast a whole garlic bulb and you've got a shiny new kitchen technique that's easy to adapt and will add a rich garlic flavor to so many of your favorite dishes, without the sinus-clearing burn of raw garlic.
how and where to use roasted garlic
When I want to include an extra punch of flavor to any bread recipe, roasted garlic is where I start first. It's a great addition to pretty much any savory yeast-or-sourdough leavened bread, whether you're making a no-knead loaf, ciabatta, or even bagels.

Roasted garlic is delicious smeared across a slice of bread, mashed into potatoes (along with or instead of butter), mixed into sour cream or plain greek yogurt for a quick and easy dip, rubbed on grilled corn (and then mashed up and tossed with it for a corn salad), mixed into hummus, added to a quinoa bowl, incorporated into ground meat for hamburgers or meatballs, sautéed with carrots or broccoli, blitzed into a caesar salad dressing, added to gravy, or mixed into compound butter for slathering on the outside of a grilled cheese sandwich for browning.
If you can use raw garlic in a recipe, you can probably replace it with roasted garlic.
An A+ tip I learned from Cates Holderness, who is wise in the ways of sourdough, is to roast garlic cloves in their skins on top of your focaccia. Homemade focaccia is a deliciously oily dough, so the cloves roast nicely as the bread bakes. When you take the bread out of the oven, slip the cloves o°ut of their skins and spread them directly on the bread.
The best part is just how simple roasting garlic is. You don't even need a pan for this, just some aluminum foil. It is truly the best kind of kitchen technique!
how to roast a whole bulb of garlic
Cut the top off a whole bulb of garlic. Try to make sure you've exposed the tops of every bulb, including the ones on the sides and center. If some of them are too far down, that's okay. You can always peel them open later.

Remove the outer skin that surrounds the whole bulb, but leave the skins of the individual cloves intact. Once the cloves roast, you'll be able to easily slide them out of their little pockets.
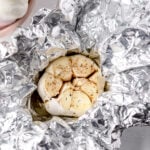
Place the garlic clove in the center of a piece of aluminum foil, cut side facing up. Drizzle it with 1-2 tablespoon of olive oil, and rub the oil in with your hands. Gently push some of the cloves apart so oil gets in between them. Sprinkle it with a pinch of salt and some grinds of fresh black pepper.

If you'd like to add any additional flavors — fennel, tarragon, thyme, bay leaves, etc — sprinkle them across the cut surface of the cloves. Then wrap the foil up around the bulb, pinching or twisting it closed at the top. You should have something that sort of resembles the shape of a large silver garlic bulb.

If you prefer not to use aluminum foil, you can place a bulb of garlic drizzled with olive oil, salt, and pepper inside the cup of a muffin tin or inside an oven-safe ramekin. I like the aluminum foil method because I feel like it traps more moisture and prevents the garlic from drying out.
Roast it in a 400°F degree oven for 40-45 minutes. When it's done, remove it from the oven, peel back the aluminum foil, and let it cool.
Once it's cool enough to handle, use your fingers to pop the cloves up out of their papery skins. If you have any cloves where the opening in the skin is too small, use a small knife or scissor to widen it.
storing roasted garlic
If you're going to use your roasted garlic within a couple weeks, store it in a small container with just enough olive oil to cover the cloves.
Once you use up the cloves, save that oil to use on salad dressings or for cooking or finishing a dish with — it'll be infused with roasted garlic flavor. This is my preferred method because YUM roasted garlic infused olive oil is the best.

If you want to store your roasted garlic for longer than a couple weeks, spread the individual cloves out on a sheet tray and freeze them. Then transfer them to a container and keep them in the freezer until you're ready to use them — just let them defrost slightly before using.
📖 Recipe
how to roast a whole garlic bulb
Ingredients
- 1 bulb garlic
- 2 tablespoon olive oil
- salt
- freshly cracked black pepper
- any other herbs or seasonings (thyme, tarragon, fennel seeds, cumin, bay leaves, cayenne, crushed red pepper flakes, paprika, etc.)
Instructions
- Preheat oven to 400F degrees. Cut the top off a bulb of garlic, exposing the tops of all the cloves. Peel the exterior papery skin off the bulb, leaving the thin papery layers that surround each clove.
- Place the bulb of garlic on top of a sheet of aluminum foil. Drizzle with 2-3 tablespoon of olive oil, gently pressing the cloves apart to get oil between them. Sprinkle with salt, pepper, and any other seasonings you want. Gather the foil around the bulb and pinch closed at the top.
- Place the foil-wrapped bulb of garlic in the center of the oven and roast for 40-45 minutes.
- Carefully remove foil packet from oven and unwrap to let garlic cool. When garlic is cool enough to handle, use your fingers or a small spatula to press at the base of each clove to slide them out of their papery skins.
- Use immediately OR store in container with enough olive oil to cover the cloves for up to 2 weeks OR freeze cloves individually on a sheet tray and transfer to a freezer-safe container. Defrost frozen garlic cloves slightly before use.
Megan says
A foolproof way to roast garlic!