
These rich and fudgy black cocoa crinkle cookies are delicate and decadent while still being melt-in-your mouth tender thanks to their signature powdered sugar coating.
Black cocoa powder gives these crinkle cookies an intense chocolate flavor that's not too sweet — kind of like a very fudgy Oreo cookie. It also gives them their dramatic black and white appearance. While all crinkle cookies are great, crinkle cookies made with black cocoa just feel more elegant; like they're dressed up for a black tie gala!

For a more casual, no chill black cocoa cookie, try my chocolate m&m cookies! You may also like my chocolate Oreo bundt cake which also uses black cocoa powder.
About Black Cocoa Crinkle Cookies
These black cocoa crinkle cookies are the kind of cookie poets write sonnets about.
Black cocoa crinkles are dramatic in appearance, taste, and texture. They are simple, yet complex; dark and mysterious, yet bright and inviting; dense and fudgy, yet light and airy.
The black cocoa flavor is intense without being overly sweet, and a double layer of sugar coatings ensures an even spread of crinkles as the cookies bake.
This is a one bowl, no mixer required cookie recipe that makes a great afternoon or weekend baking project. The dough needs to chill for at least four hours, but is fine in the fridge for as long as 24 hours, so you can make them on a schedule that works for you.
And this recipe took me exactly one try to get right.
Don't get me wrong — I would have loved to test it more* — but my sister and husband were my taste testers on the first batch and threatened to take my baking supplies away if I even thought about changing the recipe. It was perfect as is.
*I did sneakily run a few more tests and am both pleased (and annoyed) to confirm that they were right. The first version of the recipe was the best one.

Ingredient Notes
Here's what you'll need to make these black cocoa crinkle cookies. See recipe card (at the end) for quantities.

Black Cocoa Powder - The most CRUCIAL ingredient. While you can use other cocoa powders, if you want the dramatic contrasting black-and-white look and the rich, deep chocolatey flavor, you'll want to get a true black cocoa powder. Not "dark" cocoa powder. Black cocoa powder. If your grocery store doesn't have it in stock, I recommend King Arthur Baking's Black Cocoa Powder* which you can order online.
Black cocoa is an ultra-alkalized (Dutched) cocoa powder. It gives baked goods a dark black color. It's often used in addition to other cocoa powders to deepen their flavors, but for this recipe I used the black cocoa powder on its own to let its unique flavor shine.
Boiling Water - The boiling water is used to bloom the cocoa powder and bring out its flavor before you add any other ingredients. You could also use hot coffee for a more intense chocolate flavor. Measure the water after it boils, that way you don't lose any water to evaporation.
Baking Powder & Baking Soda - These are the chemical leaveners that make the cookies rise and spread in the oven. Without them you won't get the beautiful crackling cookie exterior, so don't skip these!
*Full disclosure: I received this black cocoa powder as a gift from King Arthur Baking, which is why I used it to test this recipe. I was not paid to promote it or share it. I genuinely like the product, have repurchased it on my own several times, and am recommending it because it works well.
How to Make Black Cocoa Crinkle Cookies
Start by blooming the black cocoa powder with the boiling water. This step helps intensify the flavor of the cocoa powder and also give you a chance to break up any lumps.
As always, make sure you boil the water before you measure it so that you don't lose any water to evaporation!

The black cocoa powder will start out dark brown in color, but once mixed with water will turn into a thick black paste.
Stir it very well, making sure to use the spatula to press and scrape the paste against the sides of the bowl to smush out any sneaky cocoa lumps.

Add the sugar, egg, oil, and vanilla and whisk well for at least 60 seconds. It's a thick mixture, so use a sturdy, efficient whisk!

When you have a smooth and glossy jet black mixture with no lumps, it's time to add the dry ingredients.
If you have an old school sifter, the tin-can kind with the handle you squeeze or with a crank, you can certainly use one of those. But I like using a wire mesh strainer because it's more multi-purpose in the kitchen, easier on my hands, and much faster.
Sifting the dry ingredients ensures there aren't any lumps and helps add air. It will give you a lighter, airier, and more delicate cookie dough.

Use a wire mesh strainer or sifter to sift the dry ingredients into the bowl.

Gently fold the dry ingredients into the wet ingredients.
The flour can be sneaky and hide inside the cookie dough. To make sure everything is mixing together evenly, use the edge of the spatula to draw a line down the middle of the bowl and fold the cookie dough over itself.
Rotate the bowl as you fold the cookie dough so you can scrape the sides and make sure there's no hidden pockets of flour there too!

When all of the flour is evenly incorporated, cover the bowl and chill it in the fridge for four hours or overnight before scooping it.
You NEED to Chill This Cookie Dough
This is a VERY soft cookie dough. If you tried to scoop it without chilling it would make a big mess and your cookies would spread out into giant puddles in the oven. I know this from experience, unfortunately.
Oil begins to solidify around 45-50 degrees Fahrenheit. Most refrigerators are at 40 degrees Fahrenheit or below. Chilling the cookie dough gives the oil time to solidify so that the dough is easier to scoop.


Chilling the dough also lowers the temperature of the dough which will slow down how much your black cocoa crinkle cookies spread in the oven. And it gives the flour time to absorb more of the liquid in the dough which gives you chewier cookies.
I know the chilling step is really annoying. No one likes having to chill cookie dough! We want our cookies and we want them now.
I did test the dough after one, two, and three hours to see if I could shave any time off for you, but four hours (or more) really is the sweet spot here.
It's annoying, but they're worth the wait, I promise!
Always Roll in Two Types of Sugar
When I was doing my research for these crinkle cookies I wanted to really understand the science of the crinkle. The crinkle top forms when the exterior of the cookie dough begins to set as the interior continues to expand, breaking the sugar-coated exterior into a pangea-like landscape.
I wanted these black cocoa crinkle cookies to have an even, delicate, dramatic crinkle pattern. I didn't want big clumps of powdered sugar with just a handful of large cracks to break them up.
Luckily Cook's Illustrated was one step ahead of me. It turns out the secret to getting a good even spread of crinkles and crackles is to roll the dough in not one but two types of sugar before baking. Here's how it works:
"Coating the cookies with [...] sugar draws out moisture from their surface, promoting cracks by drying out their tops before the interiors set. But granulated sugar does so more efficiently because of its coarse, crystalline structure. As the crystals absorb moisture, some—but not all—dissolve into a syrup. As the cookies continue to bake, the moisture evaporates, and the sugar begins to recrystallize [...] When enough new crystals form, they begin drawing out moisture once again. The upshot: a cookie with a faster-drying surface that is more prone to cracking."
Cook's Illustrated
So while you can roll your black cocoa crinkle cookies in plain powdered sugar, it really is worth the extra step to roll them in granulated white sugar first.
5 star reader review
“These were so good, a huge hit on the cookie tray last year. I usually try one or two new cookies a year and these are now going in the regular rotation. Delicious not-too-sweet deep chocolate flavor and the double rolling really makes a difference.”
—DeeDee
♨️ How To Tell When They're Done
These black cocoa cookies bake for just 10 minutes at 350 degrees Fahrenheit. Because they are so dark, it's hard to tell when they're done.
You'll know they're done when they spread out and are puffed up on top. They'll be slightly domed and will have a beautiful crackled pattern on top.


Black cocoa crinkle cookies are very soft and delicate, especially while still warm. Leave them on the cookie sheet to cool before transferring them to a cooling rack.
The cookies will continue to bake as they rest on the baking sheet, so don't worry about them being under baked. They'll be just fine!
Note: A lot of ovens don't run true to temperature. Mine runs a full 25 degrees cooler than it says! I recommend picking up an inexpensive oven thermometer so you can be sure you're baking your cookies at the right temperature.

How to Store Black Cocoa Crinkle Cookies
These black cocoa crinkle cookies are best eaten within 5-7 days of baking. I think they're best within a day or two of baking.
Store them carefully in an airtight container; they're quite delicate and prone to crumbling. I recommend using a wide, shallow container with a sheet of parchment paper or wax paper between each layer of cookies.
You can also freeze the baked cookies just fine; though the powder sugar cracks may be a little blurrier due to being tossed around in a bag.
While you can freeze the dough balls before rolling them in sugar, I don't recommend it unless you're prepared to let them fully defrost in the fridge before baking. You won't get the same spread and soft texture if you bake them from frozen!

Practical Tips & Recipe Notes
- Any time you work with chocolate, prepare for things to get a little messy. Chilling the dough for at least 4 hours makes it a lot easier to manage. Keep a damp paper towel or a kitchen towel you don't care about nearby to wipe your hands or tools off as needed.
- To help the dough release from the cookie scoop easily, give the scoop a light spritz with non-stick spray before scooping. Key word here is light. Too much non-stick spray will affect the texture of the cookies, so only use it as needed.
- To scrape off the spatula, I recommend using the edge of a plastic flexible bowl scraper.
- Is black cocoa the same as Dutch process cocoa powder? Dutch process cocoa is cocoa powder that has been alkalized to remove the acidity from the cocoa. This process also makes the cocoa powder a more mellow flavor and gives it a darker color. There are red, brown, and black Dutch process cocoa powders. David Lebovitz has a whole blog post about the different types of cocoa powder, but the short answer is as follows: All black cocoa powders are Dutch process, but not all Dutch process cocoa powders are black cocoa powders!
- If your cookies spread too much in the oven, you likely didn't chill the cookie dough long enough before scooping and rolling, OR you let the dough warm up too much after scooping and rolling before baking. You want the dough to still be a bit cool to the touch when the cookies go into the oven, or else they'll spread out too much as they bake.
💭 Have More Baking Questions?
I've rounded up answers to common baking questions and how-to guides, including:
- Ingredient swaps and FAQs
- Why my recipes are written in grams and not cups
- How to quickly bring eggs and butter to room temperature
- Ingredients I use (salt, flour, yeast, etc.)
- Step-by-step guides for bread and baking techniques
See my baking techniques & troubleshooting guide and ingredient swaps and FAQs for more!
📖 Recipe

Fudgy Chocolate Crinkle Cookies with Black Cocoa
Recipe Notes
- To help the dough release from the cookie scoop easily, give the scoop a light spritz with non-stick spray before scooping.
- To quickly bring an egg to room temperature submerge it in hot water for 5-10 minutes.
- Shoutout to Cook's Illustrated for the science tip to roll the cookies in granulated sugar and then powdered sugar for maximum crinkles!
Ingredients
Black Cocoa Crinkle Cookie Dough
- 54 grams black cocoa powder
- 60 grams boiling water (boil the water, then measure, so you don't lose any to evaporation)
- 192 grams granulated sugar
- 60 grams light flavored olive oil (or other neutral oil)
- 1 large egg (room temperature)
- 1 teaspoon vanilla bean paste (or vanilla extract)
- 180 grams all-purpose flour
- ½ teaspoon baking powder
- ⅛ teaspoon baking soda
- ¼ teaspoon diamond crystal kosher salt (use half as much of a different brand)
Sugar Coating
- 100 grams granulated sugar (½ cup)
- 100 grams powdered sugar (~¾ cup)
Instructions
- Mise en place. Get your ingredients to the right temperatures, measure them properly, and make sure you know where your vanilla and powdered sugar are!
- Mix the dry ingredients. Combine flour, baking powder, baking soda, and salt in a small bowl. Set aside.
- Bloom black cocoa. Measure black cocoa into a large mixing bowl. Pour the boiling water over the cocoa and mix with a spatula until a thick paste forms. Scrape everything off the spatula into the bowl and set the spatula aside.
- Whisk in sugar, egg, vanilla, oil. Switch to a whisk and add the sugar, egg, vanilla bean paste, and oil all at once. Whisk vigorously for 60 seconds until everything is combined and very smooth. This is a very thick mixture, it helps to whisk in small sections at first, gradually incorporating more and more from the sides of the bowl until it all combines.
- Sift in the dry ingredients. Use a wire mesh strainer or sifter to sift the dry ingredients into the wet ingredients. Switch back to the spatula and gently fold and stir until all the flour is combined. The flour is sneaky here and sometimes hides inside the cookie dough — use the edge of spatula to periodically draw a line down the middle of the mixing bowl to "cut" the dough in half in case anything is hiding inside!
- Cover and chill 4 hours or overnight. You can scoop the cookies in as little as two hours after chilling, but the dough is much much much easier to work with after at least 4 hours when the oil has firmed up. You can also leave it in the fridge overnight.
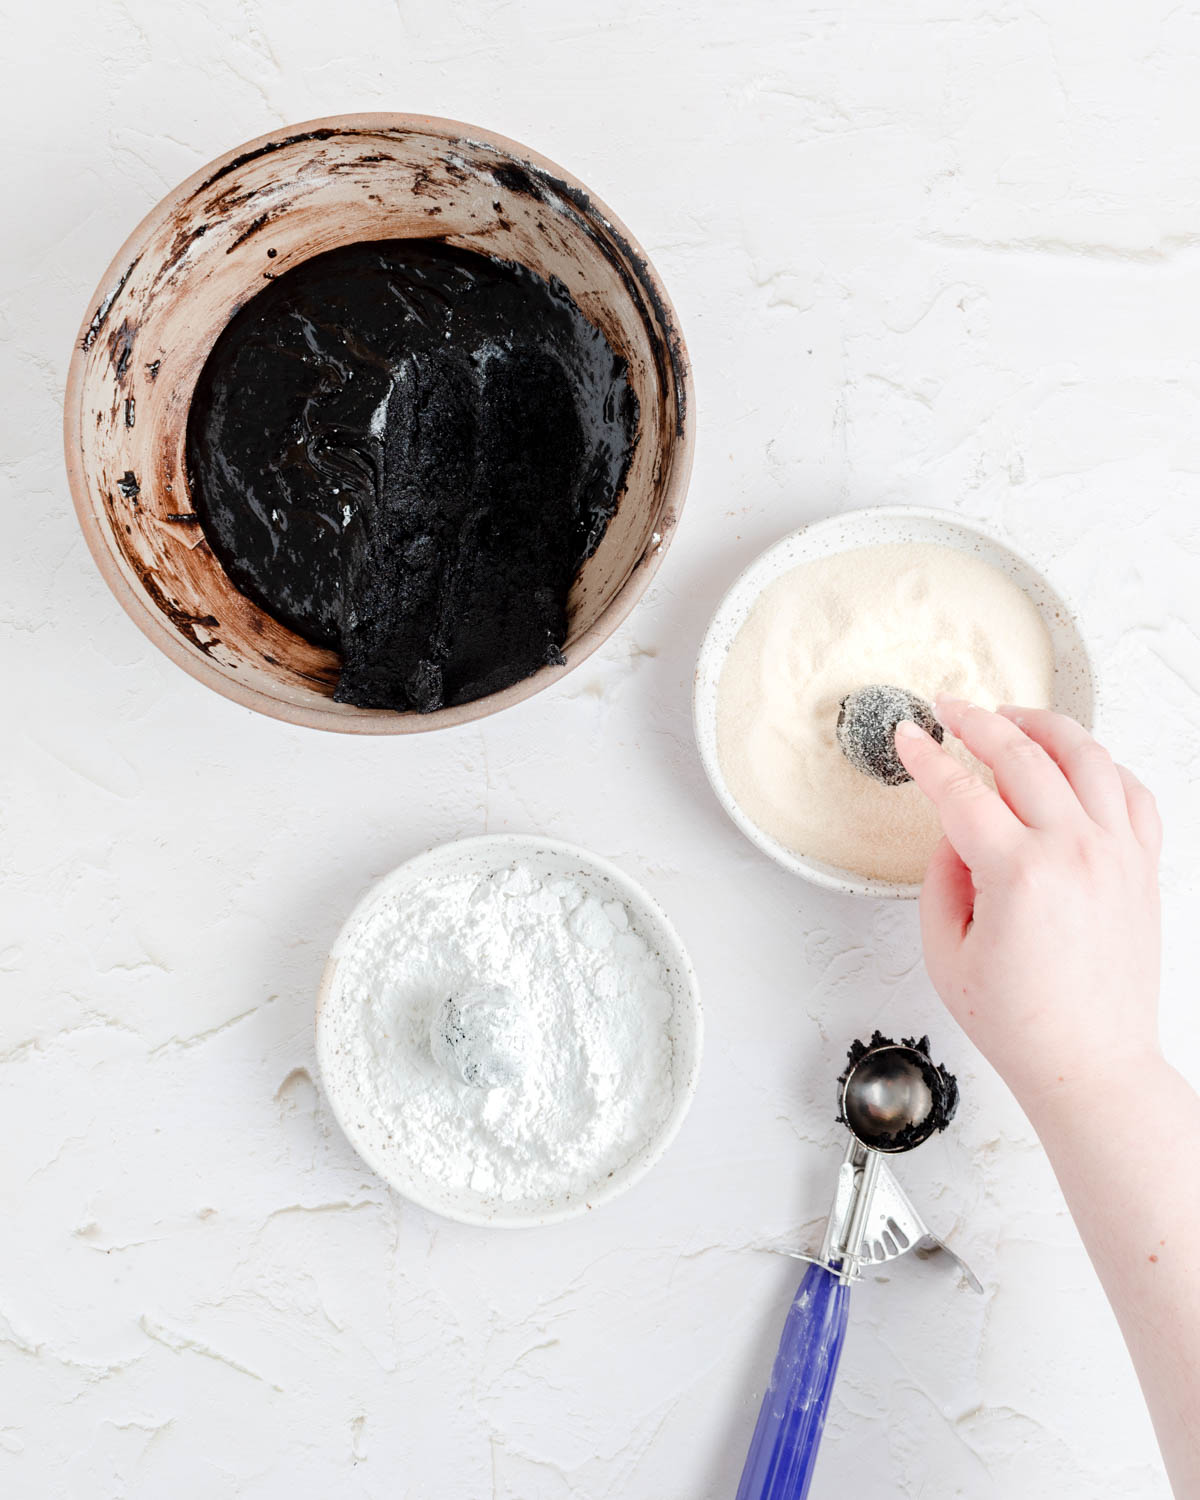
- Preheat oven to 350°F. Line two sheet pans with parchment paper or silicone mats. Assemble your cookie coating stations: Fill a small bowl with granulated sugar, and another with powdered sugar. Arrange them between the cookie dough bowl and the cookie sheets so you can easily move the dough from one bowl to the other and right onto the sheet pans.
- Scoop and roll. Use a #40 (1½ tablespoon) cookie scoop to drop balls of dough into the granulated sugar. Scrape the scoop flat against the side of the bowl to remove any excess dough so you get uniformly sized cookies. Roll the cookie dough balls around in the sugar, then roll them in powdered sugar. Be generous with the sugar coating! Arrange the cookie dough balls in rows on parchment lined sheet pans about 3 inches apart. You can usually fit about 12 on a half sheet pan.
- Bake for 10 minutes. The cookies will be puffed up and very soft when done, but will sink down as they cool. They are VERY soft and fragile. Let them cool on the sheet pan for 10-15 minutes, then transfer carefully to cooling rack to finish cooling.
Sharon Hermens says
Hello, I want to make these Black Cocoa Crinkle Cookies.
I ordered the black cocoa from Amazon. Now, Can you convert grams to ounces.
Thank you
Sharon
Rebecca Eisenberg says
So glad you ordered the cocoa and are excited to make these! If you're using a kitchen scale, you can usually push a button to switch the measurement unit from ounces to grams easily. Otherwise you can use an online conversion calculator to convert from grams to ounces!
Katy says
These cookies are delicious! They're not overly sweet, and the texture is great - soft and perfectly chewy. The black cocoa really makes these cookies stand out. I'll definitely make them again!
Helen says
Can you add chocolate or peppermint chips in the batter?
Rebecca Eisenberg says
You can! I think I tried peppermint chips when I was first testing it, I also subbed the vanilla for peppermint extract. It works well but I preferred them chipless. You can definitely experiment!
nicole says
these cookies are so so good! crinkle cookies are a childhood classic for me, and these are a big bump up in quality from the kind you make with a cake mix. theyre very easy to throw together, bake up quick, and keep really well in the fridge or on the counter depending on your room temp (we were in a heat wave when i made mine so we fridged them). they are also fantastic as ice cream sandwiches, just slap some softened ice cream (we went classic vanilla) between 2 fully cooled cookies and pop it in the freezer. we ate them straight from the freezer, no thawing needed, and their texture was perfect! make these and you will be a veerryy happy camper.
definitely do heed the part about smooshing the cocoa powder/water mix until you get all the lumps out. i happened to accidentally make uhhh a 7X the amount batch XD and ended up with way too big a batch to fully get out all the cocoa lumps. its not a huge issue, but when you do get the occasional hard bit of cocoa that wasnt dissolved its a "huh whats that?' moment. i mean, we ate them happily still, and the neighbors were all thrilled to have them too, but you do notice the texture of those bits. so if you for some reason want to also make 140 cookies in one go, make your cocoa and water mix in a few batches so you can fully smoosh it all smooth.
also! make sure you dont have a wimpy cookie scoop. this is a *thick* dough, so those cheapie spring scoops can get cranky about it. i eventually got good enough to just eyeball the right size with a normal spoon, cause yknow, lots of practice XD but one of the kinds that have the side button thing rather than the spring at the bottom is gonna be way more sturdy. go forth and make deicious cookies!
Rebecca Eisenberg says
So glad you liked the cookies, and omg a 7x batch! Good think you were able to double some of them up for ice cream sandwiches, such a good idea!
Audrey Perullo says
Can these cookies chill overnight in the fridge or should they get pulled at the four hour mark? Thanks!
Rebecca Eisenberg says
Yep! Step 6 of the recipe says: "Cover and chill 4 hours or overnight." You can keep the dough in the fridge overnight just fine.
Sarah says
Excited to make these but I thought baking soda and baking powder have some sort of reaction with black cocoa powder. No issues here? It's exactly the kind of cookie I had in mind, just want to get them right.
Rebecca Eisenberg says
Baking soda reacts with natural unsweetened cocoa powder because it's naturally acidic. Black cocoa has been alkalized, meaning the acidity has been removed and therefore it won't react with the baking soda. This recipe uses mostly baking powder since baking powder is a compound that includes baking soda and an acid which will activate the baking soda when combined with a liquid. The recipe does use a small amount of baking soda which is activated by the acidity in the eggs and the vanilla bean paste! I've tested this recipe a million times as written, no need to worry about if it works — it does work!
Laura says
Loved these cookies. Not as sweet as I expected (which was nice) and beautiful chewy texture!
Rebecca Eisenberg says
So glad you enjoyed them!
Lauren says
Coming back to this recipe a 3rd time! These are so chewy and decadent. Lovely, rich flavor!
Sam says
I made these for Christmas and they were a big hit! Everyone kept asking if they were Oreo cookies. These were super easy and they look beautiful!
Sam says
I forgot to add a rating! Definitely a 5 star from me 🙂
Catherine S says
I LOVE this recipe! I was distracted in a conversation while mixing so I did the wrong order and added the bloomed black cocoa AFTER I had mixed in the flour and it was very forgiving. They still turned out great. My only regret was that I didn’t double the recipe! I will definitely make these again. I am new to using black cocoa and this was a fun recipe to make. Love the color and texture and taste of these cookies.
Rebecca Eisenberg says
I'm so glad you liked them!! If you're looking for more ways to use black cocoa, definitely check out my chocolate m&m cookies next!
Lauren says
Exquisite. Follow the recipe exactly as written and you will achieve the most delectable cookies in flavor and texture. Black cocoa lovers rejoice!
Rebecca Eisenberg says
Ahh I'm so glad you liked it! Black cocoa is the best. 🙂 Enjoy!
DeeDee says
Starting to plan my 2023 holiday baking and I came back to this recipe and realized I never left a review! These were so good, a huge hit on the cookie tray last year. I usually try one or two new cookies a year and these are now going in the regular rotation. Delicious not-too-sweet deep chocolate flavor and the double rolling really makes a difference.
Kristen says
Hello I'm going to make these for a family friend I'm going to try to make them gluten free do you have an easier step than just replacing the flour for king authors
Rebecca Eisenberg says
I don’t! Gluten free baking is an entirely different science from regular baking. I haven’t tested and do not test my recipes to make them gluten free. You can try the cup for cup gf flours, but beyond that I don’t know enough about gf baking to guide you!
christine says
Can these be frozen after baking? I want to add these to my cookie boxes this year but do need to make them in advance...
Rebecca Eisenberg says
They should be fine to freeze after baking, just know the crinkles might not be quite as crisp after they’ve had some time in a bag in the fridge!
Lanette says
I tried the recipe and the cookies came out great! I did have an issue with the conversion from metric to imperial... I had to keep adding flour as there was so much more liquid than the black cocoa powder. Can you recommend a good site that will properly convert the measurements? After I had the issue, I looked at a few other sites and each one converted slightly differently. 🙁
Rebecca Eisenberg says
Hi! I'm so glad you liked the cookies, but the conversion to imperial is a lot more complicated than it seems and that was definitely your issue. There is no set standard for what 1 cup of flour weighs (the LA Times has a great article about this), and when you convert from something super precise like a weight measurement to something imprecise like a volume measurement, there's so much room for error based on what brand of measuring cup you're using, how loosely or tightly you scoop the flour, how well aerated your flour is, how much ambient moisture is in the flour from the humidity of your kitchen, etc. So unfortunately I don't have a good site for converting because there's truly just...no way to do it accurately! I highly recommend picking up a kitchen scale; your bakes will turn out much more consistent and with much fewer issues using weight measurements!
Toni says
These were messy and underwhelming. I also found the black cocoa powder (The Cocoa Trader brand which I have used in other recipes with no issue) to be too minerally/smokey/bitter, despite using a food scale for all ingredients. While I often times feel recipes have too much sugar, I agree with other reviews, do not skimp on either sugar (I was very heavy handed in my rolling). I would not make these again but my 13-year-old gobbled them up.
Rebecca Eisenberg says
I haven't tried the TJ's brand black cocoa powder before, so it's very possible that one has a slightly different flavor than the King Arthur one I use. Thanks for sharing that that's perhaps a brand to avoid for this recipe. I'm glad to hear your kid loved them though!
Heather says
These were amazing!! Oreo meets brownie (almost like oreo caksters-now i need to find a recipe for the filling). The batter itself it's a little bitter, but once in the sugar its soo good! Definitely making these again. 20/10 rating
Maureen says
Hi,
I made these for 2 different group and both groups loved them! Thank you! So now, of course, I have to make them for Thanksgiving. However, I was just informed that the number of dinner guests has doubled! Which is a long winded way of asking if I reduce the scoop size, to 2 tsp. instead of 1.5 tbl. what would you recommend for cooking time?
Rebecca Eisenberg says
I haven't tested them smaller but since these cook so quickly I wouldn't reduce the bake time too much — check them at 8 minutes and see how they look!
brenda says
i follow tpk on ig and fell in love with these cookies when rebecca posted about them around halloween time. i’ve never baked christmas cookies before but i thought this would be a simple but elegant entry recipe. happy to report that i nailed these. they were beautiful and delicious, light but rich and really fun to make! will definitely be making these again!
Box says
Hi! I only have regular cocoa powder, and I don't have money for black cocoa powder. Would it turn out okay with regular cocoa powder? And would I have to change anything in the recipe?
Rebecca Eisenberg says
Black cocoa powder and regular cocoa powder absorb liquids differently so I do think it will make a big difference in the way the cookie dough behaves. I haven't tested this with regular cocoa powder so can't say how it will change things, you'd have to experiment and see how it turns out!
Box says
Thanks for the reply! I'll have to try it out sometime!
Jill says
These cookies are fantastic! Not too sweet with a lovely chewy texture and they are so pretty! I brought these and the chocolate chip snickerdoodles to Christmas - everyone loved them & requested I make them again next year 😀
I really appreciate how you breakdown the recipe and have ingredient weights. It's so annoying trying to bake with volume measurements and getting different results each time. I can't wait for your cookbook <3
Laura says
Well... Dang. These were fantastic. My only complaint is that I genuinely think this recipe should be doubled. I will always make it as such going forward, even if only to freeze half! And I absolutely will be making these again because I know they will be a great treat to share and wow. Amazing texture and taste!
Caroline S says
I made these yesterday .. and today. I covered the dough that I didn’t bake yesterday and left it in the fridge overnight and just finished my baking 20 minutes ago. They were delicious both days. I’d never made crinkle cookies before - your recipe is so easy to follow and I love all the tips and other information. Thanks for all your hard work.