
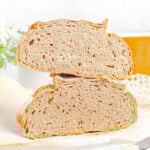
At last! The much-requested whole wheat version of my popular overnight no-knead white bread is here! I have tested it obsessively and am so pleased with the results. This whole wheat dough bakes into a crusty, rustic round loaf with a golden-brown, flour dusted, crackling crust. Inside, you'll find a dense-yet-tender crumb with a nutty-yet-mild whole wheat flavor.
It smells amazing while it bakes in a Dutch oven and it is so satisfying cutting hearty slices for sandwiches or toasting aggressively and slathering with homemade butter.

5-STAR READER REVIEW
“The recipe turned out excellent! Whenever I try to use whole wheat flour it turns out so dense, but this was light and delicious!”
—Grace
Notes From Recipe Development
Longtime readers of The Practical Kitchen know I have mixed feelings about requests for whole wheat bread recipes. One, I'm not the biggest fan of the flavor of whole wheat breads.
And two, I approach food and recipe development from an anti-diet culture perspective, and the requests for whole wheat bread recipes often come from people who disparage white breads because they think white flour is inherently "unhealthy" or "bad for you". Repeat after me: Food is food, food is morally neutral, and food isn't "bad" for you unless you're allergic or intolerant.
As to whether whole grain flours are radically more nutritious than refined flours, the answer is not as cut and dry as you might think. White flour is refined, but, unlike white sugar, it is not a purified compound; it does contain protein, vitamins, and minerals alongside all that starch. And wheat starch, unlike sucrose, is a complex carbohydrate, not a simple one. Yes, white flour is lacking in fiber, but you can get fiber elsewhere in your diet, and, more importantly, the health benefits of fiber are not incontrovertible.
— Bread Educator Andrew Janjigian, "Wheat or White?"
But some people do just like how whole wheat bread tastes. And as a recipe developer, I wanted to challenge myself to come up with a whole wheat bread recipe that was beginner-friendly and tasted good for those of you who want to enjoy whole wheat bread! Whatever your reason is!
From a purely baking science perspective, making bread with whole wheat flour is a lot harder than making bread with white flour. This is because bread-making is all about developing a gluten network in your dough. The strength of the gluten network is what allows the dough to trap air and hold its shape as it rises and bakes. Whole wheat flour contains the bran and endosperm of the wheat berries, which cut through that gluten network and weaken it.
Whole wheat flour is also more absorbent than white flour, which is why whole wheat breads often have a reputation for being dry. They need more water than their white bread counterparts. And more water = stickier dough = dough that's harder to handle.
So when I decided to make a whole wheat bread recipe, I wanted to make a loaf of whole wheat bread I genuinely enjoyed eating from a dough that wasn't a total pain to work with. I wanted to push the amount of whole wheat flour and water as high as I could without sacrificing too much strength, structure, and, most importantly: taste. And I wanted to do it while keeping the ingredient list as simple as possible.

My Perfect Ratio of Whole Wheat and White Flour
Like most whole wheat bread recipes, this recipe uses a blend of whole wheat and white flours. In this case, a blend of 42% whole wheat flour and 58% all-purpose flour.
To develop this whole wheat bread recipe, I started with my easy no-knead crusty white bread recipe and began experimenting with replacing a portion of the all-purpose flour with whole wheat flour in increasingly larger amounts. I was shocked and delighted to find I could go as high as 42% whole wheat flour and still produce a dough that was relatively easy to work with and a loaf of bread that wasn't dry.
On average, no-knead breads to range in hydration from 70% to 90%. My white no-knead bread recipe is an 80% hydration loaf (meaning the amount of water is 80% of the total weight of the flour).
But whole wheat flour is more absorbent than white flour, and I did not want a dry, dense whole wheat bread so I increased the amount of water in this whole wheat bread recipe to 85% hydration.
Even with more water, which usually produces larger air bubbles in the final bread loaf, this final whole wheat loaf has a relatively uniform interior crumb. That's because of the weaker gluten network from the whole wheat flour — it can't stretch as much to trap larger air bubbles.
Want this recipe, only smaller?
Find it in my Small-Batch Breads cookbook, available for pre-order now!
Featuring fifty easy-to-follow bread recipes made using 1 cup of flour.
Ingredient Notes
You only need five ingredients to make this easy whole wheat no-knead bread! See recipe card (at the end of the post) for quantities.

All-Purpose Flour - I use King Arthur Baking Company's all purpose flour which has a higher protein content (closer to bread flour) than other brands of flour. If you're using a grocery store brand of flour, you may get better results using their bread flour.
Whole Wheat Flour - You can use whole wheat or white whole wheat flour (sometimes called golden wheat flour) in this bread recipe. They are the same nutritionally and in terms of the way they behave in baking. The only difference between them is that whole wheat flour is made from hard red spring wheat, while white whole wheat flour is made from hard white spring wheat. White whole wheat flour has a milder taste, ideal if you're someone who doesn't love the aggressively nutty taste whole wheat flour often brings to baked goods.
How to Make Whole Wheat No-Knead Bread
No-knead bread is one of the easiest types of bread dough to make. And it's no different when mixing together a whole wheat no-knead bread dough.
- Mix all the dry ingredients together in a bowl.
- Add the water and mix until you have a sticky, messy, lumpy dough.
- Cover the bowl and let it rise at room temperature for 18-20 hours.
That's it! Really!
No-knead bread relies on time (instead of kneading) to develop a gluten network. The gluten network traps the gas produced by the yeast, creating air bubbles in the dough.


Perfectly proofed no-knead bread dough will have a bubbly top that is flat or slightly domed and stretches across the mouth of the bowl.
If your dough has overproofed, the flat top will have sunken in slightly. The good news is that slightly overproofed dough can still be shaped and baked. It will just produce a flatter loaf.
Thanks to the long, slow rise time you have a big window (about 2-4 hours) where this whole wheat bread dough is perfectly proofed and for shaping.
Depending on how cool or warm your kitchen is, your dough may rise faster or slower.
- Warmer temperatures increase yeast activity. If it's particularly warm in your kitchen (70°F+), reduce the amount of yeast to 1 gram OR know your bread may be ready to shape sooner than 18 hours.
- Cooler temperatures slow yeast activity. This is why we use cold water in this whole wheat bread recipe. We want a long rise time. You can also pop the dough in the fridge to slow it down even more if your kitchen is warm.
Make adjustments based on your kitchen environment as needed!

Then, turn the dough out onto a generously floured counter. It's very sticky dough, and the flour will prevent it from sticking. Dust the top lightly with flour too — just enough so your hands don't stick.

Whole wheat dough can feel particularly fragile during this process, so, if it helps, slide a bench scraper or plastic bowl scraper under the edges to help lift and fold the dough edges over the center.
The dough may stick to your hands slightly, but that's okay. You want it to stretch, not tear, so don't stretch it past its breaking point. Use a light touch and flour your hands or the bench scraper as needed to prevent sticking.
When all the edges have been tucked into the middle, flip the dough over. Now, the dough ball will have a nice smooth top.

Gently lift and rotate the dough ball in short, quick movements, tucking the dough underneath to create surface tension on top.

If the dough is extra sticky, slide a bench scraper or bowl scraper under it (with plenty of flour) and move it in a curved motion to help tighten up the dough.
Dust the top of the shaped loaf with flour, then cover it with a clean kitchen towel to rest. This final resting step after shaping allows the gluten network to relax and strengthen, and also regain some volume before baking.
During the final 30 minutes of rising time, preheat the oven with a covered Dutch oven inside.
Scoring and Baking
Scoring bread creates a vent for steam to escape in the oven. Without scoring, your bread will burst open unpredictably during any weak spots in the crust and might even blow out at the bottom.
When I make whole wheat bread like this, I like to use my lame to cut a design with a shaft of wheat into the top of the loaf to indicate it's whole wheat. But you can also just do a single slash down the middle or side if you prefer.

A dutch oven is the best way to get a nice crusty loaf
The tight space of the Dutch oven traps the steam released by the dough as it bakes, creating a moist environment that creates a super crunchy crust. It also helps control how the loaf rises in the oven — you'll get a rounder, taller loaf in a Dutch oven.
When you first take the lid off, your loaf will look pale. That's normal. The final 10-15 minute uncovered bake time is when the top will take on that gorgeous brown color.
Carefully remove the whole wheat loaf from the Dutch oven to a cooling rack. Let the whole wheat bread cool completely before slicing it. If you slice it before it cools, the steam trapped in the bread will turn the starches to mush.
What if you don't have a dutch oven? I tested this on a sheet pan in a 450°F oven with a couple ice cubes tossed on the sheet pan to create steam and it does work, but the crust isn't quite as nice and you won't get quite as dramatic a rise (oven spring). The confined space of the Dutch oven really will give you the best results.


Practical Tips & Recipe Notes
- Head over to my no-knead bread recipe for instructions on how to use a banneton or brotform to shape this whole wheat dough, for more detailed tips on doing a longer cold rise in the fridge, and more!
- Experiment with adjusting the hydration levels and the ratio of whole wheat flour to all-purpose flour in this recipe to find your perfect version!
- Getting a tall, domed loaf of bread depends on proper proofing, your shaping technique, and can be affected by the size of your Dutch oven. I got the best results baking this whole wheat bread in a 5.5 quart Dutch oven. If you used a bigger Dutch oven, if your dough was overproofed at all, or if you didn't create enough surface tension when you shaped the dough, these are all things that can cause a loaf to bake up with a flatter shape.
💭 Have More Baking Questions?
I've rounded up answers to common baking questions and how-to guides, including:
- Ingredient swaps and FAQs
- Why my recipes are written in grams and not cups
- How to quickly bring eggs and butter to room temperature
- Ingredients I use (salt, flour, yeast, etc.)
- Step-by-step guides for bread and baking techniques
See my baking techniques & troubleshooting guide and ingredient swaps and FAQs for more!

TL;DR - Recipe Summary
- Mix both flours, salt, and yeast. Add the water and mix into a sticky dough.
- Cover and rise for 18-20 hours at room temperature.
- Turn the dough onto a well floured surface. Dust lightly with flour.
- Tuck the edges of the dough up to form a ball. Flip so the seam side is down. Transfer to a crumpled and flattened sheet of parchment paper.
- Dust the top with flour, cover and rest 1-2 hours. During the final 30 minutes of resting, preheat the Dutch oven with the lid on inside a 450°F oven.
- Score the top of the dough. Then place the dough in the Dutch oven.
- Bake for 30 minutes covered, then 10-15 minutes uncovered.
- Let cool completely before slicing.
📖 Recipe
No-Knead Whole Wheat Dutch Oven Bread (Overnight Rise)
Recipe Notes
- This is a great base recipe for adding lots of fun spices, herbs, cheese, seeds, and more. Adding anything wet like peppers, raw onions, olives, etc. will add moisture to the dough and disrupt the gluten network while adding too many dry ingredients can also can affect the dough's hydration. I recommend adding no more than 50 grams of additional flavorings/ingredients/mixins to this dough. That's about 10% by baker's percentage (10% of the total weight of the flour).
- Gluten firms up in the fridge; if you find the sticky dough is too hard to handle at room temperature, you can pop it in the fridge prior to baking. It will be much easier to shape while it's cold. Let it rest at room temperature for an additional hour after shaping and before baking.
- For a long, cold rise, refrigerate the dough immediately after mixing or after at least 12 hours at room temperature. It will be fine in the fridge for up to 5 days!
- Diamond Crystal Kosher Salt is half as salty as other brands of salt by volume, so make sure you're measuring salt by weight! If you're using a different type or brand of salt and measuring by volume, cut the amount of salt in half.
- This is best eaten within the first 3-4 days after baking. You can store it at room temperature for 5-7 days. Storing it in an airtight container like a large resealable bag works well, though the crust will soften due to trapped moisture.
- A cloth bag, brown paper bag, or a bread box with a controlled air vent will help the bread retain moisture while preserving the crunchy crust. Do not refrigerate bread; the fridge temperature will make it go stale even faster.
- To freeze this whole wheat bread whole, let it cool completely, then wrap it well with plastic wrap and place inside an airtight bag. Defrost at room temperature, then spritz the outside with water and pop it in a 350°F oven for 10-20 minutes.
- You can also slice the loaf before freezing. Place in a plastic bag with as much air pressed out as possible. Reheat from frozen in a toaster.
Ingredients
- 290 grams all-purpose flour
- 210 whole wheat flour (or white whole wheat flour)
- 10 grams diamond crystal kosher salt (see notes for other types of salt)
- 2 grams instant yeast (use 1 gram if very warm in your kitchen)
- 425 grams cool water
Instructions
- Mix. Combine dry ingredients both flours, salt, and yeast together in a large mixing bowl. Make a well in the center of the dry ingredients for the water. Pour the water into the middle of the dry ingredients and mix until well combined. It will be shaggy and messy. That's okay.
- Long rise. Cover the bowl and set it aside at room temp to rest for 18-20 hours. You're looking for the dough to double or triple in size with a flat, bubbly top. Depending on the ambient temperature in your kitchen, the dough may be ready a little before the 18 hour mark, or be fine slightly past the 20 hour mark.
- Shape. Use a bowl scraper or your fingers to gently release the top edge of the dough from the bowl, pulling it into the center. Generously flour a clean countertop and turn the dough out onto the counter. Lightly flour the top of the dough just enough to prevent it from sticking to your hands. Fold the edges of the dough across the middle to pull it into a round shape with the edges pinched together on top. Flip the loaf over so the seam side is underneath. Cup your hands around it and lightly lift and rotate the ball of dough against the counter, tucking the dough underneath itself as you go to create surface tension on top. Dust with more flour as needed during shaping to prevent sticking.
- Rest. Crumple a piece of parchment paper into a ball. Flatten it out, then crumple and flatten it out again. Use a bench scraper to lift the ball of dough onto the flattened piece of crumpled parchment paper. Dust the surface of the dough lightly with flour, cover it with a clean dish towel, and let it rise for 1-2 hours.
- Preheat the oven to 450°F with a covered Dutch oven inside during the final 30 minutes of rise time.
- Score and bake. Score the top of the loaf. Then, carefully remove the Dutch oven from the oven. Take the lid off and set it aside. Gather the corners of the parchment paper together, pick the dough up, and place it inside the Dutch oven. Put the lid back on the Dutch oven.
- Bake. Place the Dutch oven inside the oven and bake the bread with the lid on for 30 minutes (don't peek!), then remove the lid and bake another 10-15 minutes until deeply golden brown on top.
- Cool. Transfer the fully baked loaf to a cooling rack and let cool completely before slicing.
Grace says
The recipe turned out excellent! Whenever I try to use whole wheat flour it turns out so dense, but this was light and delicious!
Valerie says
This recipe is amazing! I prefer the nutty taste of wheat bread over white and for years I’ve been using other bread recipes and playing around with substituting some of the flour and then messing with the water. (But never really recording anything so I could never repeat it haha) I loved this blog post that explained the water to flour ratio for wheat and why my experimentation often ended up with a dense loaf. This recipe worked amazing and I had a beautiful and tasty loaf. Thank you for doing the hard work!
Rebecca Eisenberg says
Yesssss I'm so so glad you enjoyed this! Whole wheat flour can be really finicky if you don't understand what it's doing in the recipe — I'm so glad this worked for you and that you enjoyed it! Happy baking!
Lu B. says
I wanted to write this review as soon as I made this successful and lovely loaf yesterday. But I felt it was necessary to first taste it before I did that. Having made a piece of toast for breakfast today, I can now confirm without a doubt that this bread is absolutely delicious. I did use the King Arthur White Whole Wheat (now known as Golden Wheat Whole Wheat Flour). It is so "wheaty" tasting but not heavy or dense. This will join my repertoire of frequently made breads, so many from Rebecca and her Practical Kitchen!
Charity says
When the dough is proofing after being shaped, should the loaf be in a bowl for its last proof, or just sitting on the counter?
Rebecca Eisenberg says
After you shape it and are just waiting for the Dutch oven to finish preheating it should be on the parchment paper on the counter covered with a clean kitchen towel or with a bowl inverted on top of it so it doesn’t dry out!
Ricci says
Alternative to a Dutch oven? Can I use a regular loaf pan?
Rebecca Eisenberg says
Hi Ricci! I answered this in the blog post: "What if you don't have a dutch oven? I tested this on a sheet pan in a 450°F oven with a couple ice cubes on the sheet pan to create steam and it does work, but the crust isn't quite as nice and you won't get quite as dramatic of a rise (oven spring). The confined space of the Dutch oven really will give you the best results. That said, the Kitchn has a good blog post with alternatives to Dutch ovens, but I haven't personally tested them and can't speak to how well they'll work."
Maria says
I can't wait to try this recipe! Quick question about the oven: do you use conventional heating or convex? My oven can do both, but the required temperatures are different for conventional and convex, so I want to be sure I'm doing it right.
Rebecca Eisenberg says
I have a boring old regular oven, no fancy convection settings at all!
Leslie says
Hello. I'm loving your recipes. What would happen if vital wheat gluten was added to this recipe? I have some because I thought one day I'll try whole wheat bread and when I read that whole wheat flour doesn't have the gluten white flour does, this question popped into my head. Thanks for your recipes. I'm enjoying them.
Rebecca Eisenberg says
I haven't tested this so I'm not sure, but I think that advice usually applies more to breads made with 100% whole wheat flour. This recipe uses a blend of wheat and white flours to ensure there is enough gluten to support the structure of the loaf. I don't think adding a bit of vital wheat gluten would hurt it — it will just make the dough a bit stronger!
Leslie says
Thanks. That makes sense!
Alison M says
I LOVE this recipe and make it once a week for months now. Sometimes twice!! Thank you for de-mystifying whole wheat bread! This week I needed a sandwich shaped loaf so I made it using your method with two Pullman pans. Perfection!
Alyssa says
Can active yeast be substituted for instant? I know in some of your recipes it needs to be increased to accommodate and in others it’s the same.
Thank you!
Rebecca Eisenberg says
Yes you can use active dry yeast in this recipe without changing anything! Happy baking!
Alyssa says
It worked great! Thank you!!!
Molly says
Can you sprinkle a coarse flavored salt on top of the dough before baking it for a little extra crunch and taste?
Rebecca Eisenberg says
Absolutely!!