
A gorgeous, tender, deeply flavorful red wine braised brisket might not be something you make every week — or month, even — but on those special occasions when you do? There's nothing better.
Slow cooking beef brisket in a rich, savory red wine bath for several hours transforms the tough, fatty cut of beef into something so tender and juicy you hardly need a knife to cut it.

This red wine braised brisket recipe is a variation of the recipe my husband and I usually make for my family at Passover. We usually use a 10-12 pound brisket, but I shrunk this recipe down to use a medium sized 6 pound brisket since it's easy to scale up or down.
Braised brisket is also a great dish for other food-centric holidays like Rosh Hashanah, Hanukkah, Shabbat, or, for my non-Jewish readers, Christmas.
A braised brisket is the perfect blend of high and low effort cooking to both impress and feed a hungry crowd.
- Brisket can be partially prepped in advance. In fact, it tastes even better when made ahead as the flavors have more time to absorb.
- Braised brisket cooks low and slow for several hours without you needing to do anything with it.
- It rests in the cooking liquid after being sliced so it stays juicy and doesn't dry out, which is great if you aren't serving it right away.
- Braised brisket can easily be served family style, buffet style, or plate-by-plate.
- Brisket is an expensive cut of meat, but it also feeds a lot of people for the money. It's a good choice if you're looking for a slightly expensive dinner that doesn't feel too fussy or formal.
Braised brisket doesn't just have to be for holidays and crowds. If I ever see a good price on a 3-6 pound brisket, I'll pick one up for non-holiday cooking purposes, cook it up over the weekend and enjoy eating brisket sandwiches as leftovers all week long.

If you're looking for other low-and-slow recipes that feed a crowd, check out my applesauce-glazed oven ribs!
Credit where it's due: This recipe was adapted from the Braised Brisket recipe in Chef Antonia Lofaso's Busy Mom's Cookbook (which uses a 3 lb brisket) and Andrew Zimmern's Hanukkah Brisket along with some additions and changes of my own.
Ingredient Notes
Here are the ingredients that you'll need to make this red wine braised brisket recipe! See recipe card (at the end of the blog post) for quantities.

- Brisket - One whole brisket flat. If your brisket has a particularly large or thick fat cap, you may want to trim it down slightly before cooking. Sometimes the brisket flat is sold along with the brisket point. If you buy them together, you'll want to separate them before starting the recipe.
- Onions, Celery, Carrots - Your classic mirepoix ingredients. Chop them pretty large so you don't have lots of little pieces to remove or strain out later.
- Tomato Paste - I usually use the canned tomato paste for this rather than the tomato paste concentrate from the tube.
- Rosemary, Thyme, Bay Leaves - Fresh rosemary and thyme, dried bay leaves. These are pretty classic roasting herbs; you could also add sage or tarragon.
- Beef Bouillon Paste - A low-sodium beef bouillon paste works best here. If you can only find the full sodium beef bouillon paste, hold back on adding salt later in the recipe until you can taste it.
- Water - To help deglaze the roasting pan.
- Dry Red Wine - Honestly, I just look for the cheapest Cabernet Sauvignon I can find at the wine store. You really don't need anything fancy here.
- Salt - I use Diamond Crystal Kosher Salt which half as salty as other brands. If measuring by weight, it doesn't matter what brand of salt you use. But if you're measuring by volume and using a different brand of salt, even a different brand of kosher salt, cut the amount of salt in half.
- Black Pepper - Pre-ground black pepper or freshly cracked, both will work just fine.
- Vegetable Oil - You can also use olive oil.
"[Cabernet Sauvignon] is an excellent choice for braising proteins such as ribs. The braising effect will soften the meat while it cooks and enriches the flavors of the additional ingredients. [...] When deglazing with a cabernet, its lack of sugar will prevent it from caramelizing over a hot pan."
Masterclass.com, "What is the Best Wine for Cooking"
Instructions
The trickiest thing about making a braised brisket is simply managing the size of it. I wrote this recipe to use a medium-sized six pound brisket. It won't fit in a standard sized pan on your stove.
This means you will need to use a large roasting pan across two burners on your stove for the first few steps. It can feel a little bit frantic, so make sure you have your ingredients and equipment organized before you begin.
Most importantly: Make sure you have an oven mitt nearby. Not all roasting pans have heat-safe handles the way skillets do, and you don't want to accidentally grab the edge of the hot pan with a bare hand. If you have a second person around who can hold the pan in place while you flip the brisket, please ask them to help!
Do NOT use a disposable aluminum roasting pan for this recipe. They are not designed to be used on the stovetop and will buckle under the weight of the brisket.

Pat the brisket dry with paper towels and season on both sides with salt and pepper. You can do this step the night before and leave it, covered, in the fridge overnight, too.

Sear the brisket on both sides in the roasting pan over two burners on your stove. You may need to use two sets of tongs to lift the brisket.
At this stage you're not trying to cook the brisket all the way through. The goal is just to get some nice browning (we love a Maillard reaction moment) on the brisket and let some of the fat render into the roasting pan for flavor.
Remove the seared brisket from the roasting pan back to the sheet pan. Don't worry about putting cooked meat on a raw meat surface — the brisket is going to be cooked again soon!

Add 1-2 tablespoons of oil to the pan and saute the onions, carrots, and celery until they begin to soften.
Then add the tomato paste and beef bouillon paste.
Stir well until everything is coated begins to caramelize and brown around the edges.

Add the fresh herbs and garlic, then deglaze the pan with a cup of water.
As the water bubbles and boils, scrape up any browned bits of bouillon and tomato paste on the bottom of the pan.
This is called "fond" and it's full of flavor!

Push the vegetables to the edges of the pan and add the brisket back to the center. Pour the whole bottle of wine over it. Cover the pan tightly with foil and place in the center of a 300°F oven.

Cook the brisket covered until the internal temperature of the brisket reaches 195°-200°F internally. There will be some carryover cooking as it rests.
Cook time can vary based on how cold the brisket was when it went into the oven and how well your roasting pan conducts or retains heat. A good rule of thumb is to assume 20-40 minutes cook time per pound of brisket.
But the most important thing is that the brisket has reached the correct internal temperature. The timing is an estimate only, think of it as a way for you to know when to start checking for doneness.
You can use either a wired or wireless internal thermometer probe which will alert you when the brisket reaches the right temperature without you having to take the foil top off to check.
Or you can use an instant read thermometer to check the brisket for doneness after the minimum estimated time has passed.
The Practical Kitchen Recommends


Keeping Braised Brisket From Drying Out
When the brisket reaches the right temperature for doneness, remove the pan from the oven and let it rest, still covered with foil, for about 30 minutes.
This gives it some time to keep soaking up that braising liquid without overcooking.

The next step is to remove the brisket from the roasting pan to slice it.
But this isn't the last time we're going to let the brisket soak up those flavors and moisture! I told you — we are not going to let this brisket dry out.

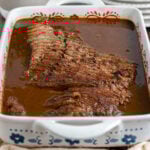
Remove the whole brisket to a cutting board and slice it across the grain into ¼" thin strips.

Strain the braising liquid into a pot to remove the vegetables and herbs.
You may want to remove some of the vegetables with tongs before lifting the hot roasting pan to pour; it's less messy!
(The braised carrots are incredibly tasty — treat yourself to some nibbles for your hard work!)
Let the braising liquid stand for 2-3 minutes so the fat rises to the top of the pot. Use a spoon to skim off as much of the fat as you can.

Bring the braising liquid to a boil, reduce the heat slightly to maintain a low boil, and let reduce for 10-15 minutes. Taste and add salt or pepper if needed.

Return the sliced brisket to the roasting pan or a serving dish and pour the reduced braising liquid back over it. This will keep it from drying out!
How to Serve Braised Brisket
If you're not serving the brisket for a couple more hours, reduce the oven heat to 200°F and place the covered pan back in there to hang out until it's time to eat. Turn the heat back up to 300°F about 30 minutes before serving.
If you're not serving the brisket until the next day, let it cool completely, then place in the fridge overnight. Reheat in a 300°F oven for about an hour before serving.
You can choose to serve the brisket in the braising liquid or with the braising liquid on the side.
- In the braising liquid: Works best if eating "family style" with a smaller group where everyone can easily reach the serving dish. Serve with a small ladle or serving spoon on the side so people can spoon the liquid over the slices on their plates. You can just put the whole roasting pan on the table if you're serving it this way, but I usually transfer the sliced brisket to a smaller rectangular casserole dish if I'm going to put it on the table.
- Braising liquid on the side: Works best if you're serving a large group at a big table. When you're ready to serve, transfer the sliced brisket (which has been resting in the braising liquid in the roasting pan) to a serving platter. Pour the reduced braising liquid into a gravy boat and place on the table for guests to pour over their brisket slices.
Scaling Up and Down
To scale this six pound braised brisket recipe up or down, you don't need to make too many changes unless the brisket is significantly larger or smaller.
Most of the ingredients are aromatics that get strained out anyway, so scaling is mostly about adjusting the cook time.
A good rule of thumb is to assume 20-40 minutes cook time per pound of brisket. The key indicator for doneness is an internal temperature of 195°-200°F.
- For a 3 pound brisket, you can use a 4 quart cast iron braising pan instead of a large roasting pan. With a smaller surface area, you'll need less salt and pepper when seasoning the brisket. Use the same amount of wine, but reduce the number of carrots and onions by one each.
- For a 10-12 pound brisket, add an extra onion and carrot and twice as much wine (a 1.5 liter bottle). The larger surface area means you'll need to increase the amount of salt and pepper for seasoning the brisket as well.
Storage Notes
Braised brisket stores nicely in the fridge for up to 5 days.
Store braised brisket tightly covered in the braising liquid to reheat the whole dish in the oven at 300F. Or store the brisket slices and braising liquid in separate containers to reheat separately.
If I'm not making this to serve a crowd, I usually do the latter and reheat a few slices at a time in the microwave. The meat is so tender and juicy the microwave actually works really well for it!
The Kitchn has a great guide to freezing braised brisket, which involves freezing the slices individually on a sheet pan so you can easily reheat just what you need.

Practical Tips and Recipe Notes
- If you don't want to use red wine, use beef broth instead. You'll still want to use the beef bouillon paste as written in the recipe. Just substitute the wine for beef broth.
- Most resources I've consulted while developing this recipe estimated 30-60 minutes of cook time per pound of brisket, but I've found my brisket is usually slightly above temperature by the time I check at the minimum time estimated if I use those guidelines. I prefer to use an estimate of 20-40 minutes per pound of brisket.
- Check out my guide to slicing against the grain if you're not sure how to do so. In a brisket, the grain usually runs on a diagonal, so don't worry if you're not perfectly perpendicular to it. As long as you aren't slicing perfectly parallel to the grain, it'll be fine.
- In these photos I'm using a non-stick roasting pan with a grill-pan style bottom. This is NOT the best type of roasting pan to use here. A non-stick pan isn't meant to be used over the high heat of a stovetop for very long. I recommend a stainless steel roasting pan with a flatter bottom if you have one. My usual roasting pan is currently in storage and this is the only one I could borrow from my MIL that would fit the brisket.
- Do NOT use a disposable aluminum roasting pan for this recipe. They are not designed to be used on the stovetop and will buckle under the weight of the brisket.
📖 Recipe
Red Wine Braised Brisket (Great for Holidays!)
Recipe Notes
- A good rule of thumb is to assume ½-1 pound of brisket per person (uncooked), and 20-40 minutes per pound of meat for the cook time. The timing is always an estimate. The internal meat thermometer is the only way to know for sure it is done.
- If you don’t want to cook with wine, you can use beef stock instead. You will still want to use the beef Better than Bouillon with the vegetables in addition to the beef stock.
Ingredients
- 6 lb brisket flat
- 2 large carrots (peeled and cut into 3" chunks)
- 3 large celery stalks (cut into 3" chunks)
- 2 large yellow onions (peeled and cut into quarters)
- 1 bulb garlic (cut in half)
- ¼ cup tomato paste
- 2 sprigs fresh rosemary
- 8-10 sprigs fresh thyme
- 3 bay leaves
- 1 cup water
- ⅛ cup beef bouillon paste
- 750 mL dry red wine (one standard sized bottle)
- 2 tablespoons diamond crystal kosher salt (divided)
- 2 teaspoons black pepper (divided)
- ¼ cup vegetable oil (or olive oil)
Instructions
- Prep and season. Trim the brisket if needed. Season each side with 1 tablespoon of salt and 1 teaspoon of black pepper. Place on a sheet pan and set aside. This step can be done the night before; cover the brisket loosely with foil and refrigerate overnight.
- Preheat the oven to 300F. Place a rack in the top most position and lower middle position. Hang your oven thermometer from the top rack in the center of the oven. Adjust the oven temperature as needed until the oven thermometer reads 300F.
- Mise en place. Prepare the vegetables and herbs. Peel and cut the carrots, chop the onions and celery, get out the herbs, measure out the bouillon, tomato paste, water, and uncork the wine bottle. Make sure you have an oven mitt handy.
- Sear. Place the roasting pan across 2 of your stove top burners over medium heat. Drizzle 2-3 tablespoons of vegetable oil in the bottom of the pan, enough to coat. Let the oil warm up until shimmering, then carefully sear the brisket on both sides, about 3-4 minutes per side. If you’re feeling ambitious and have someone to help hold the pan in place, use two tongs to carefully lift the brisket and hold it upright to brown the edges. Remove the brisket from the roasting pan back to the sheet pan to rest.
- Vegetables. To the same roasting pan, add another drizzle of oil. Then add the chopped carrots, onions, and celery. Stir frequently until the veggies soften and the onions are starting to become translucent, about 5-7 minutes.
- Tomato paste and deglazing. Add the tomato paste and beef bouillon paste and stir well until the vegetables are coated with it and it starts to brown and caramelize, about 3-5 minutes. Deglaze the pan by adding a cup of water, using the edge of your spatula to scrape any browned bits (the fond) off the bottom of the pan.
- Aromatics and wine. Add the garlic and whole herbs. Stir to submerge them in the broth. Push the vegetables and herbs to the edges of the pan. Put the brisket back in the roasting pan and pour the whole bottle of wine over it. Cover with aluminum foil.
- Braise. Place roasting pan in the center of the oven. Cook the brisket covered, until the internal temperature reaches 195-200F internally, approximately 3 hours. Actual cook time will vary depending on the temperature of your brisket before going into the oven; a good rule of thumb is to estimate 30-60 minutes per pound.
- Resting. Take the whole pan out of the oven and let it rest, covered, for 30 minutes. Then, remove the brisket from the pan, leaving the liquid and vegetables behind.
- Strain and reduce. Use tongs to remove the biggest chunks of vegetables from the braising liquid. Pour the liquid through a strainer into a sauce pot. Let stand for 2-3 minutes so the fat rises to the top of the pot. Use a spoon to skim as much of the fat as you can. Place the pot on the stovetop and bring it to a boil. Reduce to a low boil and maintain it for 10-15 minutes.
- Slice. While the liquid is reducing, carefully slice the brisket into ¼” strips. Return the brisket to the roasting pan. Taste the reduced braising liquid and add ½ teaspoon salt and ¼ teaspoon pepper if it needs it. Then pour the liquid over the brisket into the roasting pan.
- Keep warm or serve. Serve immediately or cover with aluminum foil and let rest in a 200°F oven to keep warm. Thirty minutes before serving, increase the temperature to 300°F. After transferring the brisket to a serving platter, pour the liquid into a gravy boat or bowl for people to spoon over their brisket.
Meg says
This recipe turned into the most delicious meal. My 4.75lb Brisket took a little over 5 hours, but it was very much worth the wait. I love how your instructions were so detailed. This was not as difficult of a cooking project as I anticipated it would be.
Tavie Phillips says
I sent this recipe to my sister for our Easter/Passover family meal and she made it for our family of 7 and it was a huge success. Definitely going into the permanent rotation. She reports that it was easy to make - the hardest part was transporting all that meat to our aunt’s house! She included the carrots in the final presentation and I was so glad she did because they were, as you reported, incredibly tasty.
I’m already looking forward to making this on a smaller scale for just me and my husband. That gravy was next-level delicious.
A million stars for this one!!!
Chicken lady says
Very tasty. I added carrots and onions the last hour to serve with the meat. Came out very tender.
Rebecca Eisenberg says
Such a good idea to add veg at the end to actually serve! So glad you liked it 🙂
Robin says
I can’t find beef bouillon paste that’s kosher for Passover. Can I use something called ‘beef flavor instant soup and seasoning mix’ instead?
Rebecca Eisenberg says
I think that would work but you could also just replace it with more tomato paste!
Robin says
Great! Thank you so much! Have a great holiday!
Mike says
Internal temperature, thank you! The first recipe that included that! Making a 3 pound flat cut tonight, was thinking mostly along the lines of your ingredients. Life is a test kitchen....
Rebecca Eisenberg says
I've done this recipe with a 3 lb flat! It can cook quite a bit quicker, so make sure to keep an eye on it! Enjoy your dinner!
gg says
This recipe is a keeper. My guests loved it!
Mr. G. says
Hello : I am a crock pot lover..... how would you adjust the recipe for a crock pot or slow cooker ?.... ALSO, could you leave out the water,using more red wine ? I would appreciate also a response in an email....
Rebecca Eisenberg says
Hi! I don't have a crock pot so unfortunately I can't tell you how to do this. I think you'd still have to sear it on the stove before putting it in the slow cooker, at which point it should cook similarly to how it does in the oven. But I'm not positive on that! I'd recommend doing some searching for brisket recipes that are made in a slow cooker and using their cooking methods with these ingredients. And yes, you can replace the water with more red wine.
EDIT: I removed your 4-star rating since you haven't made the recipe.
Mashwe Hla says
I will be making it along with other dishes for a huge gathering, can I cook it a days ahead and either refrigerate or freeze the meat part and sauce separately
thanks, looks like a great recipe and I've love to make it
Rebecca Eisenberg says
Yes! You can cook this up to 7 days ahead of time and store it in the refrigerator until ready to serve.
Mashwe says
Thank you, you are a sweetheart.
Love your recipe, and love you
Bonny Lister says
The Best Ever!
So tasty and worth every minute it cooked. I made this recipe for my son (my best critic) and he loved it. He said it even tasted better the next day. So this will be part of my Christmas Eve Dinner, and for many more dinners to come.
Thank you so much.
Margo Rogers says
excellent made for Easter Sunday
Daniel says
Great dish, used 4.5 lb brisket, not enough veggies, so will increase carrots next time. Used entire can (6 oz) of tomato paste, absolutely awesome tasting sauce. Served with mash and poured some of the sauce of it, great taste. We used better than bouillon and used 2 heaping tablespoons.
Aimee Silverman says
I have made wine, braze, brisket before and instead of using dry wine I have used Manischewitz Concord grape wine and beef broth instead of beef bouillon. How different would it be if I followed your recipe? Also, if I have a 10 pound brisket and I cut it in half, will it cook in half the time?
Rebecca Eisenberg says
You can use concord grape wine and beef broth instead of bouillon in this recipe without an issue, mine is probably pretty similar! A 5lb brisket will probably take anywhere from 3-5 hours to cook!
Jin-hyuk Yu says
Really good recipes.
I used 5 lbs of pork neck since I couldn't buy a brisket, but this worked really well.
Sauce came out too much, but I saved remaining sauce to use for other types of steak like a prime rib. Really amazing.
Rebecca Eisenberg says
Love that!!!