

Ciabatta is an Italian bread known for its floury crust and airy, chewy crumb. My recipe for soft-baked ciabatta bread uses a simple coil fold, which involves periodically lifting and tucking the dough under itself while it rises to develop strength and structure. The result is a super soft homemade ciabatta bread with an open crumb, perfect for sandwiches. Ciabatta's rustic appearance also means it is surprisingly easy to shape!

Clocking in at just three hours start to finish (most of it hands-off resting time), my beginner-friendly ciabatta recipe is a perfect option for a lazy weekend or evening baking project! I love baking ciabatta sandwich rolls to serve with my deli-style tuna salad or as tear-apart dinner rolls with my favorite homemade spaghetti sauce.
5 star reader review
“I LOVE this recipe!!! It's easy to follow even though I'm a super beginner at baking and it's my second weekend in a row that I've made a batch!! The bread comes out tasting better than ANYthing I've ever bought in the store and I find myself a giggling mess just thinking that "I" made bread!”
—Ida
The SOFTEST Ciabatta bread you'll ever bake
One of my biggest complaints about store-bought ciabatta bread is that the crust is too thick and hard. It can be tough to bite into, especially with lots of sandwich fillings.
So for my homemade ciabatta bread recipe, I focused on developing a soft and fluffy texture inside and out. The crust is chewy and floury; it's undeniably ciabatta, but soft and squishy enough to bite into without issue.
This is the full-size version of my small-batch ciabatta which is made with one cup of flour. To scale the mini ciabatta up and better support the additional weight of a larger dough, I snuck in an extra set of folds and extended the bulk fermentation by 30 minutes. But don't worry, it's still a quick ciabatta bread recipe that you can make by hand, no mixer needed.

To give this ciabatta bread its soft, fluffy crumb my recipe uses a high-hydration, very wet dough. Since it's too wet to knead, I like to use a coil fold (more on that below) technique to build structure into the dough.
You don't need a special pan to bake ciabatta bread. Just plop it onto a parchment-lined sheet pan, cut it into pieces, and your soft and fluffy ciabatta is ready to bake.
Grocery List and Ingredient Rundown
Here are the ingredients that you'll need to make my soft and fluffy ciabatta bread! They're all very basic and easy to find in most grocery stores. See recipe card (at the end of the post) for ingredient quantities.

How I Mix My Ciabatta Dough
Making my soft-baked ciabatta takes just about 3-ish hours, start to finish. It's a very hands-off recipe with no fancy shaping; it's meant to have a rustic, imperfect shape.
If you're new to bread making, homemade ciabatta bread is a great place to start. You can do this!


I use a square container for mixing and folding my soft-baked ciabatta dough — it helps train the dough to hold a square shape so it's easier to cut later. But you can absolutely use a round mixing bowl instead.
Resting and Coil Folding (Bulk Fermentation)
After the dough has been mixed, it's time to let it rest for two hours (this is called "bulk fermentation"). During the first hour, you'll build strength and structure into the dough using a gentle technique called a coil fold.
By letting the ciabatta dough rest between these sets of coil folds, air bubbles are trapped inside the dough's gluten network, giving the ciabatta its open, airy crumb.
I know, it sounds complicated! But all you really need to know is that it's a two-hour rest total, with folds every 15 minutes for the first hour. That's four sets of folds total. During the second hour, I leave the dough to rise undisturbed.
TIP: To keep track of which set of folds you're on, put a small bowl with four candies, crackers, or snacks in it. Eat one each time you do a set of folds.

The first hour starts immediately after you finish mixing the dough. After mixing, the dough rests for 15 minutes, and then you do the first set of coil folds. Each "set" of folds consists of four coil folds.
On the first set of folds, the ciabatta dough will feel weak and might even tear. That's okay. Keep going. Plop it down over itself. It will continue to strengthen as you keep folding.
![[coil fold] an overhead shot of two hands lifting ciabatta dough straight up from the center to do a coil fold.](https://thepracticalkitchen.com/wp-content/uploads/2023/04/fluffy-fast-ciabatta-bread-234.jpg)
![[coil fold] a side view showing two hands lifting stretchy ciabatta dough straight up from the center in a square dough bucket.](https://thepracticalkitchen.com/wp-content/uploads/2023/04/fluffy-fast-ciabatta-bread-247.jpg)
It's okay if both ends of the ciabatta dough release from the bowl. The goal is to get the two flaps tucked under the dough. Pull the dough toward your body, so the flap of dough closest to you curls under itself. Let the far flap of dough settle on top of it to form a coil shape.
![[coil fold] two hands lowering the stretched dough so that one side of it has tucked under the other creating a coil shape.](https://thepracticalkitchen.com/wp-content/uploads/2023/04/fluffy-fast-ciabatta-bread-294.jpg)
![[coil fold] two hands pulling out of the bucket having just released the dough after finishing a set of coil folds. the dough is in the bucket with both ends tucked under itself.](https://thepracticalkitchen.com/wp-content/uploads/2023/04/fluffy-fast-ciabatta-bread-304.jpg)
Rotate the bowl a quarter turn and repeat. Each time you pick up the dough, your fingers should be sliding under the newly tucked-under ends.
On the first coil fold in each set, the dough will be relaxed and easier to stretch. By the final fold in each set, it won't stretch it quite as much. The gluten network is getting stronger. Each time you do a set of folds the dough will feel smoother and stronger.
After the final set of coil folds, cover the bucket and let the dough rest. At this point, you want the dough to work on developing nice bubbles. At the end of the rise time it will look airier and will double in size.


How I Shape and Cut Ciabatta Dough
Always cut and shape ciabatta on a generously floured work surface.

If you're going to cut your ciabatta into smaller ciabatta buns, this is the time to do it. You can also just bake the loaf whole, that's fine too.
- Cut in half: Long loaves, good for slicing like sandwich bread.
- Cut in quarters: Large sandwiches.
- Cut in eighths: Medium sandwiches.
- Cut into sixteenths: Dinner rolls.


You can also cut the dough into sixteenths or even smaller to make dinner rolls. Don't separate the rolls on the pan before baking, and they'll bake up pull-apart style.
Use a sharp knife or bench scraper in an up-and-down motion to make your cuts, and leave the sticky cut edges facing open. Don't tuck them under or try to hide them. Ciabatta is a very loose bread — no fancy shaping required.
BONUS: Flipping for Floury Stripes
This is a technique I picked up in a class at King Arthur Baking HQ in Vermont. And while it's technically optional, it gives the ciabatta such a pretty pattern on top.
While the cut loaves are resting, the dough expands, and the flour on the countertop trapped underneath the ciabatta gets trapped in the wrinkled creases, creating a unique striped pattern.
To reveal those beautiful tiger stripes and give your soft-baked ciabatta buns their own unique fingerprints, flip each loaf over as you transfer it onto the sheet pan, immediately before baking.

Slide a metal bench scraper under the ciabatta in one quick motion.

Use the bench scraper or floured hands to nudge the flipped rolls apart.

Right out of the oven, the ciabatta loaves will feel hard to the touch. That's okay, they will soften as they cool.
5 star reader review
“This is an amazing bread. I made it twice so far. The first time was 8 little ones for smoked meats sandwiches and again this morning but I made 2 loaves. I taught my 10 year old son to make it and he was amazed at how good it was for so little effort. Thank you for sharing this.”
—Scott


💭 Have More Baking Questions?
I've rounded up answers to common baking questions and how-to guides, including:
- Ingredient swaps and FAQs
- Why my recipes are written in grams and not cups
- How to quickly bring eggs and butter to room temperature
- Ingredients I use (salt, flour, yeast, etc.)
- Step-by-step guides for bread and baking techniques
See my baking techniques & troubleshooting guide and ingredient swaps and FAQs for more!
📖 Recipe
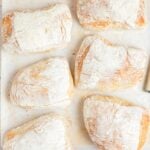
3-Hour Soft-Baked Ciabatta Bread
Recipe Notes
- Overnight rise: Cover the dough and place in the fridge after the final set of coil folds and let it finish bulk fermentation there.
- Be gentle: The folding process is as much about incorporating air as it is about building strength into the dough. Once the dough has finished bulk fermentation, handle it as gently as possible to preserve as much of the air inside the dough as you can. Use "fingertip light" pressure to stretch and shape it.
- Coil fold troubleshooting: If you find it easier to do stretch and folds, do those instead. It doesn't matter that you do the coil folds perfectly. It matters that the gluten network in the dough is getting folded at all. Do your best with the coil folds, but if there's a different folding method or technique that works better for you — use it!
- Dust off excess flour before baking: Some people like a super floury ciabatta, while others prefer less flour on the outside. Whatever flour is on top of your ciabatta loaf when it goes into the oven is going to be there when it comes out. For a less floury ciabatta, use a pastry brush or your fingers to dust it off.
- How to store: Baked ciabatta can be stored at room temperature for 4-5 days in an airtight container or plastic bag at room temperature with a paper towel to absorb moisture. It will begin to lose its super soft and squishy texture after about 2 days, but can be revived by toasting or popping it in a 350°F oven for a few minutes.
- How to freeze: Ciabatta freezes beautifully. I usually just toss the loaves in a plastic bag and freeze them, but if you want to do it "right" and avoid freezer burn, wrap each individual loaf in foil or plastic wrap before putting them in a bag in the freezer. To reheat soft-baked ciabatta from frozen, unwrap the bread and place the whole loaf in a 350°F oven for 5-10 minutes.
- On a baking steel/stone: To bake on a baking steel, preheat the oven for 1 hour at 450°F. Launch the ciabatta loaves onto the steel using a pizza peel with or without parchment paper and bake for 15-17 minutes.
Ingredients
- 500 grams all purpose flour (plus ~20 grams more for dusting)
- 15 grams diamond crystal kosher salt
- 6 grams instant yeast (2 teaspoons)
- 425 grams warm water (90°F)
- 30 grams extra virgin olive oil
Instructions
- Mix. In a large mixing bowl (or a square dough container), whisk together the flour, salt, and yeast. Make a well in the center and add the warm water and olive oil. Use a dough whisk, fork, or small spatula to stir the liquid in the center, slowly incorporating flour from the sides of the bowl until it comes together in a messy ball with no dry patches of flour hiding inside.
- Bulk Fermentation. Cover the bowl and let the dough rest for 1 hour, performing a set of coil folds every 15 minutes. After the final set of folds, cover the bowl and let the dough rest for an additional 1 hour.
- Preheat. Preheat the oven to 450°F with a rack in the center position. Line a sheet pan with parchment paper and set it aside.
- Stretch. Dust your counter well with flour, then dust the top of the dough with flour too. Flip the bowl upside down over the floured countertop and let gravity pull the dough down. Gently lift the bowl off the dough, using your fingers or a bowl scraper to help any stuck pieces of dough release cleanly.
- Cut. Dust the sticky top side of the dough lightly with flour. Cut the dough into two, four, eight, or 16 rolls. Cut in an up and down motion so the dough doesn't stick to your blade. Dust the newly cut sides with additional flour as needed to prevent sticking. Be patient, and don't worry about them being perfect. Cover the dough with a clean dish towel and let it rest for about 30 minutes.
- Flip (Optional!). Dust any excess flour off the top of the dough, then slide a bench scraper under the ciabatta loaves in one quick movement. Lift and gently flip them over onto the sheet pan so the underside is now facing up. If you don't have a bench scraper, use your hands to flip it.
- Bake. Bake until puffed up, light golden brown around the edges, and the internal temperature reaches 195°F, 17-19 minutes.
- Cool. Let cool completely before slicing. Even soft-baked ciabatta will seem very hard and crusty when it first comes out of the oven, but will become soft and fluffy as it cools. Transfer to a wire rack to cool faster.
Julie says
Too much salt in this recipe I’d use 10 grams other than that it’s great
nicole says
i don't think ive left a review yet, but we make this recipe all the time! its such a delicious bread and has great texture, perfect for sandwiches and straight up snacking. i love that its a start at lunch and have for dinner situation, and it doenst need much hands on time. plus its a great bread to prep ahead since they freeze so well, we always appreciate having some in the freezer for future easy sandwiches.
i think it makes a great beginner bread as long as you can trust the process. you need very few supplies and tools, and its pretty quick and simple to throw together. the first fold is a moment of 'oh crap did i mess up?' but as long as you trust the recipe and keep going, it really does become a more manageable dough. and even if you flop them on to the tray less than gracefully, theyre forgiving and bake up beautifully. a ten out of ten for us, we will happily keep coming back to this recipe!
Pop Pop Bakes says
These are amazing. I love her recipes, so easy to follow and she does such a great job explaining all of the steps and tips!
Amanda says
Great recipe, will definitely be making again! Flavor and texture were perfect .
Katherine says
Delicious and so easy! My whole family enjoyed this ciabatta! The instructions are super helpful. We will make it again and often for sure. Thank you so much for sharing this wonderful recipe!
Brant Zijlstra says
Made this today from 100 gram whole wheat spelt and 400 grams 65 spelt and it is great followed the recipe was a littlebit scared at first because it was so wet but after the folding it was ok.
Spelt has sometimes issues with rising but this was good all the way
A big thankyou!!
And it tastes great!!
Jenn says
I made this recipe and it was very easy so soft and super delicious. These will be my new go to buns.
Wes says
I loved these so much, following the recipe as written, that I am trying it using my sourdough starter instead of yeast, adjusting the amount of flour and water to allow for the extra flour and water in the starter. I also want to use the dough to make cheesy bread bites. I'm excited!
Charlie says
I just made these and they turned out fabulous. I did make 2/3rds of the dough and cut the rolls into 6. The only part I was unsure about is when you stretch the dough out, roughly what size is it before cutting?
Rebecca Eisenberg says
Hi Charlie! I'm so glad you liked the ciabatta. Because the dough is so loosely shaped, I don't usually measure it before cutting, I just aim for it to be roughly even in thickness across, maybe about an 3/4"-1" tall.
Emily says
Just made this recipe for the second time and turned out perfectly both times! It is now firmly a keeper in our house. 😊 I use regular yeast so I just use some of the water a little warmer and proof quick before continuing with the recipe. Makes the perfect bun for crispy chicken sandwiches! YUM
Morebread Please says
Easily the best recipe for a simple quick and delicious Ciabatta bread.
I've made this multiple times now and have had nothing but success!
Thanks so much.
Robin says
Made these Saturday morning for a late afternoon party. Recipe was so easy to follow. I did struggle a bit with the coil folds, but then got the hang of them. WET HANDS ARE A MUST! I ended up with 18 pull apart rolls because I accidentally only cut the dough in thirds horizontally.🤦🏻♀️ Baked for 20-21 minutes and they came out perfectly!
Aneta says
Great and easy recipe
The bread came fluffy, with ait bubbles inside and soft as promised. Very easy to follow the instructions. I give it five out of five.
Jason says
Seemed complicated at first but it’s actually quite easy and my favourite bread to make, either a single loaf or multiple buns. Very delicious!
Sarah says
This recipe is great and has become my family’s sandwich bread. I’ve made it exactly as written with good results, and have started adding sourdough discard to it regularly. (It works best for me to add 200g sourdough discard and reduce the water in the recipe by 100g while leaving the flour quantity the same.) It’s perfect every time!
Bob P says
This is about a half dozen times so far making these. Always come out consistently perfect and delicious. They have become my #1 sandwich and burger buns, and they're so easy to make.
Pamela says
I made two loaves and they turned out fantastic. I put in 12 g of fine sea salt. I didn't let them rest for the 30 minutes because the loaves looked like they might get over proofed. Very nice open crumb, light and airy!! Loved this recipe. I wish I could show you the photos. Thank you for sharing it.
Carol says
Make this recipe regularly - as buns and as 2 big loaves. Always gets rave reviews from whoever is eating it!
Mariciel says
This is quick, easy and fool proof. I am new to bread making and this recipe is awesome. Thank you!
Olga says
Hello, Can I use bread flour instead of all purpose? If so, do I need to adjust the amount of water?
Rebecca Eisenberg says
Yes, you can use bread flour. Bread flour absorbs more water than all-purpose flour so you may need to add just a bit more water to get the dough to the right consistency. Pay attention to the visual and textural cues in the recipe and photos to add water while mixing to get the dough to look and feel right. Happy baking!
Giovanna Rosenfeld says
Can you do these with King Arthur GF Bread Flour? I love the regular recipe, my daughter-in-law has celiac - and she would love these. I tried to look in the comments to see if anyone has done. Sorry if this is a repeat question
Rebecca Eisenberg says
I haven't personally tried them with GF flour or GF bread flour, but I know that some people have had success with the cup-for-cup King Arthur flours for bread making so I think it could be worth a try! If you do give it a go please report back and let us know how it turns out.
ash says
If my oven is too small to bake all 16 at one time should I leave the second batch on the counter or in the fridge for the 17 minnutes it takes to bake the 1st batch?
Rebecca Eisenberg says
If it's hot in your kitchen, I would stick them in the fridge, but if it's cool in your kitchen, they'll be fine at room temperature!
Gen says
I made this and even got my kids involved- they had a blast lifting up the dough. Turned out amazing and so easy. Thank you 😊
Sophie says
This is my favorite bread to make. So easy, and great every time. I make it weekly!
Caitlin says
Absolutely delicious, soft bread! So easy to make!