I know that baking intimidates a lot of people because it’s a technique-driven process that can have varied (and potentially negative) results if you don’t follow instructions and work the ingredients just so. I’m here to tell you that while technique does matter (a lot), baking can and should be a fun, meditative process too!
To make things a little less scary, I’ve broken down the most common techniques you’ll see in my recipes starting with how to properly measure wet and dry ingredients, as well as different methods for mixing and kneading doughs.
I’ve also noted some of the most common mistakes that home bakers make when trying their hand at homemade biscuits or breads so you don’t experience the same pitfalls. Each of my recipes will go into even greater detail for the relevant techniques, but consider this your 101 guide to common baking methods and techniques.
Jump to:
- Why don't your recipes use volume (cups) measurements?
- How to Use a Digital Kitchen Scale
- How to Measure as Accurately as Possible By Volume (Cups, Teaspoons)
- Mise En Place — Softening butter, warming eggs, etc.
- The Three Main Mixing Methods
- Mixing Vs. Kneading in Bread making
- Autolyse
- Folding Bread Doughs
- Windowpane Test
- How to Keep Track of Folds
- The Fingerprint Test
- General Bread Troubleshooting
Why don't your recipes use volume (cups) measurements?
When it comes to baking, measuring by weight using a kitchen scale is the most accurate way to do so and will give you the best results. I test most of my recipes by weight (particularly the baking recipes), not volume.
If you’ve been measuring using cups/spoons and have wondered why sometimes you make a recipe and it turns out perfectly, and other times you make the same recipe and it turns out flat or dense or the dough is just way too sticky or dry, measuring by weight will help fix that problem.
Did you know that there’s no universally accepted standard for what “1 cup” of flour weighs? Unlike denser ingredients like water, honey, or granulated sugars, which can fill a measuring cup with no air pockets, flour is light and can be loosely scooped or tightly packed into a measuring cup depending on how you scoop it.
Different recipe developers and flour brands use different conversions for “1 cup” of flour by weight, making it very hard to convert a baking recipe from volume to weight measurements (and vice versa) with any sort of accuracy. One baker’s loosely scooped “1 cup” of flour may weigh 120 grams. Another baker’s “1 cup” of flour may weigh 200 grams. And when you scoop the flour in your own kitchen, it may weigh as much as 240 grams! That makes a big difference in how the recipe turns out!
Recipes of mine that use volume measurements are likely cooking recipes, not baking, and can handle some inaccuracy in the ingredient quantities.
And before you say "but in America we use cups!" hi, hello, I am American and went to American pastry school and in American pastry schools we use ounces and pounds which are a weight measurement. I think grams and kilograms make for easier math, so I test my baking recipes using gram measurements.
And finally, no, I won't convert the recipes to cups for you. Do so at your own risk.
How to Use a Digital Kitchen Scale
Most digital kitchen scales have two main buttons. One is a TARE button (this is also sometimes the ON/OFF button), and the other is a UNIT CONVERSION button, which allows you to switch between Imperial (ounces/pounds) and Metric (grams/kilograms) measurements. Follow these step-by-step instructions to learn how to use a kitchen scale:
- Turn the kitchen scale on and place the bowl you’re using on top of it.
- Hit the TARE button. The TARE button puts a zero back on the kitchen scale, removing the weight of whatever is already on the scale (this is called “zeroing out”).
- Add your first ingredient to the bowl and look at the display to see its weight.
- Hit the TARE button again. The scale is now back to zero (“zeroed out”) and ready for you to add your next ingredient.
- Repeat until all your ingredients are in the bowl.
NOTE: When adding liquid ingredients to dry ingredients, measure the wet ingredients into a separate cup or bowl first OR pour the liquids onto a spoon over the bowl to help slow down the rate at which you pour. If you accidentally add too much liquid to the dry ingredients in the bowl, it’s pretty hard to remove without taking some of the flour, salt, or yeast with them!

How to Measure as Accurately as Possible By Volume (Cups, Teaspoons)
If you insist on measuring your ingredients by volume (cups, teaspoons, etc.), it is super important that you measure the ingredients properly. Use dry measuring cups for dry ingredients and liquid measuring cups for liquid ingredients. If you measure with cups and measuring spoons and the recipe does not turn out right, that is likely why. Try again!
When measuring dry ingredients like flour and sugar by volume, be sure to use something sharp like the back of a knife to level off the ingredients in the dry measuring cups.
- How to Measure Flour by Volume - Stir and thoroughly fluff the flour in your flour container, so there's plenty of air in it. Use a spoon to gently scoop the flour into the measuring cup, then sweep any excess off the top. The cup should feel pretty light and the flour should not be tightly packed into it. (If you use the measuring cup for scooping too, it may result in a more densely packed cup of flour).
- How to Measure Sugar By Volume - Although it’s typically added with the wet ingredients, you’ll want to use a dry measuring cup to scoop and measure your sugar. Use your hands to tightly pack white or brown sugar into the measuring spoons or cups, so there are no air pockets trapped inside.
- How to Measure Liquids by Volume - Whether you’re measuring water, oil, or milk, use a liquid measuring cup (the kind with a spout) for the most accurate reading. Place it on a level surface and fill it until the liquid reaches the correct marker when looking at it at eye level.
- How to Measure with Measuring Spoons - Scoop dry ingredients like spices, baking soda, and cornstarch flat against the rim or edge of the container, or use the back of a knife to sweep the excess off the top. Do not use heaping scoops unless otherwise specified. Liquid ingredients such as extracts and liquors should not overflow the rim of the measuring spoon, again, unless otherwise specified.
Troubleshooting: If the dough seems overly dry, add water ¼ teaspoon at a time until the dough looks right. If the dough is too wet and sticky, very lightly dust in more flour as you work.
Mise En Place — Softening butter, warming eggs, etc.
Mise en place is a French culinary term that literally translates to "putting in place." It basically means: Gather all of your ingredients (so you can be sure you’re not out of something!), measure, and make sure you have all the right tools and equipment ready to go when you need them before you start working. This can make a huge difference in a) how enjoyable you find the baking and cooking process and b) the success of your recipe!
Here are my favorite ways to properly prep certain ingredients to the right temperature, even if you’re short on time:
- Eggs — Many of my recipes will call for room-temperature eggs. If you’re short on time, submerge them in very hot tap water for 5-10 minutes. This is important because cold eggs don’t incorporate smoothly and can lead to dense, flat baked goods.
- Softened Butter — Getting a stick or two of cold butter to the proper room temperature can be tricky. To soften butter quickly, microwave the wrapped stick(s) for 3-4 seconds per side. Properly softened butter should be cool to the touch but soft enough to press a finger into. It should not be greasy and it should still feel slightly cool to the touch. If a recipe calls for less than a whole stick of butter, microwave in 3-5 second bursts just until you can easily press a finger into the butter.
- Melted and Cooled Butter —Some recipes (like my Easy Blueberry Chocolate Chip Cookies and Chewy Buttercrunch Cookies) call for melted and cooled butter, or, in some cases, browned butter. To properly melt your butter, microwave it in a small bowl in 10-second bursts until just a few solid pieces of butter remain. Stir the butter until it’s fully melted, then let it cool at room temperature for about 20-30 minutes. You’ll know it’s ready when some of the butter just barely starts to solidify around the edges, and the bottom of the bowl is cool to the touch.
- Water or Milk — To quickly warm water or milk, pour it into a glass measuring cup or bowl and microwave in 10-15 second bursts, stirring in between to disperse hot spots. Use an instant-read thermometer if you need a precise temperature. If warming a very small amount of water or milk (1-2 tablespoons) use 5-7 second bursts instead.
- Sifting — I use a wire fine-mesh strainer to sift dry ingredients when needed. It’s much more efficient and easier on the arms than an old-school squeeze-handle or crank sifter. Sift directly into your mixing bowl or onto a sheet of parchment paper; you can then lift the parchment paper to make a sling to slide the ingredients into your mixer bowl.

The Three Main Mixing Methods
Every recipe requires some amount of mixing in which you combine wet and dry ingredients together. These are the three most common techniques you’ll see across my recipes:
Creaming Method
The Creaming Method is characterized by the use of a solid, soft, room temperature fat (shortening, butter, etc.) that is aerated with sugar.
- Cream the butter and sugar together until aerated.
- Add the room temperature eggs one at a time, scraping down the bowl well after each one. Add any extract, if using, along with the last egg.
- On low speed, alternate adding the dry ingredients and wet ingredients (if there are any), mixing just until combined and scraping down the bowl between each addition. Start and end with the dry ingredients.
If you’ve ever made my Vanilla Pound Cake (or pretty much any basic cookie recipe), then you’re probably familiar with the creaming method, which starts with combining room temperature softened fat (usually butter) with sugar.
During the creaming process, the sugar granules tear lots of tiny holes in the butter, which are are then sealed up and trapped inside. These tiny air bubbles give your favorite baked goods their necessary rise and fluffy, soft, tender texture. It’s important to scrape down your mixing bowl and beater with a spatula often to ensure that the sugar and butter are very well incorporated.
The amount of time needed for creaming can depend on the recipe and the temperature of your ingredients, but as a rule of thumb, you want the butter and sugar mixture to be pale, light, and fluffy. If you rub a small amount between your thumb and forefinger, it should feel just slightly grainy.

It can take anywhere from 3-7 minutes for the butter and sugar to be properly creamed!
Once this happens, add one egg at a time and beat in 60-second intervals. Add any extracts along with the final egg.

Honestly, when it comes to the creaming method. when in doubt, scrape down the bowl.
Then, incorporate the dry ingredients and liquid ingredients (e.g. sour cream, milk, etc.) in alternating batches until the mixture is just combined—aka there are very few streaks of flour left. Once you begin adding flour, it’s important not to overmix; otherwise, your baked goods may be dense and tough. For this reason, I like to mix the final few strokes by hand.
If you're adding any inclusions (e.g. sprinkles, chocolate chips, nuts, etc.) mix them in by hand at the end. Those final few streaks of flour will get mixed in at the same time and prevent your cake batter or cookie dough from being overmixed.

Muffin Method
The Muffin Method is characterized by the use of a liquid fat (oil, melted butter, etc.) and is usually stirred together by hand, no mixer needed.
- In one bowl, whisk together the dry ingredients. In another, whisk together the room temperature wet ingredients (including sugar).
- Pour the wet ingredients into the dry ingredients and use a dough whisk or spatula to gently fold them together, just until combined.
- Finish by stirring in any inclusions (berries, nuts, chocolate chips, etc.) by hand.
Despite its name, the muffin method doesn’t just apply to mixing muffin batter (though I do utilize it in my Mini Blueberry-Lemon Muffins with Buttermilk). It’s a simple technique that I also use in my Sweet Homemade Cornbread Skillet.
When you follow the muffin method, you mix your dry and wet ingredients in separate bowls, then slowly fold the wet ingredients into the dry ingredients until they’re just combined.
![[gif] folding dry ingredients into wet ingredients](https://thepracticalkitchen.com/wp-content/uploads/2021/08/double_chocolate_banana_muffins_1.gif)
![[gif] folding muffin batter just until combined](https://thepracticalkitchen.com/wp-content/uploads/2021/08/double_chocolate_banana_muffins_2.gif)
Basically, stop mixing as soon as you can't see any streaks of dry flour in the bowl. The batter should still be a little bit lumpy. It's super important that you don't overmix the batter or else your baked goods will end up tough, dense, and dry.

Biscuit Method
The Biscuit Method is characterized by the use of a cold, hard fat (butter, shortening, lard, etc.) that is cut or rubbed into the dry ingredients. It is used to make flaky pastries like biscuits and pie doughs.
- Whisk the dry ingredients together in a mixing bowl. Toss cold cubes of butter in the flour to coat, then use your fingers or a pastry cutter to pinch or cut the butter pieces into flat shingles coated in flour. The recipe will tell you how big the butter pieces should be.
- Make a well in the center of the dry ingredients and pour the cold wet ingredients into the middle. Use a dough whisk, spatula, or your hands to mix the dough following the recipe.
On first glance, there are a lot of steps to making biscuits but I promise it’s easy! Start by mixing the dry ingredients together in a large bowl, then pinch in the cold, cubed butter until it's the size the recipe says (usually quarters, nickels, or dimes).
Larger butter pieces = flakier dough. Smaller butter pieces = a more mealy dough.
Then stir in the cold buttermilk or water until it has been mostly absorbed. Some recipes will have you stir it all in at once, others have you add the liquid gradually. As with other techniques described here, it’s important not to overmix so you don’t end up with tough, dense baked goods.

Oh, and you probably noticed that I emphasized using cold butter and liquid ingredients—doing so is part of the trick to creating flaky layers. The cold butter turns to steam in the hot oven, pushing the layers of dough apart. If your dough is too warm, the butter will melt instead of turning to steam. So when in doubt, when it comes to biscuits and pie dough, always keep things cold, cold, cold!
Mixing Vs. Kneading in Bread making
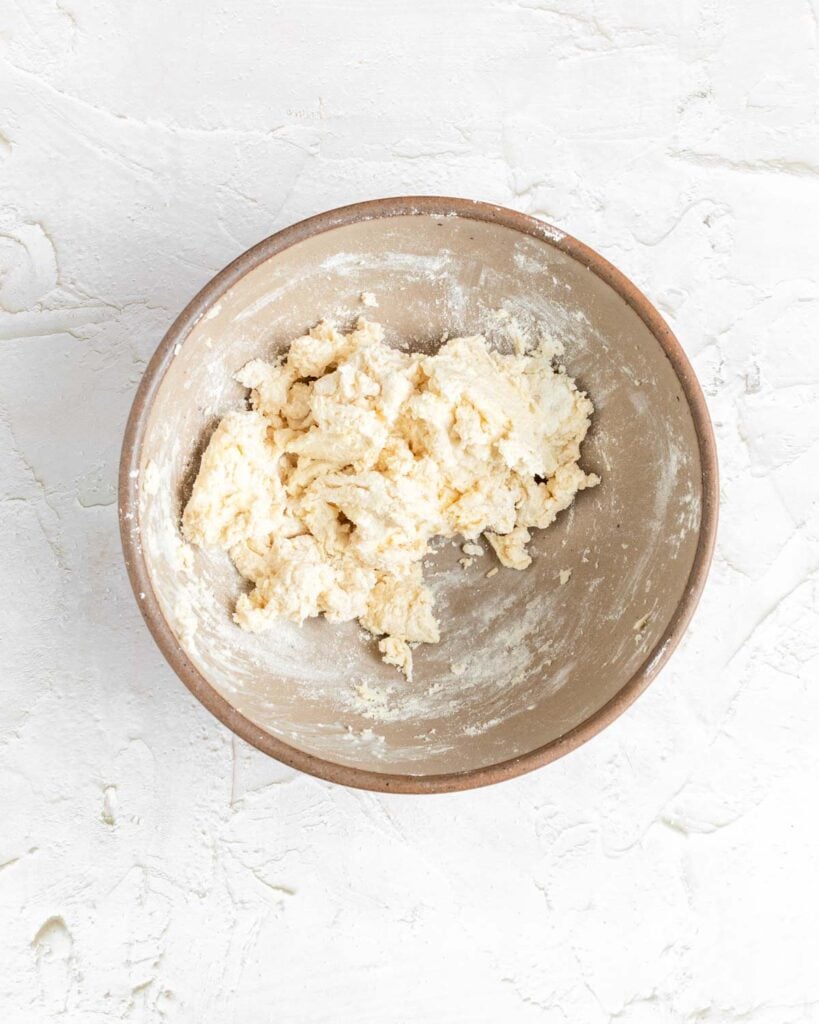
Mixing the dough is the step where you want all the ingredients to just come together. There shouldn't be any dry bits of flour or puddles of water in the bottom of the bowl and it should mostly be one messy looking lump on the dough hook. If mixing by hand, it should be completely hydrated and collecting around your dough whisk or mixing utensil. Even with a stand mixer it can take a few minutes before the dough is completely mixed so be patient.
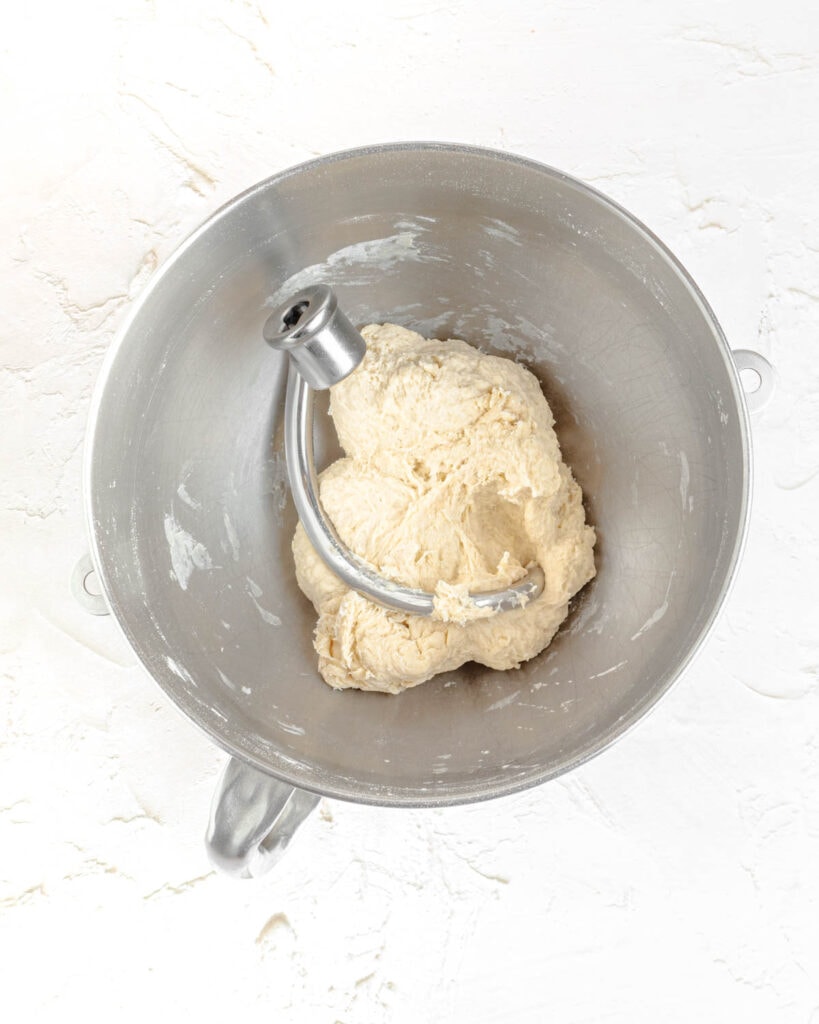
Kneading or Folding are the steps following mixing where you're developing gluten in the dough. In this stage, the dough is repeatedly folded over itself to create a criss-crossed network of gluten in the dough. Think of it like scaffolding; the gluten network provides strength and structure as the dough rises, trapping air bubbles inside.
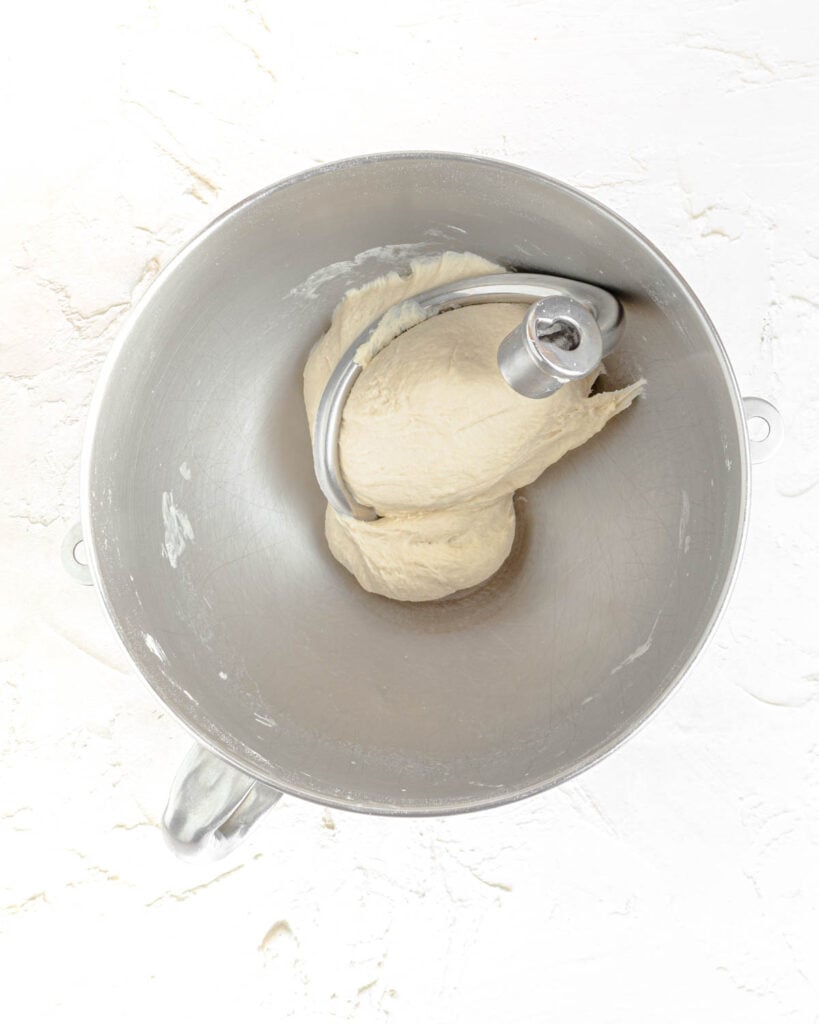
While kneading or folding, you'll see your messy, lumpy dough become smooth (or smoother) as it gets stronger. This is a good time to assess the look and feel of the dough to see if it matches the visual cues in the recipe. If it’s too dry, you can dribble in a bit more water. If it’s too wet and sticky, dust in flour.
Folding is done by hand, but kneading can be done by hand, in a bread machine, or in a stand mixer using a dough hook.
Mixing vs Kneading:
Mixing vs Folding:


Autolyse
This sounds like a fancy technique, but it’s actually one of the simplest ways to improve the elasticity of your bread dough! Autolyse just means letting a mixture of water and flour rest so the starches in the dough can begin to relax and align before adding in any other ingredients that might tighten the gluten network, like yeast, salt, oil, or sugar.
It’s super helpful in recipes where you want a nice, stretchy, and elastic dough that is easy to shape (like my overnight pizza dough recipe). Although you can do this for hours, I find that even a 10-minute autolyse resting period can make a big difference.
Folding Bread Doughs
Not every bread recipe needs to be kneaded. Folding is a slower, gentler method for developing strength and structure in bread doughs. It’s particularly useful for high-hydration, sticky, wet bread doughs that are impossible to knead by hand.
Though some of my recipes call for specific folding methods, you really can use any of the following techniques interchangeably:
Stretch & Fold
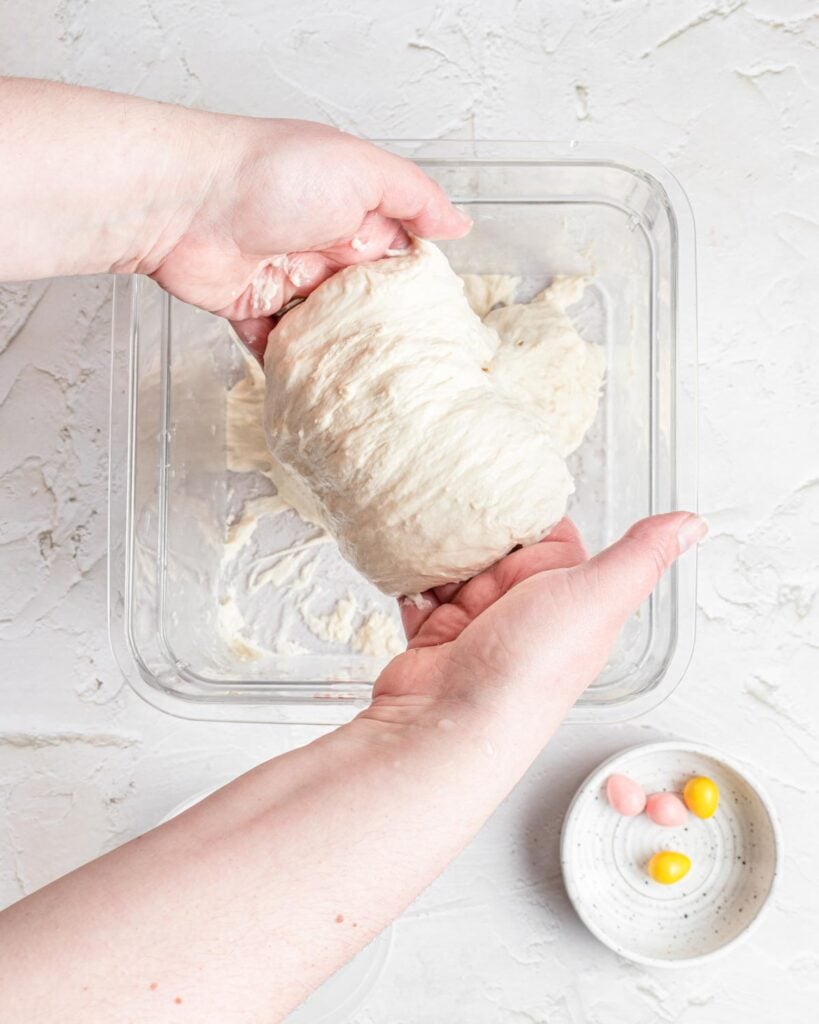
This is a method that I utilize in my Overnight Focaccia. Once you’ve made your dough and have given it a few minutes to rest, you’ll start the process of stretching and folding. Start by lightly wetting your hands with water, then gently grab the top edge of the dough and pull it away from itself, then fold it forward over the rest of the dough. Rotate the bowl a quarter turn and repeat until you've gone all the way around the dough. After the final fold, flip the dough so the seam side is tucked underneath. Let it rest a bit more, then repeat the process before allowing it to properly rise.


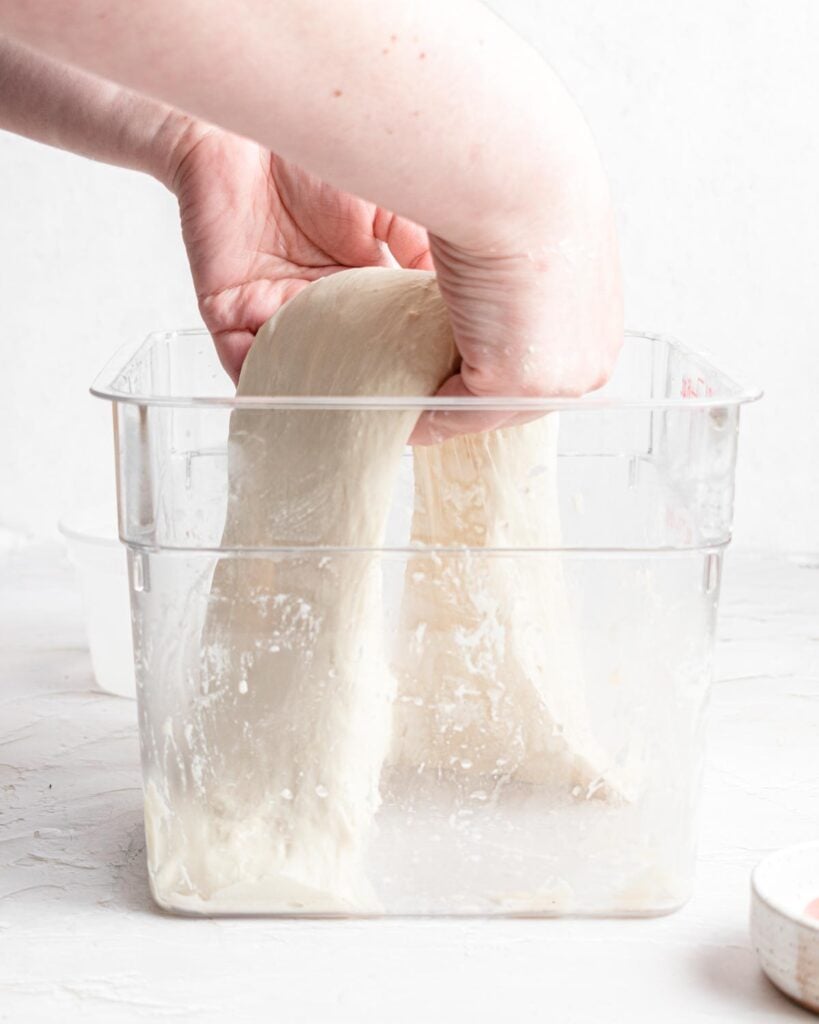
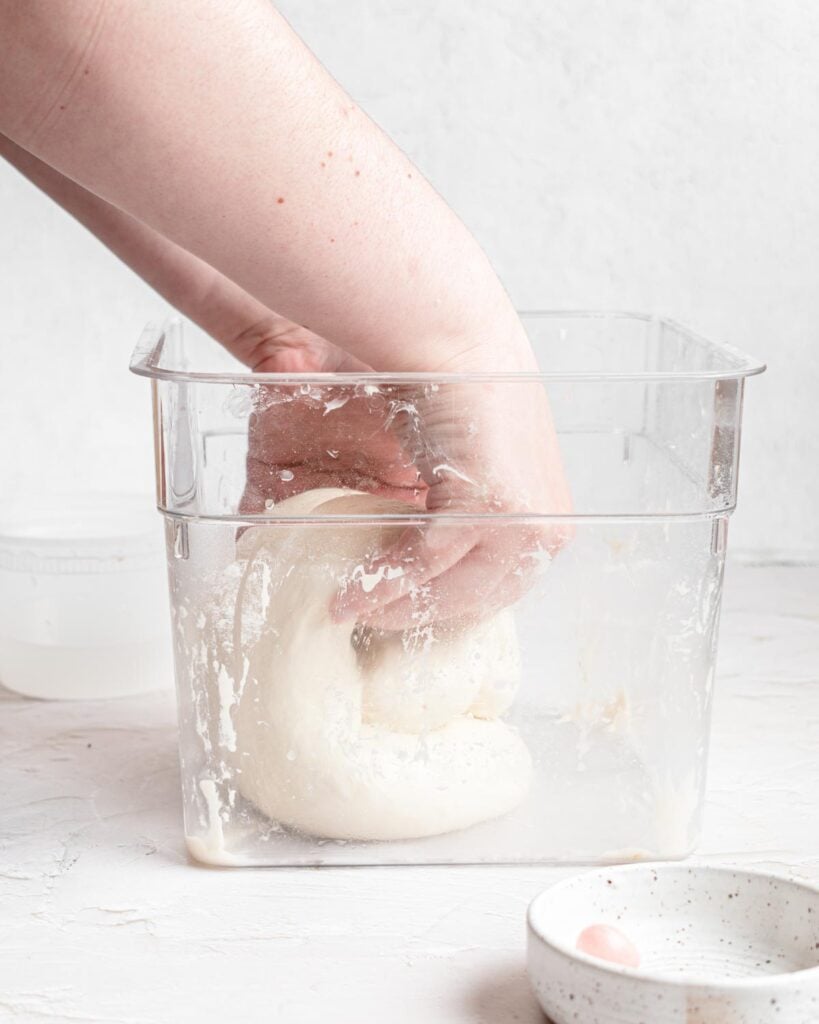
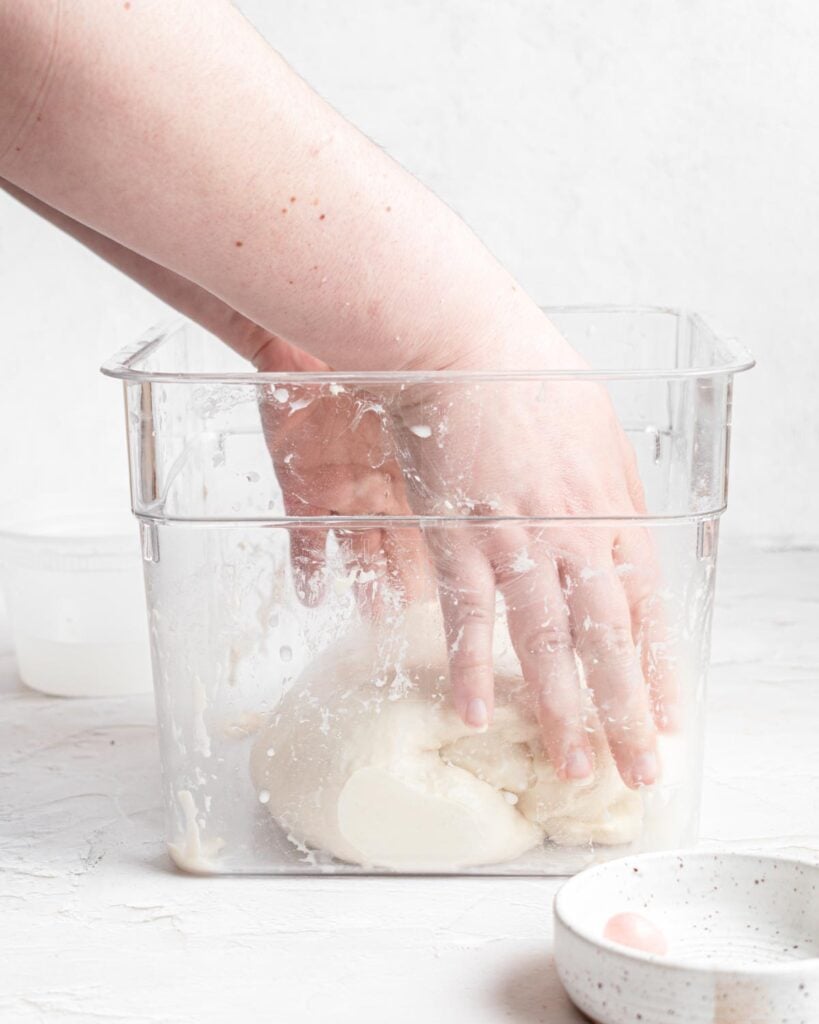
Slap & Fold
The purpose of the slap & fold method is similar to a stretch & fold—it allows you to strengthen your dough without having to spend a ton of time kneading. The difference is in the technique. Use damp or lightly oiled hands to gather and slap the dough against itself, rotating the bowl 90 degrees (a quarter turn) between folds so that the gluten is being stretched in all directions. You shouldn’t need to slap & fold more than about six times before letting the dough rest again. This is my favorite method for making my Small Batch Mini Ciabatta and my famous Mini Loaf Pan Focaccia.
![[GIF] showing the slap and fold.](https://thepracticalkitchen.com/wp-content/uploads/2023/02/slap-and-fold-ciabatta-gif-001.gif)
![[GIF] showing the slap and fold.](https://thepracticalkitchen.com/wp-content/uploads/2023/02/slap-and-fold-ciabatta-gif-002.gif)
Coil Fold
Two of my favorite ciabatta recipes—these Twisted Ciabatta Breadsticks and my Soft Baked 3-Hour Ciabatta Bread—utilize a coil fold method. It's a little gentler than the stretch/slap and fold methods.
A coil fold involves sliding your fingers under opposite sides of the dough and lifting straight up from the middle, so that the two ends end up tucked (coiled) underneath. Rotate the bowl 90° (a quarter turn) and repeat the coil fold again. Each time you pick up the dough, your fingers should be sliding under the newly tucked-under ends. The dough will get stronger with each coil fold.
Windowpane Test
The "windowpane test" is a way of checking how well developed the gluten network in your dough is. Not every bread dough needs to pass the windowpane test.
To check if your dough has reached the windowpane stage, tear off a piece of dough about the size of a grape. Roll it into a ball, coat it with flour and use your thumb and fingers to gently press it into a flat shape, smoothing from the center out.
Stretch the dough between your fingers and thumb, kind of like you would silly putty as a kid. When you can stretch it quite thin in the center — thin enough to see light through it (like a windowpane, get it?) — without it tearing, that’s a sign that the dough is ready.
How to Keep Track of Folds
You can use a tally system, but my favorite way to keep track of folds is to put that number of candies or snacks in a small bowl next to my dough and eat one every time I do a fold. When no candies are left, I know I've done my last fold!

The Fingerprint Test
One of the best ways to tell if dough is properly proofed and ready to be shaped or baked is a technique that doesn’t require any fancy equipment—all you need is your hands!
Press a lightly floured finger gently into the surface of the dough. If you feel resistance, almost like you're poking a firm balloon, and the indentation springs back immediately and fills in completely, the dough is underproofed. Give it another 10-15 minutes to rise, then check again.
If the indentation fills in slowly but remains visible, the dough is perfectly proofed and ready to be shaped.
If the dough deflates completely when you poke it, that means it has overproofed.
Here are a few things you can do if your dough has overproofed during the first rise:
- If the dough has slightly overproofed, I usually just continue on with the recipe, since the shaping process realigns the yeast and starches, and the dough gets a second wind as it rises once you shape it anyway.
- If it has moderately overproofed, I usually knead it back together (or do another set of folds, depending on the recipe) and let it rest for another 10-15 minutes before continuing on.
- If the dough has majorly overproofed, I'll use it to make focaccia or a slab pizza.
If the dough overproofs during the final rise, after you've shaped it, my recommendation is to still bake it anyway. It won't be perfect, but it should still be edible!
General Bread Troubleshooting
- If your dough seems too dry, add water.
- If your dough seems too wet, add flour.
- If your dough is rising slowly, put it somewhere warm or let it rise longer.
- If your dough is rising too quickly or you need to slow it down, put it somewhere cold.
- If you live somewhere very humid or wet/rainy, hold back about 5-10 grams of water to start and add it only if needed.
- If your dough is too sticky to handle, try lightly flouring your hands. If that doesn’t work, try using damp or lightly oiled hands.
- If your dough is fighting you, shrinking back a lot, or not stretching as much as it should, cover and let it rest for a few minutes, then try again.
- If your bread is consistently underbaked and pale OR overbaked and dark, get an oven thermometer.