

If you love a low-effort crusty bread, you won't find anything better than a no knead dutch oven bread! This is such a simple bread recipe that uses all-purpose flour, instant yeast, and a dough that takes 5 minutes to make with no mixer needed.
Instead of kneading, a no-knead bread relies on time to develop a gluten network in the dough. The dough will literally do the work for you while you sleep. Easy! And thanks to the hot and steamy environment inside a Dutch oven, it bakes up with a wonderfully crunchy, floury crust!

5 star reader review
“Writing this review as I’m eating my fifth slice of this bread. The bread is so good I have my 2 year old daughter crying for more. We are just eating it plain with butter and I’m 100% satisfied. I am a first time bread baker and I am excited to use this recipe again in the near future(like again next week)”
—Caitlin
I've got lots of great homemade bread recipes on my site, but this is one of my favorite base recipes that I often customize with lots of other flavors. Once you've mastered this one, you'll love trying my crusty rosemary parmesan no-knead bread. And yes, I do have a whole wheat no-knead bread recipe too if you're interested in that.
This is moderately low-hydration dough, which makes it easy to shape and handle for beginners. I also have a small-batch crusty bread version of this recipe that uses just one cup of flour if you prefer a smaller loaf.
About My No-Knead Dutch Oven Bread
There are a lot of types of no-knead breads, but usually when someone says they're making a "no knead" bread, they're referring to a crusty white bread that bakes in a Dutch oven.
No-knead bread is what it says on the tin — a bread dough that requires no kneading. In other types of dough, kneading is how you encourage the yeast and the starches and proteins in the flour to develop a strong gluten network. But they will do that on their own if left alone long enough, which is what a no-knead dough relies on. No periodic folding, no fancy mixers, nothing.
All you have to do is stir four ingredients together to form a shaggy dough and let it sit overnight to rise.
I am far from the first person to ever develop a no-knead Dutch oven bread recipe. They saw a surge in popularity in 2006 when Jim Lahey and Mark Bittman published their version in the New York Times (later updated in 2021). It's a popular homemade bread recipe for good reason, and there have been dozens, if not hundreds, of recipes spun off from it (mine included).
The four basic ingredients remain the same: flour, water, salt, and yeast, but by shifting the ratios, timing, and shaping techniques, no-knead bread recipes can produce a wide variety of loaves.

The way I make no-knead bread is simple, and I've removed a few finicky steps from other recipes that I often find myself skipping.
I also shrunk the overall size of the loaf to something that should feel a little more manageable in a beginner bread maker's hands. So if you're looking for an easy bread recipe for beginner bread bakers, this is a good place to start!
A High Hydration Dough
The hydration of a dough is calculated as is the weight of any ingredient compared to the weight of flour in a recipe, expressed as a percentage. So if your dough calls for 100 grams of flour and 50 grams of water, that's a 50% hydration dough. This type of formulation is called baker's percentage and makes scaling recipes up and down very easy.
No-knead doughs are often very high-hydration recipes. J. Kenji Lopez-Alt of Serious Eats and The Food Lab prefers a lower-hydration 70% dough but gives his a long (3-day!) rise in the fridge to develop a more open crumb. Other no-knead recipes can go as high as 98% or even 100% hydration!
The thing is, the wetter a dough is, the more frustrating (read: stickier) it can be to handle.
When it comes to this base no-knead bread recipe, I wanted something easy to manage. My no-knead bread recipe is 80% hydration. It has a tender crumb with a few larger air bubbles, but not so many that you can't use it for grilled cheese or sandwiches.
At 80% hydration, this loaf may still be a bit challenging to shape the first time you try it, especially if you're new to bread making. But you'll get the hang of it quickly.
Just remember: rustic no-knead crusty breads are not meant to be tightly controlled, so even if it's a little lumpy or imperfect or messy, that's absolutely okay. It's an easy homemade bread recipe. As long as it tastes great, that's what really matters.
Ingredient Notes
You only need four ingredients to make this no-knead bread! See recipe card (at the end of the post) for quantities.

- All-Purpose Flour - I use King Arthur Baking Company's all purpose flour which has a higher protein content (closer to bread flour) than other brands of flour. If you're using a grocery store brand of flour, you may get better results using their bread flour.
- Salt - Salt doesn't just add flavor to your dough, it helps control the yeast activity. I use the chef-standard Diamond Crystal Kosher Salt which has larger, irregular crystals that dissolve quickly compared to other brands and styles of salt. Diamond Crystal Kosher Salt is also half as salty as other brands of salt by volume, so make sure you're measuring salt by weight! If you're using a different type or brand of salt and measuring by volume, cut the amount of salt in half.
- Instant Yeast - Sometimes called "rapid rise," or "instant dry" yeast. Active dry yeast will also work here, no modifications needed. Store your yeast in the fridge or freezer to be sure it stays good! If you're not sure your yeast is good, add it to the warm water. If it bubbles after a few minutes, it's good! If your kitchen is warm (70°F+) then consider cutting the amount of yeast in half.
- Cool Water - Cold water allows the yeast to work slowly, which is what we want.
How to Make No-Knead Bread
Mix all the ingredients together in a bowl. That's it. You're basically done. (I told you this was an easy bread recipe for beginner bread bakers, and I meant it!)
Of course, there are a few things you can do to make it just a little easier on yourself. Mix your dry ingredients together first to disperse the yeast and salt throughout the flour for more even mixing. Then add the water and mix the ingredients together until you have a sticky, messy, lumpy dough.
It won't look smooth at all. You're just looking for all the flour to be hydrated and all the water to be incorporated. It's supposed to be shaggy, messy, and lumpy. It will be sticky to the touch and impossible to knead (because it doesn't need kneading).

Tovolo 12" Stainless Steel Dough Whisk
The stiff coil of dough whisk is ideal for efficiently mixing sticky, wet doughs to break up any sneaky lumps of flour hiding inside.
A Long Overnight Rise
Like I said, no-knead bread relies on time to develop a gluten network. The gluten network traps the gas produced by the yeast, creating air bubbles in the dough.
Thanks to the long rise time, there's a pretty big window during which the dough is at its peak for shaping.


Perfectly proofed no-knead bread dough will have a bubbly top that is flat or slightly domed and stretches across the mouth of the bowl.
If your dough has overproofed, it will have sunken in or collapsed slightly. Slightly overproofed dough can still be shaped and baked. It will just produce a flatter loaf.

Shaping A Round No-Knead Bread
When your dough is ready to shape, turn it out onto a generously floured counter. Dust the top very lightly with flour too — just enough so your hands don't stick to it.


Use a light touch as you handle the dough. When all the edges have been tucked in, flip the dough over so it has a nice, smooth top.
Cup your hands around the dough and gently lift and rotate it in short, quick movements to create surface tension on the top as you use your pinkies to tuck the dough underneath.


Transfer the dough onto a crumpled piece of parchment paper for its final rise. Crumpling the parchment paper softens it so that it fits neatly into the round space of a Dutch oven without digging into your dough.
How to Shape an Oval No-Knead Bread
In bread making lingo, an oval or football shaped loaf of bread is called a bâtard. There are a lot of different methods for shaping a bâtard, but with a loose, sticky dough like this, I find simple is best.
Stretch the dough into a loose square shape. Fold the top two corners in to make a point, then loosely roll the pointed end toward your body. Apply very little pressure - you don't want to create too much tension here.


Keep rolling until the seam is against the counter and the smooth side is facing up. Gently tuck the ends under. Proceed with the rest of the recipe as written!
Why Scoring Bread Matters
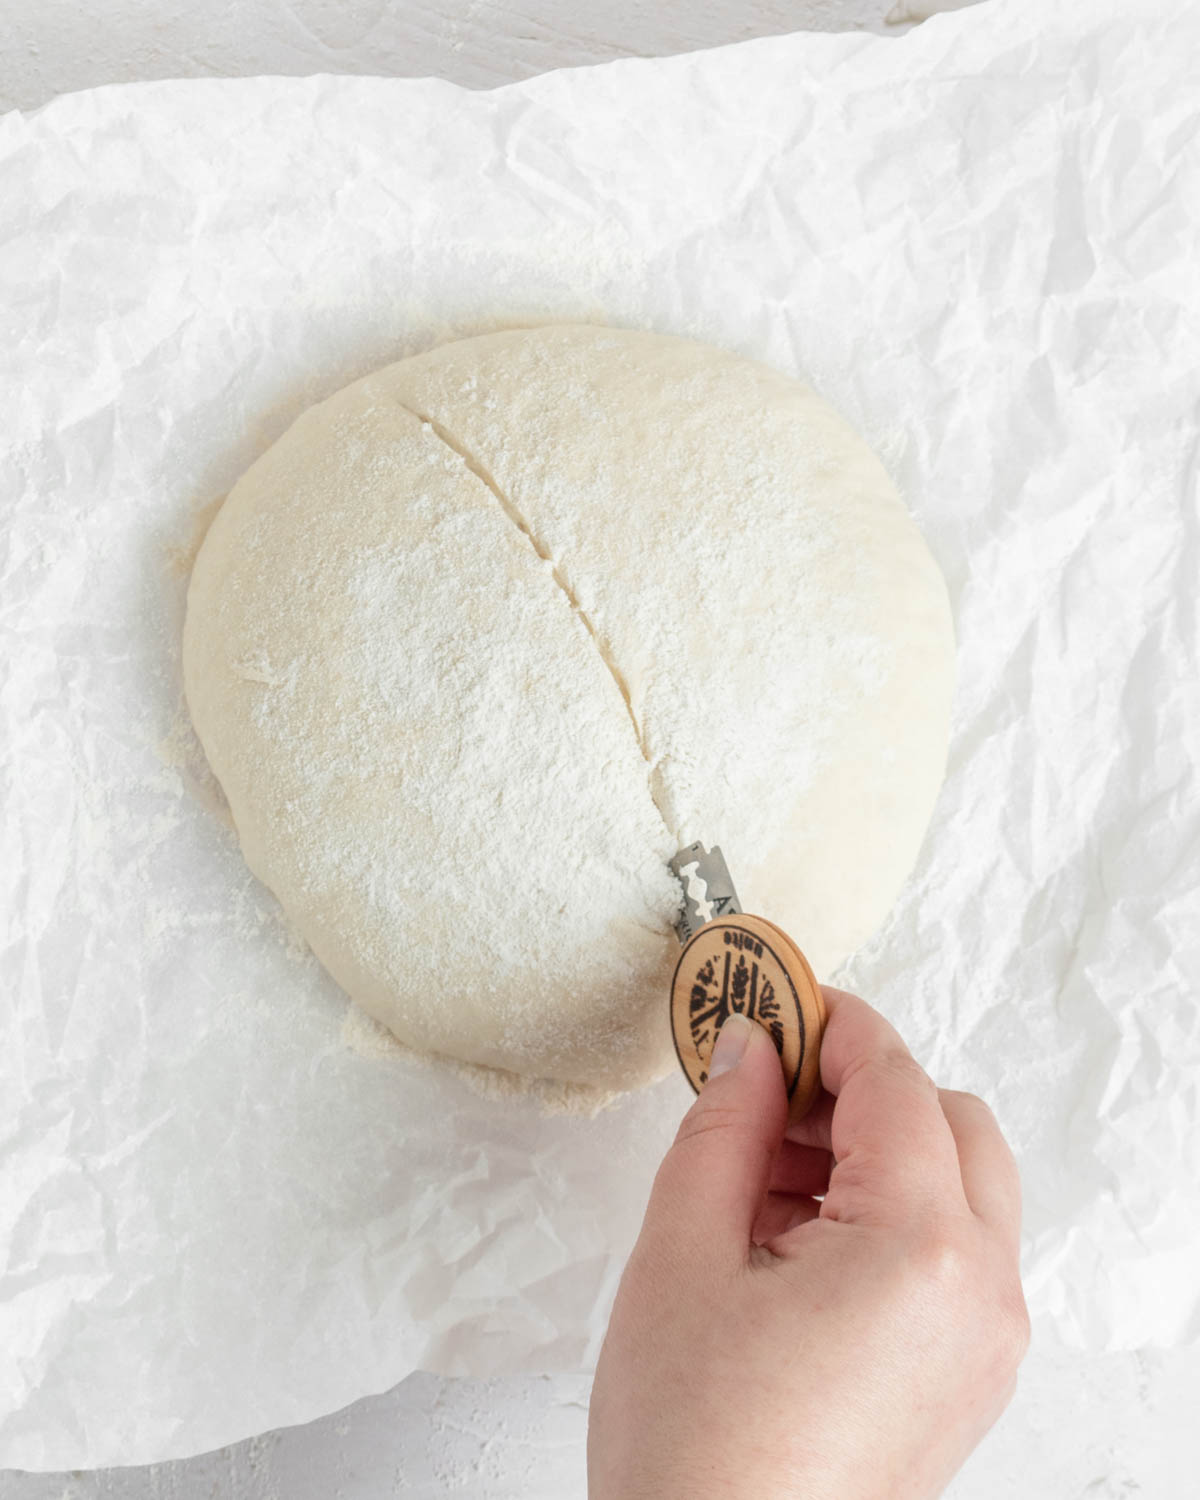
Scoring bread creates a vent through which steam can escape. Without scoring, the steam will try to escape through any weak points in the dough and might even blow out at the bottom.
To get an "ear" (the dramatic, crisp flap of bread that runs the length of the scoring mark) hold the blade at a 45° angle when you make the slash. You can even cut designs into your loaf if you want to, but you do want at least one big, deep slash.

Baking in a Dutch Oven
The confined space of a pre-heated Dutch oven traps the steam released by the dough as it bakes, creating a nice moist environment which results in a super crunchy crust.
"Steam [...] helps produce a really crisp crust. When the surface of the dough reaches 180°F, the starches in the slowly forming crust start absorbing moisture. They eventually become so saturated that they burst and liquefy. As the bread continues to cook, this starch gel turns into a brittle and glossy shell. The more moisture there is on the surface of the dough, the more abundant the starch gel, and the crisper and more crackly the eventual crust."
Slate, "Why Does Steam Make Bread Light and Crusty?"

Carefully remove the baked loaf from the Dutch oven to a cooling rack. If you listen closely you'll be able to hear the crust cracking as the inside of the loaf contracts as it begins to cool!
I always let my no-knead bread cool completely before slicing it. If you slice it before it has cooled, the steam still trapped in the bread will turn the starches to mush.
Using a Banneton or Brotform (Optional!)
Using a banneton or brotform proofing basket is optional here, but it gives the bread a gorgeous floury spiral pattern and helps support the dough as it rises. It will add more time to the overall process, making this more of a 48-hour recipe than a 24-hour recipe.
Here's how to use a banneton or brotform:
- Dust the basket generously with rice flour, then shape the bread as instructed.
- With the smooth top of the shaped boule facing up, slide a bench scraper under and invert it into the basket. The smooth top side will be against the bottom of the basket. The seam side will be facing up.
- Dust with flour and cover with plastic wrap. Refrigerate overnight.
- The next day, flip the shaped loaf out of the basket and onto the twice crumpled parchment paper, score it, and bake according to the recipe!

Frieling 10" Bread Proofing Basket
A round 10" bread proofing basket (also known as a banneton or a brotform) made of natural cane. Dust generously with rice flour to prevent sticking.
Letting the shaped no-knead dough rise in the fridge for a longer period of time also makes for a more flavorful loaf of bread with a slightly airier crumb.
Using a banneton or brotform is ideal if you plan on doing any intricate scoring designs. Not only do they help support the bread so it holds its shape, the dough will also be colder when you score it, giving you more time to work before it needs to go into the oven.

Practical Tips & Recipe Notes
- If floured hands aren't working for you during shaping, try using lightly damp or lightly oiled hands when handling and shaping the dough instead.
- This is a great base recipe for adding lots of fun spices, herbs, cheese, seeds, and more. Just remember if you add anything wet like peppers, raw onions, olives, etc. it will add moisture to the dough. And if you add too many dry ingredients, it also can affect the dough's hydration. I recommend adding no more than 78 grams of additional flavorings/ingredients/inclusions to this dough. That's about 20% by baker's percentage (20% of the total weight of the flour).
- Experiment with adjusting the hydration levels of this recipe to find your perfect version! Keeping everything else the same, you can go as low as 70% hydration or as high as 90% hydration and see how it changes the outcome! Less water means a tighter crumb. More water means an airier, more open crumb.
- For an even longer rise: Put this no-knead dough in the fridge immediately after mixing or after the first overnight rise. I've left it for as long as 5 days in the fridge before baking and it works just fine. As a bonus, gluten tightens up in the cold, meaning cold dough is slightly easier to shape.
💭 Have More Baking Questions?
I've rounded up answers to common baking questions and how-to guides, including:
- Ingredient swaps and FAQs
- Why my recipes are written in grams and not cups
- How to quickly bring eggs and butter to room temperature
- Ingredients I use (salt, flour, yeast, etc.)
- Step-by-step guides for bread and baking techniques
See my baking techniques & troubleshooting guide and ingredient swaps and FAQs for more!

TL;DR - Recipe Summary
- Mix the flour, salt, and yeast. Add the water and mix into a sticky dough.
- Cover and rise for 18-20 hours at room temperature.
- Turn the dough onto a well floured surface. Dust lightly with flour.
- Tuck the edges of the dough up to form a ball. Flip so the seam side is down. Transfer to a crumpled and flattened sheet of parchment paper.
- Dust the top with flour, cover and rest 30 minutes while the Dutch oven preheats at 450°F.
- Score the top of the dough. Then place the dough in the Dutch oven.
- Bake for 30 minutes covered, then 10-15 minutes uncovered.
- Let cool completely before slicing.
📖 Recipe

Crusty No-Knead Dutch Oven Bread (Overnight Rise)
Recipe Notes
- Gluten firms up in the fridge; if you find the sticky dough is too hard to handle at room temperature, you can pop it in the fridge for up to 2 days prior to baking. It will be much easier to shape while it's cold. Let it rest at room temperature for 1 hour after shaping and before baking.
- If using a banneton or brotform, dust the basket well with rice flour, then transfer the shaped loaf of dough smooth side down, into the basket. Cover and refrigerate overnight. Then proceed with the recipe as written!
- For a long, cold rise, refrigerate the dough immediately after mixing or after at least 12 hours at room temperature. It will be fine in the fridge for up to 5 days!
- This no knead bread is best eaten with in the first 3-4 days after baking. You can store it at room temperature for 5-7 days. Storing it in an airtight container like a large resealable bag works well, though the crust will soften due to trapped moisture.
- To freeze: Slice the baked bread, then place in an airtight bag in the freezer with as much air pressed out as possible. Reheat from frozen in a toaster for 2-3 minutes.
Ingredients
- 390 grams all-purpose flour
- 7 grams diamond crystal kosher salt (see notes for other types of salt)
- 2 grams instant yeast (use 1 gram if its warm in your kitchen)
- 312 grams cool water
Instructions
- Mix your dry ingredients (flour, salt, yeast) together in a large mixing bowl. Make a well in the center of the dry ingredients for the water.
- Pour the water into the middle of the dry ingredients and mix until well combined. It will be shaggy and messy. That's okay. Cover the bowl and set it aside at room temp to rest for 18-20 hours (or in the fridge for up to 7 days). You're looking for the dough to double or triple in size with a flat, bubbly top. Depending on the ambient temperature in your kitchen, the dough may be ready a little before the 18 hour mark, or be fine slightly past the 20 hour mark. You have a pretty big window of time to work with here!
- During the final hour of the rise time, preheat oven to 450°F. When the oven reaches temperature, place a Dutch oven inside, covered, and let preheat for 30 minutes at 450°F. Crumple a piece of parchment paper into a ball. Flatten it out, then crumple and flatten it out again.
- While Dutch oven preheats, generously flour a clean countertop. Gently release the dough from the sides of the bowl and turn it out onto the counter. Dust the top lightly with flour, just enough so your hands don't stick.
- Gently stretch the dough into a loose square. Dust any excess flour off the top. Fold the corners of the dough across itself to pull it into a round shape with the edges pinched together on top. Flip the loaf over so the seam side is underneath. Cup your hands around it and lightly lift and rotate the ball of dough against the counter, tucking the dough underneath itself as you go to create surface tension on top.
- Use the bench scraper to lift the ball of dough onto the flattened piece of crumpled parchment paper. Dust the surface of the dough lightly with flour, cover it with a clean dish towel, and let it sit until the Dutch oven finishes preheating.
- Carefully remove the Dutch oven from the oven. Take the lid off and set it aside. Score the top of the loaf to create a vent for steam to escape. Gather the corners of the parchment paper together, pick the dough up and place it inside the Dutch oven. Put the lid back on the Dutch oven.
- Bake with the lid on for 30 minutes (don't peek!), then remove the lid and bake another 10-15 minutes until deeply golden brown on top.
- Transfer the fully baked loaf to a cooling rack and let cool completely before slicing.
Caitlin says
I cannot praise this recipe enough! I made it exactly as directed and let it rest on the counter for 18 hours. This recipe is easy, straightforward, and produced an exceptional loaf of bread. I will definitely be making this again!
Rebecca Eisenberg says
I’m so glad you liked it! Happy baking! 🙂
DeeDee says
Such a great recipe! I’m a fairly regular bread baker and I used Rebecca’s excellent step by step instructions to shape my loaf into a batard, the first time I’ve done that! It was absolutely delicious and we devoured it with salty butter as an accompanyment to dinner. I’m certain I’ll add this to the regular baking rotation!
Jade says
Hello, it happen to me two time now and I don't know if you can help me.
When I'm shaping my bread, I'm forming it into a ball, flip it, and tight the ball. But after the shaping, I can see my dough is fallen/torn apart and it's just very flat and sticky.
Do you have any idea what's happening? (And yes I measure with a food scale)
Rebecca Eisenberg says
Thank you for letting me know you measured with a kitchen scale, that rules out the first thing that could cause this! The other thing could be that you need more flour on your counter during shaping or that your dough has overproofed. Shaping does take a little bit of practice, so it might be that you're stretching the dough too much or not enough. And if the dough has overproofed, I would recommend trying a cold rise in the fridge instead. Since gluten firms up in the fridge, shaping cold dough is a bit easier and the dough is less likely to collapse on you. Good luck!
Laina says
This recipe is great!!
I've made it twice now and it's came out wonderful both time. The first time, since I don't have a Dutch oven, I used a big steel stockpot with a lid, and damp parchment paper. Came out amazing, but the crust was a little uneven. Still delicious though.
The second time, I wanted to make a double batch because it got eaten so fast at the event I took it to that I wanted to make two loaves. So this time, I used my biggest baking sheet, preheated it while the oven was preheating + an extra half hour, then put the loaves on damp parchment paper again and covered them each with a small steel bowl for the first 30 minutes, then uncovered for 15.
They came out so evenly browned and the crust is just beautiful. I did get a couple little "butts" from the parchment creasing them as they baked, but that's just gonna happen in a confined space. Otherwise, they are just beautiful and I think that worked really well as a Dutch oven alternative.
Can't wait for them to cool enough to cut into them!
Rebecca Eisenberg says
These are such good tips for anyone else who wants to bake this without a dutch oven! The damp parchment paper tip is so smart — thank you for sharing. Enjoy the bread!
Katie says
This is such a delicious and easy recipe! The flavor is amazing because of the long rise and it bakes up into a perfect boule. I live at 6500 feet above sea level making it very difficult to get bread to rise and bake properly. I’ve tried other no-knead recipes but this is the only one that has actually given me the loaf I’m looking for. I did use bread flour because that tends to give extra structure at altitude, but no other tweaks necessary. Thank you for finally giving me a go-to bread recipe!!
Suzanne says
I measured with a kitchen scale and everything came out great except that the crust is very very hard and difficult to cut. I baked it in a dutch oven at 450 F for 30 minutes with lid on and 10 minutes with lid off. Any suggestions? Thanks!
Rebecca Eisenberg says
Make sure you're using a sharp serrated bread knife in a sawing motion back and forth to cut through the crust! Don't apply too much downward pressure, let the sharp teeth of the knife saw through the crust. Alternately, if you store the bread in an airtight bag overnight the crust will soften slightly and be easier to cut.
JJ says
It's my first time to try and put a dough in fridge before baking. How many minutes (or hours) do i have to wait when i put it out before i can bake in oven?
Rebecca Eisenberg says
Are you putting it in the fridge before or after shaping it? If you're shaping it after taking the dough out of the fridge, I like to give it at least 30 minutes at room temp (the time it takes for the oven to preheat). If you've already shaped it and let it rest in the fridge in a proofing basket, you can bake it pretty much immediately after taking it out of the fridge and scoring the top! Enjoy the bread!
JJ says
Thanks for replying! Appreciate it 🙂
Cate says
Question!! Sometimes, after the 18 hour mark, my dough has tough spots on the top. Even sometimes the entire surface is like, congealed. I keep it covered, in a metal or glass bowl, and either in a dry place or in my off oven with the light on. What am I doing wrong 😭
Rebecca Eisenberg says
Hmmmm… Tough spots like it’s dried out? Do you cover it so it’s airtight or just with a kitchen towel? If you use a kitchen towel those spots are likely the surface drying. If it’s air tight then it might be that there were some clumps of flour that didn’t get fully hydrated during the mixing and rising process. Does it bake up fine in the end? If so, I wouldn’t worry too much about it!
Cate Blaufuss says
I usually just cover with a towel. But if you think Saran Wrap over the top would be a good trick then I’ll try that! Because either way the bread always comes out perfect!! My coworkers are always amazed because it tastes so fancy, and I love telling them your recipe is only 4 ingredients!
Rebecca Eisenberg says
Aha, that’s probably what’s happening! A towel is fine for doughs with a shorter rest time but for one with a long rise time the towel allows for some air to get in which is probably drying out the top of yours. Try plastic wrap and see if that helps! Good luck and keep on enjoying the bread!
Kathy says
This is my family’s favorite recipe. Even my 13-year old granddaughter makes the bread for her family. So easy to make. Can the recipe be doubled or tripled? One loaf is not enough. If yes, does all the ingredients increase accordingly (double or triple) or do they change?
Rebecca Eisenberg says
Yes it can be doubled or tripled, but I wouldn't increase the yeast at all. If it's VERY COLD in your kitchen, you could go up to 3 grams, but even that might cause it to rise faster than you want!
Phyllis Anderson says
I use cups and ounces in my recipes. Not familiar with grams. Could you please put your recipes in cups to make it easier for me.
Rebecca Eisenberg says
No. Please see my website FAQ for why I don’t do this.
McJanine says
I have made this one a few times now. I do find that doing a few folds early on during the first rise does help the gluten strength. (I have done it both ways). I let it rise in my banneton until it doubled again for the second rise and it worked out fine, although it did take more than 30 minutes. No biggie. This is a nice recipe.
Emma says
Why are we crumbling the parchment paper then flattening back out?
Rebecca Eisenberg says
Great question, Emma! I explained in the blog post: "Crumbling the parchment paper softens it so that it fits neatly into the round space of a Dutch oven without digging into your dough." It just makes it easier to fit into your Dutch oven.
Jeff says
Can I put homemade jalapeño jam in this recipe?
Rebecca Eisenberg says
Yep! I wouldn’t use too much, wait until the dough has been mixed together and then stir in it so it’s still pretty streaky.
Lip says
Hey! I have a question, and i’m not sure but i’m pretty confident i got the measurements right, but instead of regular all purpose flour i used kamut flour, which does have a slightly higher protein content. anyways my dough ended up on the drier side after mixing, so much so that i technically could knead it? i’m not sure what went wrong but i’ll add a little more water and hopefully we’ll see in the morning.
Rebecca Eisenberg says
I haven't ever worked with kamut flour, but given that it's a whole wheat flour that's probably why it ended up so dry. Bread recipes that use 100% whole wheat flour are pretty tricky to pull off, since whole wheat flour struggles to develop a strong gluten network on its own. If you want to use kamut flour I would try it in my whole wheat no-knead bread recipe instead.
Joe says
On first try with this recipe today, I found the bread was a little "gummy"!
Would a longer covered bake or longer uncovered bake help with this? I used both of your times and temperature.
It had proofed 18 hours and had a very acceptable rise, loads of bubbles and flat on top.
Ideas?
Rebecca Eisenberg says
So sorry to hear yours turned out slightly gummy. Yes, you can bake it longer covered to solve that problem! Also, just in case this may have been the issue — make sure you let the bread cool completely before slicing. If it's still warm when you cut it, the steam inside the bread can make the starches gummy like that. If you did let it cool completely before slicing, then definitely bake it longer next time, it can handle it!
Lynda says
TY for sharing this recipe! I'm hooked on bread baking and this recipe makes it super easy for beginners. My sister is wanting to try her hand at bread making and I was thinking of sharing this recipe with her; would it work in her 3.1 qt Dutch oven? TIA for your help!
Rebecca Eisenberg says
It should work in a 3qt Dutch oven, yes! Happy baking!!
Capt. Julie M Clement says
I did not see if there is a gluten free conversion for this bread? Possibly using the King Arthur bread flour (GF of course) or the measure for measure? I would love to make this bread, I have been Gluten Free since it was termed "Tropical Sprue" in 1997 and have not had a loaf since.....
Rebecca Eisenberg says
I haven't personally tested gluten free options but some people have said that the GF cup-for-cup flours do work. Give it a try and let me know how it goes for you!
Veerle De Cock says
Dear Rebecca
I tried your recipe of the small batch, and it was perfect.
Yesterday I tried the recipe for the normal batch, and it didn't work out at all: the dough was very wet, and I couldn't make a ball of it; it always went back into a very flat something. The result is a flat, not risen "bread", not good to eat.
I used spelled flour instead of white flour. The rise was 17 h instead of 18-20h.
Help! What did I do wrong? What can I do better?
I could send you a picture of the result.
Thank you for helping me.
Veerle
Rebecca Eisenberg says
Using spelt flour would absolutely cause that issue! I don’t work with spelt flour much but my understanding is it needs less water than all purpose. It’s a more delicate flour that requires different handling! I would look up a spelt-specific recipe if that’s what you’re after.
Veerle De Cock says
Thank you, Rebecca! I keep trying your recipe, and I succeed in using it for spelt or mixed white/spelt, I can reply to you.
Jim Turner says
Since this is a true no-knead bread, at what point would you add any add-ins, such as cheese or herbs
Rebecca Eisenberg says
I would add them to the dry ingredients at the beginning before adding the water.
Kathy says
Question: If I see that the rise reached a peak in 12 hours for the regular crusty bread recipe and then begins to fall slightly, does that mean that it is time to prepare it for baking or can I leave it for another 6 hours for the fulll 18 hour rise. My kitchen is 74 degrees so it might rise faster.
Rebecca Eisenberg says
If you see it starting to fall, it is time to prepare it for baking! If you need to extend that window you can pop the dough in the fridge to slow it down.
Kathy says
I did place it in the fridge at 9 am which was only 13.5 hours. I decided to place in fridge to enhance the taste and give me an easier time forming it into a boule. I will do a stretch and fold when I take it out of the fridge around 12:30and let it rise for an hour before forming into a loaf. Then an extra 30 minutes before placing into Dutch Oven. I follow your instructions otherwise. Thank you for your input. Kathy
Jennifer says
This looks wonderful, can’t wait to try it and thanks for sharing! I tried another no knead recipe before and got stuck after it was in fridge for 24 hours. I took out the dough, shaped it according to directions, but then it completely fell flat and lost any shape it had while sitting out waiting for dough to get to at least 70 degrees F. That took 100 min. Could you please tell me exactly what you do with your dough after you remove from fridge before baking? Do you let your dough get to at least 70 degrees before baking? I hope this makes sense and appreciate any advice you have with this step! Thank you so much ! 🙂
Rebecca Eisenberg says
No-knead recipes are super resilient and flexible but can also be finicky! It's hard to know what exactly can cause something like that to happen — could be lack of tension in your shaping, could be temperature, could be the size of your dutch oven, etc. I can't really give advice on other recipes as I'm not as familiar with them as I am with my own, but I don't personally usually temperature-check my dough before baking. If the dough has been in the fridge, I usually shape and let it rest at room temperature just while the dutch oven preheats — about 30 minutes. Maybe up to 60 minutes. Hope this helps!
Jennifer says
Thank you so much for your reply! So, I listened to you and just went with it, even though the dough read 52 degrees at 60 min, and I threw it in. It came out perfect and thank you for your advice! I kept seeing ppl say it needed to be closer to 70+ degrees F and was leaving dough out almost 2 hours. This round was much better and thanks!! The other recipes I had tried were almost identical, except for the yeast about and proof time. I like yours much better as it calls for much less yeast and longer proofing. Thanks so much for letting me know I didn't need to worry about this dough temp! Your recipe is FANTASTIC!! 🙂
Scott says
Honestly love this recipe, I use it all the time, do a 18-20 hour bulk rise on the counter and then shove it in a banneton in the fridge for a cold fermentation till im ready to bake and it comes out amazing everytime.
I just had a question, have you ever tried adding inclusions to this?
Rebecca Eisenberg says
So glad you like it! And yes, I do add inclusions to it sometimes. You can mix them in right at the start.
Sylvain says
This is the recipe I didn’t know I needed. I found your website because Aubrey Gordon from Maintenance Phase mentioned you as a friend and a great recipe blogger. This recipe got me started on what I hope is a long bread baking journey. Could you explain why using a banneton adds 12 hours of proofing in the fridge? I want to try proofing with a banneton and I am curious. Thank you so much!
Rebecca Eisenberg says
Hi! Thanks for being here. Yeast activity slows down in the cold temp of the fridge so once you shape it and put it in the banneton it needs more time for the yeast to work. The longer it’s in the fridge the more time the dough has to settle into the shape of the banneton, too. You could do the banneton rise at room temp for less time but I find it’s just not worth getting out the banneton because it’s not in the banneton long enough to really make a difference in the final bake. That’s just my approach though, other bakers have different methods. Hope this helps!