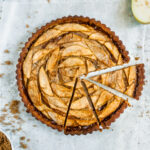
This pear and gruyere tart tastes like a fruit and cheese plate, all in one bite. It's not too sweet, not too savory — and is a truly special way to end a meal.
While I love a rich chocolate dessert, like my favorite mint chocolate ganache tart, sometimes I'm in the mood for something warm and fruity instead.

In season 1, episode 3 of Pushing Daisies, the most perfect TV show ever created, secretly alive-again Chuck bakes anti-depressants into a Pear & Gruyere pie for her two aunts who are mourning her supposed death (don't worry, I've omitted the anti-depressants from this recipe).
It was during a recent rewatch of the show that I realized I hadn't really paid attention to The Pie Hole's incredible baked creations during my earlier viewings. The idea of combining pear and gruyere intrigued me.
I've eaten hundreds of pears in my life and I love gruyere cheese, but I couldn't quite imagine what they would taste like together, in pie form. Pushing Daisies' creator Bryan Fuller loves cute and quirky wordplay, so part of me wondered if the fictional pie was more about the rhyming pear with gruyere, rather than an actual recommended pairing of flavors.
Recently a friend of mine, who has recently begun watching Pushing Daisies for the first time, asked if we could try making a pear and gruyere tart of our own. So I went down the Google-hole and discovered that a few people had indeed created their own versions of the pear & gruyere pie from the show.

Why a pear and gruyere tart, not a pie
Here's the thing: I don't really... love... pie? Deep-dish fruit pies, at least. I don't hate them, but I have a thing about mushy fruit, and pies are often so heavy and syrupy and sugary that I eat a few bites and then have had my fill. And when I looked for pear & gruyere tarts, all I found were savory recipes that used puff pastry, rosemary, sausage, and swiss chard.
So while I wanted to try the pear & gruyere pie, I also didn't really want a whole pie, and I didn't want a savory appetizer pastry, either. So I picked the things I liked best from the recipes I found, cut them down by a third to a half, added some cardamom (I'm obsessed with cardamom rn), and created a Pear & Gruyere Tart.

The gruyere cheese gets added to the crust along with the chilled butter, and the pears are tossed in a warm, cinnamon-y, ginger-y, brown sugar/nutmeg/vanilla mixture that browns and caramelizes around the thin slices of pears while they bake.
How to get the tart crust in the pan
There are a lot of different methods for getting a sweet tart crust into a pan. You can put your disc of dough in the center and press and smush it until it fits. Or, you can do what I do and roll the dough out first. Then fold it into a little packet, place it in the pan, and unfold it there.
Be gentle when you unfold it; the dough is thin and the edges of the pan are sharp. Gently lift the overhang to let out any trapped air, and use the backs of your fingers to press the dough into the corners and edges of the pan.
Finally, run a rolling pin across the top of the pan to trim the overhang. Use the excess dough to patch any holes or thin spots if needed.
![[gif] folding the sides of a rolled tart dough in to the center](https://thepracticalkitchen.com/wp-content/uploads/2019/08/how_to_press_tart_crust_1.gif)
![[gif] unfolding the tart crust so it hangs over the edges of the pan](https://thepracticalkitchen.com/wp-content/uploads/2019/08/how_to_press_tart_crust_2.gif)
![[gif] pressing the tart crust into the pan with the back of my fingers](https://thepracticalkitchen.com/wp-content/uploads/2019/08/how_to_press_tart_crust_3.gif)
![[gif] a rolling pin trimming the overhang dough on a tart pan](https://thepracticalkitchen.com/wp-content/uploads/2019/08/how_to_press_tart_crust_4.gif)
Pre-baking your tart crust
This tart requires you to pre-bake your tart crust. Pre-baking means baking your crust almost all the way to completion before adding your filling and finishing the baking process.
For more on how to pre-bake your crust, the importance of "docking," and how to use pie weights, check out this post.


Because the pear filling doesn't need to bake (it doesn't have any eggs, or ingredients that need to be baked in order to eat or set up properly) pre-baking the crust and sealing it with an egg white wash will help ensure you don't end up with a "soggy bottom."
Once you add the pear filling, the recommended bake times for this recipe can vary based on your particular oven. Keep an eye on your tart while it's in the oven, and if your crust looks like it's at risk of burning or browning too much, tent a piece of aluminum foil over the top while it finishes baking.
Don't be afraid to pull it out of the oven early if the pears look suitably browned and the crust is getting dark.

If you don't have a tart pan - make a galette!
If you don't have a removable bottom tart pan, you can simply bake this as a galette.
To make a pear and gruyere galette: Roll the chilled dough out into a rough circle ~⅛" thick and transfer it to a parchment-lined baking sheet. Dump the pear mixture into the center and fold the edges of the dough up and to hold it all in place.
Brush the crust with melted butter and sprinkle some raw/turbinado sugar around the edges before baking to make sure it crisps up. Bake it for 40-45 minutes at 400 degrees.
Important tart baking tips:
For the most part, recipes can be pretty forgiving if you take a step or two out of order. But in the process of testing this recipe a few times, I got a little cocky and took some key steps out of order with disastrous results. So here are your two warnings:
- Add the cheese to the dough WITH the butter: When making the dough, you must incorporate the grated cheese at the same time as the butter. If you try to incorporate it after the dough has formed, it won't incorporate smoothly and the dough will be fragile and break when it bakes.
- Add the vanilla to the pear filling AFTER you add the pears to the dry mixture: If you add the vanilla before pears, the dry mixture will get clumpy and it will be hard to evenly coat the pears. For this same reason, you should peel, slice, and toss your pears all at once, rather than trying to do them in batches.

💭 Have More Baking Questions?
I've rounded up answers to common baking questions and how-to guides, including:
- Ingredient swaps and FAQs
- Why my recipes are written in grams and not cups
- How to quickly bring eggs and butter to room temperature
- Ingredients I use (salt, flour, yeast, etc.)
- Step-by-step guides for bread and baking techniques
See my baking techniques & troubleshooting guide and ingredient swaps and FAQs for more!
📖 Recipe
'pushing daisies' pear & gruyere tart
Recipe Notes
- If you don't have a food processor, make the tart dough by combining the dry ingredients in a large bowl. Then, use your fingertips OR two knives or forks OR a pastry cutter to cut and rub the butter into the flour mixture until it reaches the texture of cornmeal. Work quickly to keep the butter from melting. Then proceed with the recipe as instructed, using a plastic bowl scraper or pastry cutter in place of the food processor.
- Add the cheese to the dough WITH the butter: When making the dough, you must incorporate the grated cheese at the same time as the butter. If you try to incorporate it after the dough has formed, it won’t incorporate smoothly and will cause your dough to be fragile and break when it bakes.
- Keep it cool! If your kitchen is warm or your hands run hot, you’ll melt the butter in the pie dough. It’s important to keep it chilled and handle it as little as possible, and to refrigerate or freeze your dough between steps to keep that butter chilled before baking.
- *Pie weights can be dried rice, beans, or sugar, or you can buy a set of pie weights (more about my preferred pie weights here). Be generous with your weights — 1-2 cups of beans, rice, or sugar will do. You'll still be able to use them later.
- Add the vanilla to the pear filling AFTER you add the pears to the dry mixture: If you add the vanilla before pears, the dry mixture will get clumpy and it will be really hard to toss the pear slices in it to get them evenly coated. For this same reason, you should peel, slice, and toss your pears all at once, rather than trying to do them in batches.
- To make a galette: Roll the chilled dough out into a rough circle ~⅛″ thick and transfer it to a parchment-lined baking sheet. Dump the pear mixture into the center and fold the edges of the dough up and to hold it all in place. Brush the crust with melted butter and sprinkle some raw/turbinado sugar around the edges before baking to make sure it crisps up. Bake it for 40-45 minutes at 400 degrees.
Ingredients
gruyere tart crust
- 150 grams all-purpose flour (1¼ cups)
- 32 grams powdered sugar (¼ cup)
- ⅛ teaspoon salt
- 113 grams very cold unsalted butter (8 TBSP, 1 stick)
- ½ cup gruyere cheese (finely grated)
- 1 egg yolk (large)
- 1 tablespoon ice water (plus more if necessary)
- cooking spray (for greasing the tart pan)
- 1 egg white (for brushing the crust)
pear filling
- 3 pears (peeled and thinly sliced)
- ½ cup brown sugar
- 3 tablespoon corn starch
- ¾ teaspoon cinnamon
- ¼ teaspoon salt
- ¼ teaspoon whole nutmeg (freshly grated, always!)
- ¼ teaspoon cardamom
- ¼ teaspoon ground ginger
- ½ teaspoon vanilla (get the good stuff!)
- 1 tablespoon butter (cut into pieces)
Instructions
make the gruyere dough
- Cut the butter into cubes and chill in the fridge until ready to use.
- In a food processor, pulse together the flour, sugar, and salt until combined. Add the butter and gruyere and pulse until it has the texture of cornmeal.
- Add the egg yolk and pulse to combine. Then, pulse in the ice water. Start with 1 tablespoon of water, but you may need to add a little more if necessary (err on the side of less!), just until the dough holds together when you squeeze it in your hand.
- Turn the dough out onto the counter and knead quickly and gently until it’s combined and smooth. Try to avoid touching it with your hands too much so the butter doesn't melt.
- Flatten dough into a disc, wrap in saran wrap, and refrigerate for at least 20 minutes or up to 2 days (or up to 3 months in the freezer). If the dough has been in the fridge for longer than an hour, let it sit at room temp for 20 mins before rolling it out.
to pre-bake the crust
- Preheat oven to 425°F and arrange an oven rack so that it's on the lowest setting. Generously spray a fluted tart pan with a removable bottom with cooking spray, making sure to get into all the nooks and crannies. Set aside.
- Lightly flour the dough with your hands and begin pressing it out into a larger disc. Again, try not to handle it too much so your hands don't melt the butter. When it’s not quite the size of the bottom of the tart pan, switch to a rolling pin, rolling it out until it's about ⅛" thick.
- Gently fold the edges of the tart in, creating a galette-like shape that's slightly smaller than the bottom of the tart pan. Carefully pick the galette up and place it in the center of the tart pan. Then, unfold the edges of the dough so that they're draped over the sides of the pan.
- Make your way around the tart, carefully lifting the draped edges of the dough with one hand and using the backs of your fingers on the other to press the dough into the bottom corners and sides of the tart pan.
- Run a rolling pin across the top of the tart pan or use a sharp knife to trim the excess dough hanging over the edges of the tart pan. Use the dough scraps to patch any thin spots or cracks in the crust.
- Use a fork to dock the surface of the pie crust, including the sides, to prevent bubbling. Freeze for at least 20 minutes before baking.
- Spray a sheet of aluminum foil with cooking spray and press it greased-side down onto the surface of the frozen tart crust to prevent it from getting too dark. Leave enough foil overhang so that you can easily grab it later. Sprinkle your pie weights of choice* onto the aluminum foil.
- Place the tart on a sheet pan and bake it for 12 minutes at 425°F. Then, remove the foil and pie weights, reduce the oven temperature to 350°F, and bake an additional 10 minutes. The crust should be a light golden brown color.
- Brush the crust with a thin layer of egg white, then return to the oven for 30-60 seconds to seal the crust.
- Remove and let cool. Your tart is now ready to be filled.
pear filling & final assembly
- In a large bowl, combine brown sugar, corn starch, salt, nutmeg, ginger, cardamom, and cinnamon.
- Peel and slice the pears, then dump them into the dry mixture in the large bowl, add the vanilla, and stir and toss to combine. You’ll need to stir this mixture slightly longer than you’d expect — the moisture of the pears will begin to dissolve the sugar, creating a sauce-like coating for the pears, rather than a dry rub.
- Return the oven to 425°F. Layer your pear filling into the pre-baked and cooled tart shell (it’s okay if it’s still a little warm). You can get creative here! Try arranging the pears in concentric circles, or maybe standing upright. I prefer to make sure the slices are all lying flat on their sides but it’s entirely up to you.
- Pour any of the leftover brown sugar mixture over the top of your prepared tart. Dot cubes of butter across the top of the pie.
- Place the tart shell, still in its tin, back on the sheet tray (in case of spillage). Bake on middle rack for 15 minutes at 425°F, then lower the temp to 350°F and bake for an additional 15-20 minutes (or even up to 30 minutes) or until until pears are crisp and brown on top.If your crust seems to be browning too quickly, loosely tent a piece of aluminum foil over the top of the tart pan when you drop the oven temp.
- Remove tart from oven, let cool in the pan. When cool, remove the outside piece of the tart tin and serve it up.
Tara says
Rewatching Pushing Daisies as well and was inspired to make a pear and Gruyere pie. This looks amazing! Will have to give it a try! So creative.
Carissa Renard says
Even though I messed up the pie crust I’d say this turned out pretty tasty. Unfortunately it started cracking when I was rolling it out and I couldn’t get it to a uniform thickness so some of the crust was uneven but the flavor of it was really good
Hailey says
I made this for a wine and cheese party. I opted for the galette as I didn’t have a tart on. It came out so pretty and rustic and tasty! A lovely crunchy crust made subtly savory with the gruyère all balanced by the a delicately sweet filling bursting with delicious flavor from the variety of spices! At a party where there was no shortage of food, I sure was smirking at my contribution being quickly wiped out. Will certainly make again and look forward to doing so as a tart!
Rebecca says
I'm so glad to hear it was a success!! <3
Sandi says
Hi! Do think it would be OK to make the crust a day in advance? I'm worried about running out of time. 🙂 And, if it IS all right to make in advance, should I store it on the counter, or in the refrigerator?
THANK YOU THANK YOU! This looks delicious!
Rebecca says
Yes! You can definitely make the crust in advance. You can make the dough for it in advance, in which case you should store it in the fridge. If you're baking the crust in advance then you can store it in a large ziplock back or wrapped well in plastic wrap for up to 3 days at room temperature. If you want to make it longer than 3 days in advance, wrap and freeze the parbaked crust. Let it defrost in the fridge overnight before baking.