
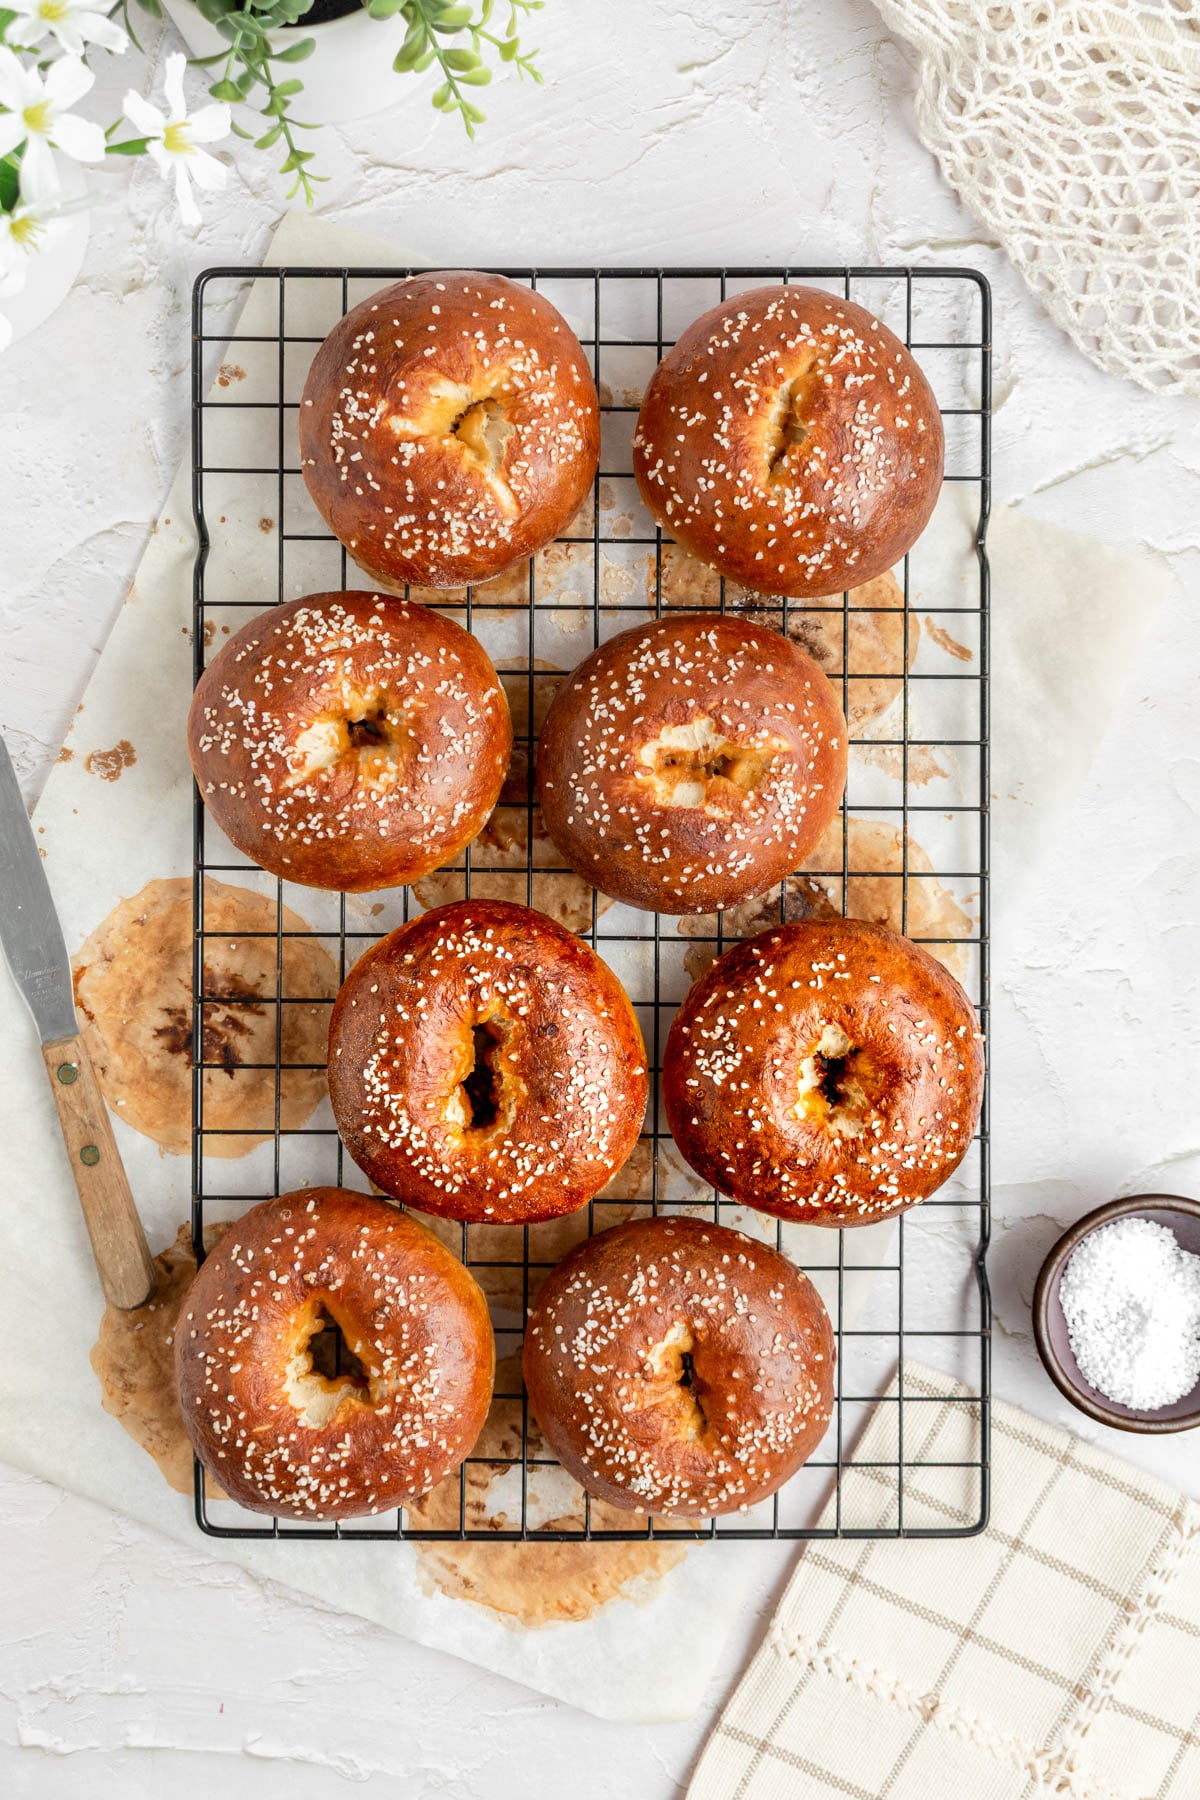
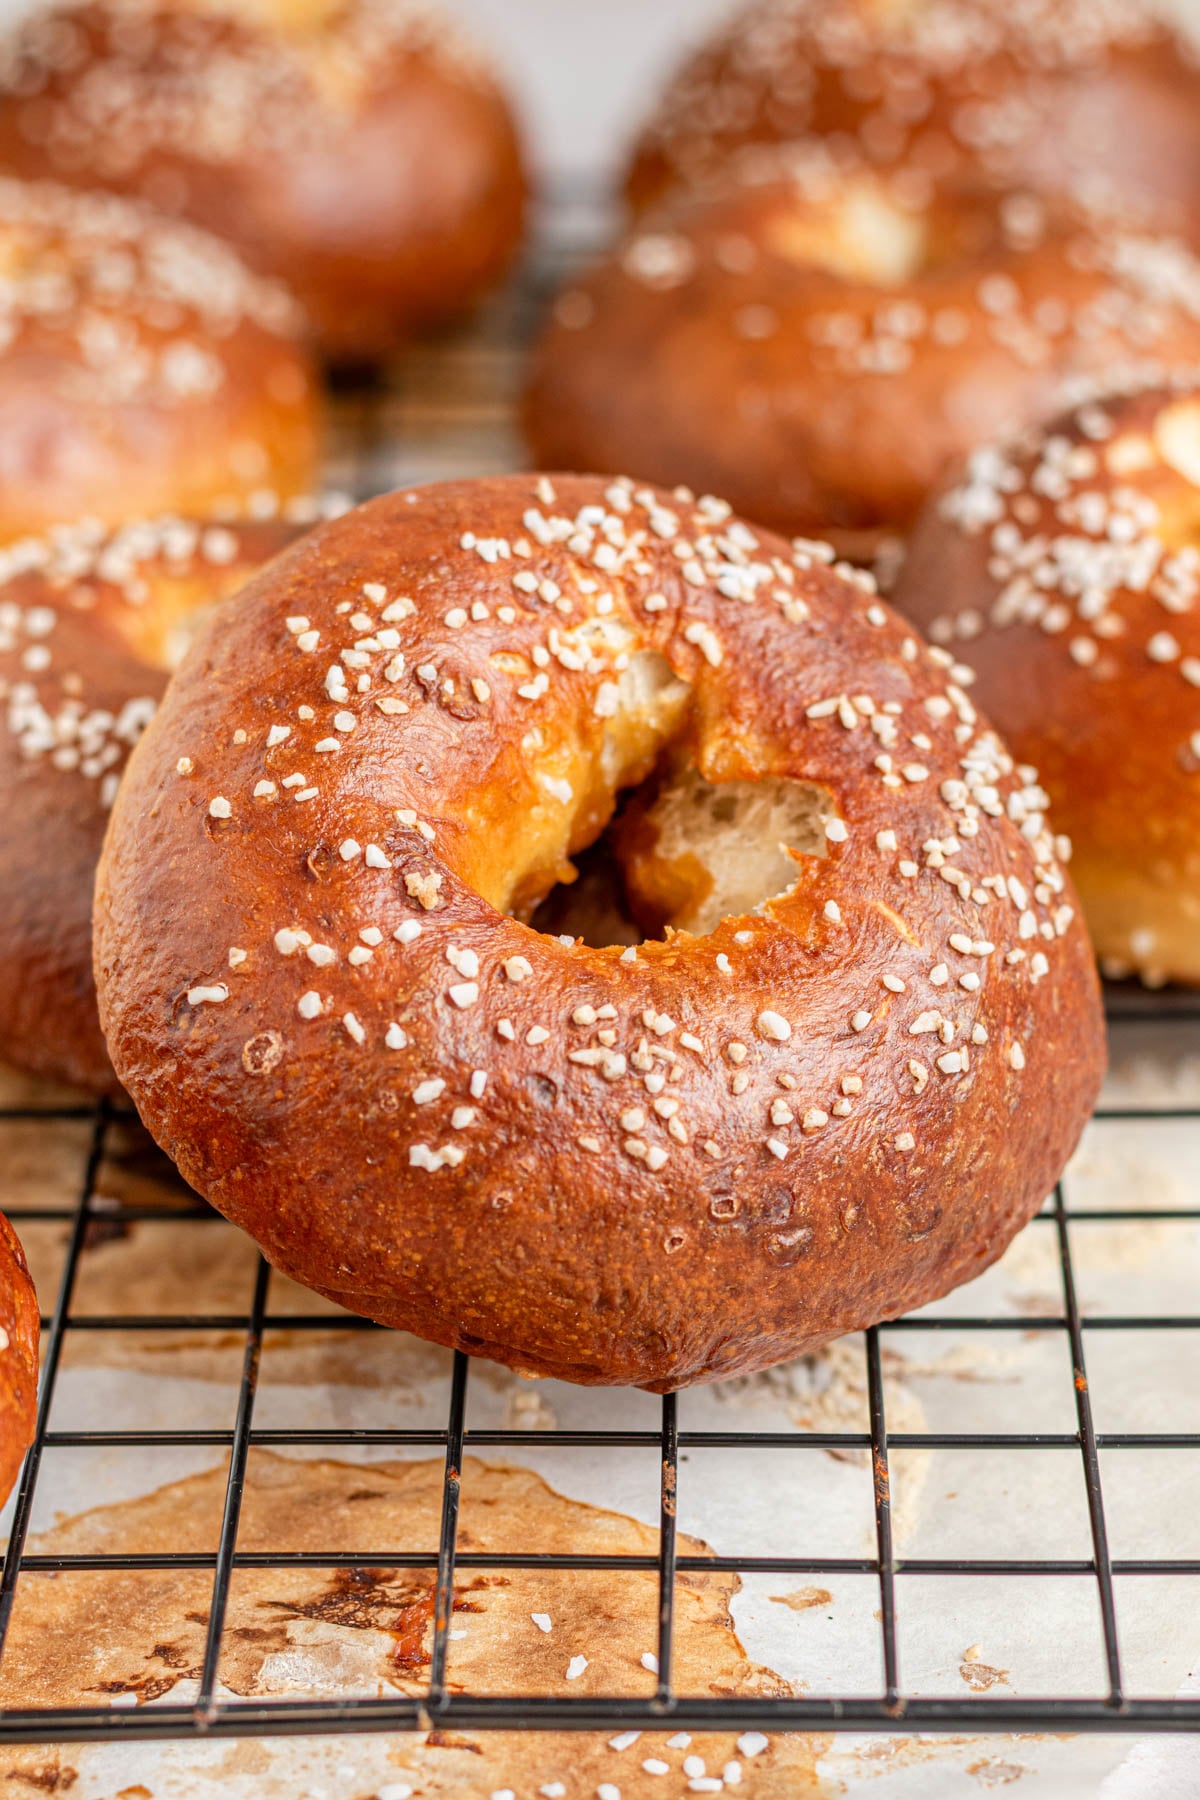
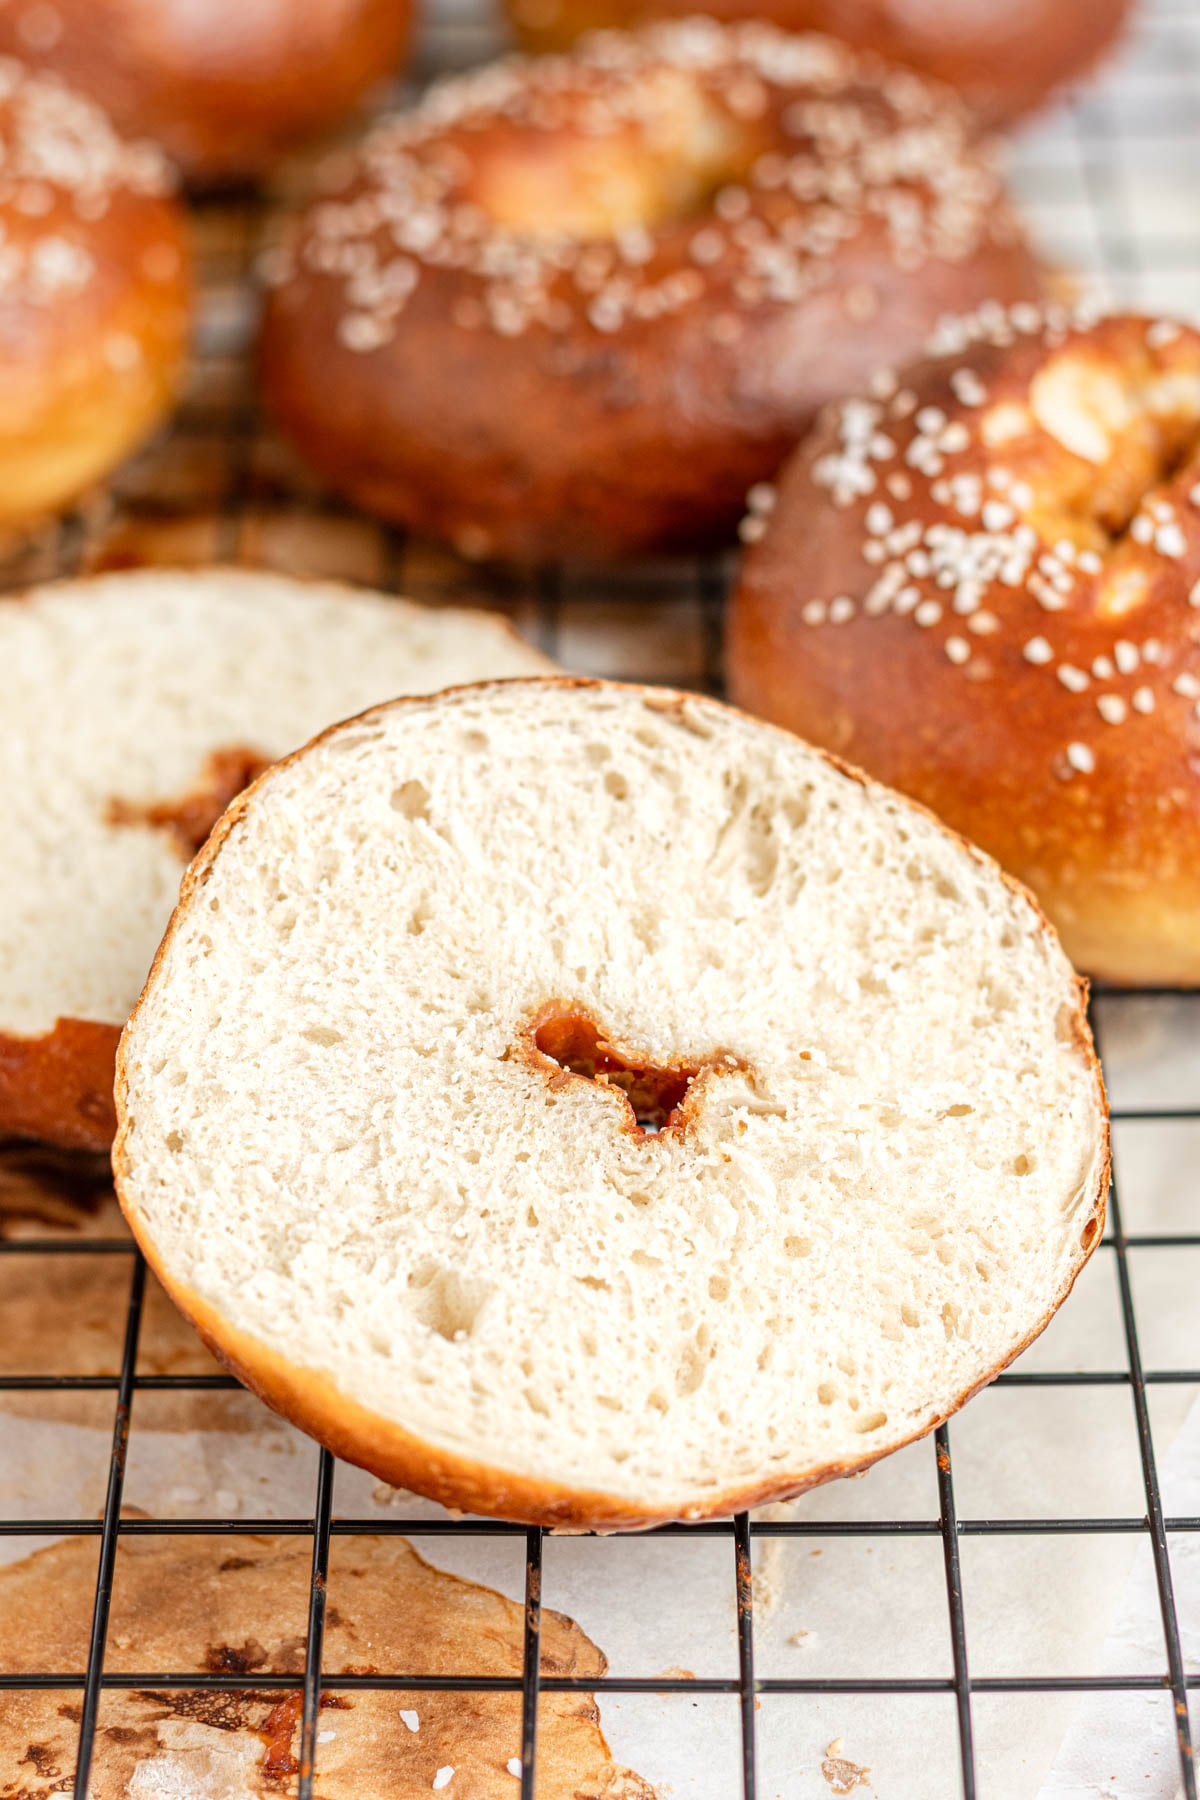
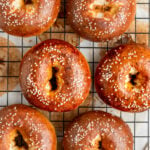
These pretzel bagels are the best of both worlds — deeply browned, salty pretzel exterior with a chewy, dense bagel interior. So good toasted with a bit of homemade cream cheese or used to make a ham sandwich, heavy on the mustard.
This is a quick and easy bagel recipe that's great for beginners. It makes eight bagels and can be done in just a few hours!
I'm so excited to be sharing this recipe with you, because getting this pretzel bagel recipe just right was not easy! The recipe itself is extremely easy, don't worry. But figuring out how to adapt my favorite easy plain bagel recipe to produce excellent pretzel bagels was a challenge!
Pretzels and bagels are similar in that both go through a water bath before they get baked. Bagels are usually boiled in water or a mixture of water and barley malt syrup. Pretzels are sometimes boiled, sometimes not, but always dipped in an alkaline bath before baking. Traditional pretzel recipes use food-grade lye, but in home kitchens, a mixture of water and baking soda does the pretzel-ing trick just fine.
A pretzel bagel combines ingredients and techniques from both pretzel and bagel making to create a finished product that's somewhere in the middle.
This Pretzel Bagel Uses *Baked* Baking Soda
Baking the baking soda before mixing it with the water for these pretzel bagels, intensifies the alkaline properties of the baking soda, gives the bagels a darker crust, and more of that slightly bitter, classic pretzel taste.
How you apply the baking soda bath for pretzel making can also vary the outcome of the crust in terms of flavor and color. Some pretzel recipes only use a cool water bath and skip boiling entirely. Others add the baking soda to boiling water. Some recipes dip in alkaline solution, then rinse it off, others don't rinse at all.
In developing my own pretzel bagel recipe, I tested all the boiling and dipping methods I could. Rinsing versus not rinsing. Boiling vs. dipping. Not boiling versus just dipping. Boiling with baking soda vs. without baking soda. Baked baking soda vs. unbaked baking soda.
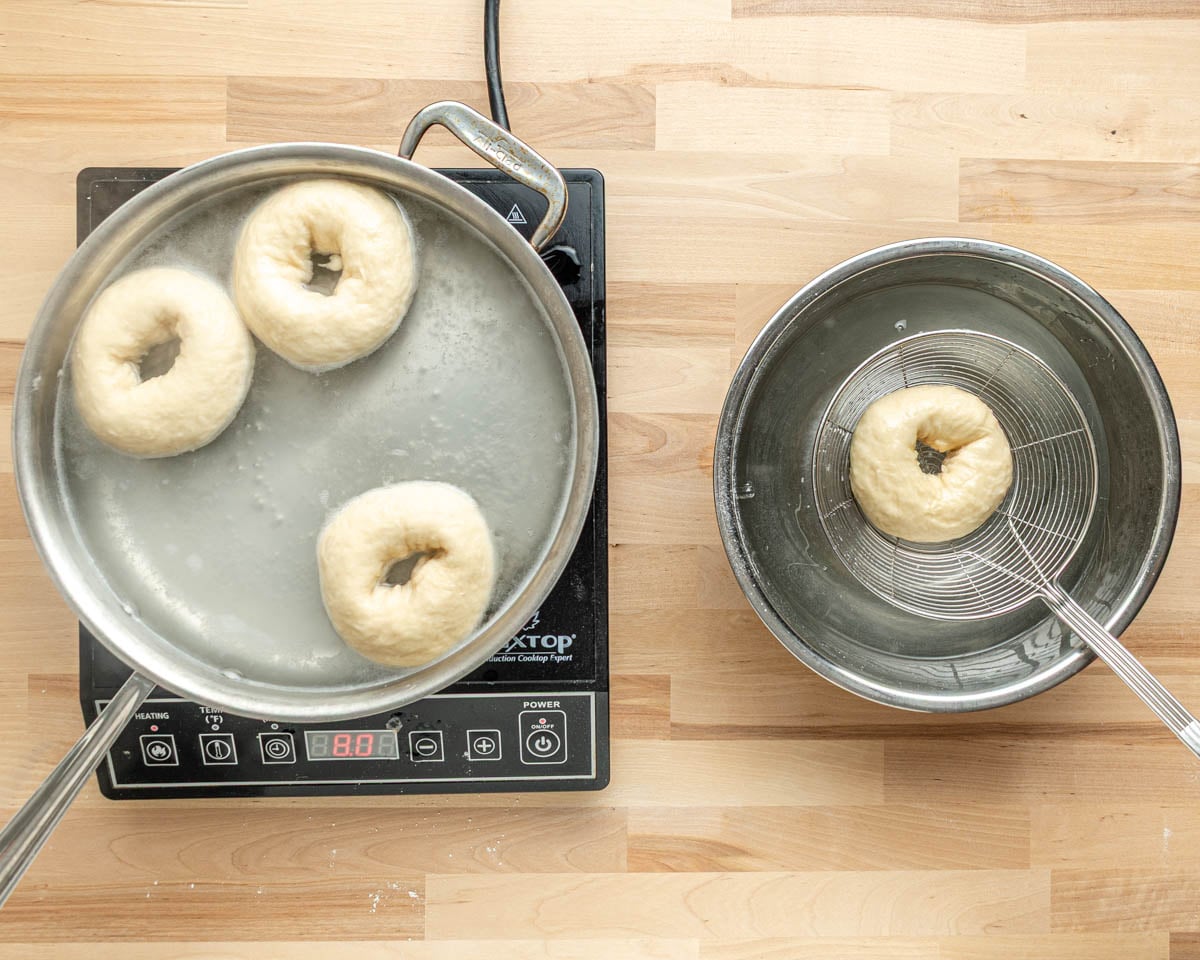
Boiling the pretzel bagels in the baking soda solution for too long made them unpleasantly bitter. But to give them the bagel texture, they needed at least 45-60 seconds boiling per side. And to give them the pretzel flavor, they needed no more than 15-20 seconds in the cool baking soda solution. The math of finding a happy medium started to hurt my brain, so to keep it simple: you'll boil, then dip. Easy!
And yes, you will need to bake your baking soda for this recipe, but you can do it while your pretzel bagel dough is rising.

The bagel dough itself is a riff on my standard plain bagel recipe, only I've swapped in brown sugar and added melted butter, which are more common in pretzel dough. The butter gives the bagels a softer, fluffier texture than you might expect from a bagel, but really helps bridge the gap between pretzel and bagel nicely.

The butter makes the dough stretchier and more elastic, which means you absolutely must stick your shaped pretzel bagels in the fridge for at least 10 minutes before you boil them. The cold temperature helps the butter firm up so that your bagels survive the boiling and baking soda bath steps.
To finish the pretzel bagels, I tried them with and without a egg wash and honestly couldn't notice a difference. They're gorgeously shiny and deeply browned even without the egg wash.
Pretzel Bagel Ingredient Notes
See the recipe card at the end of the post for ingredient quantities!
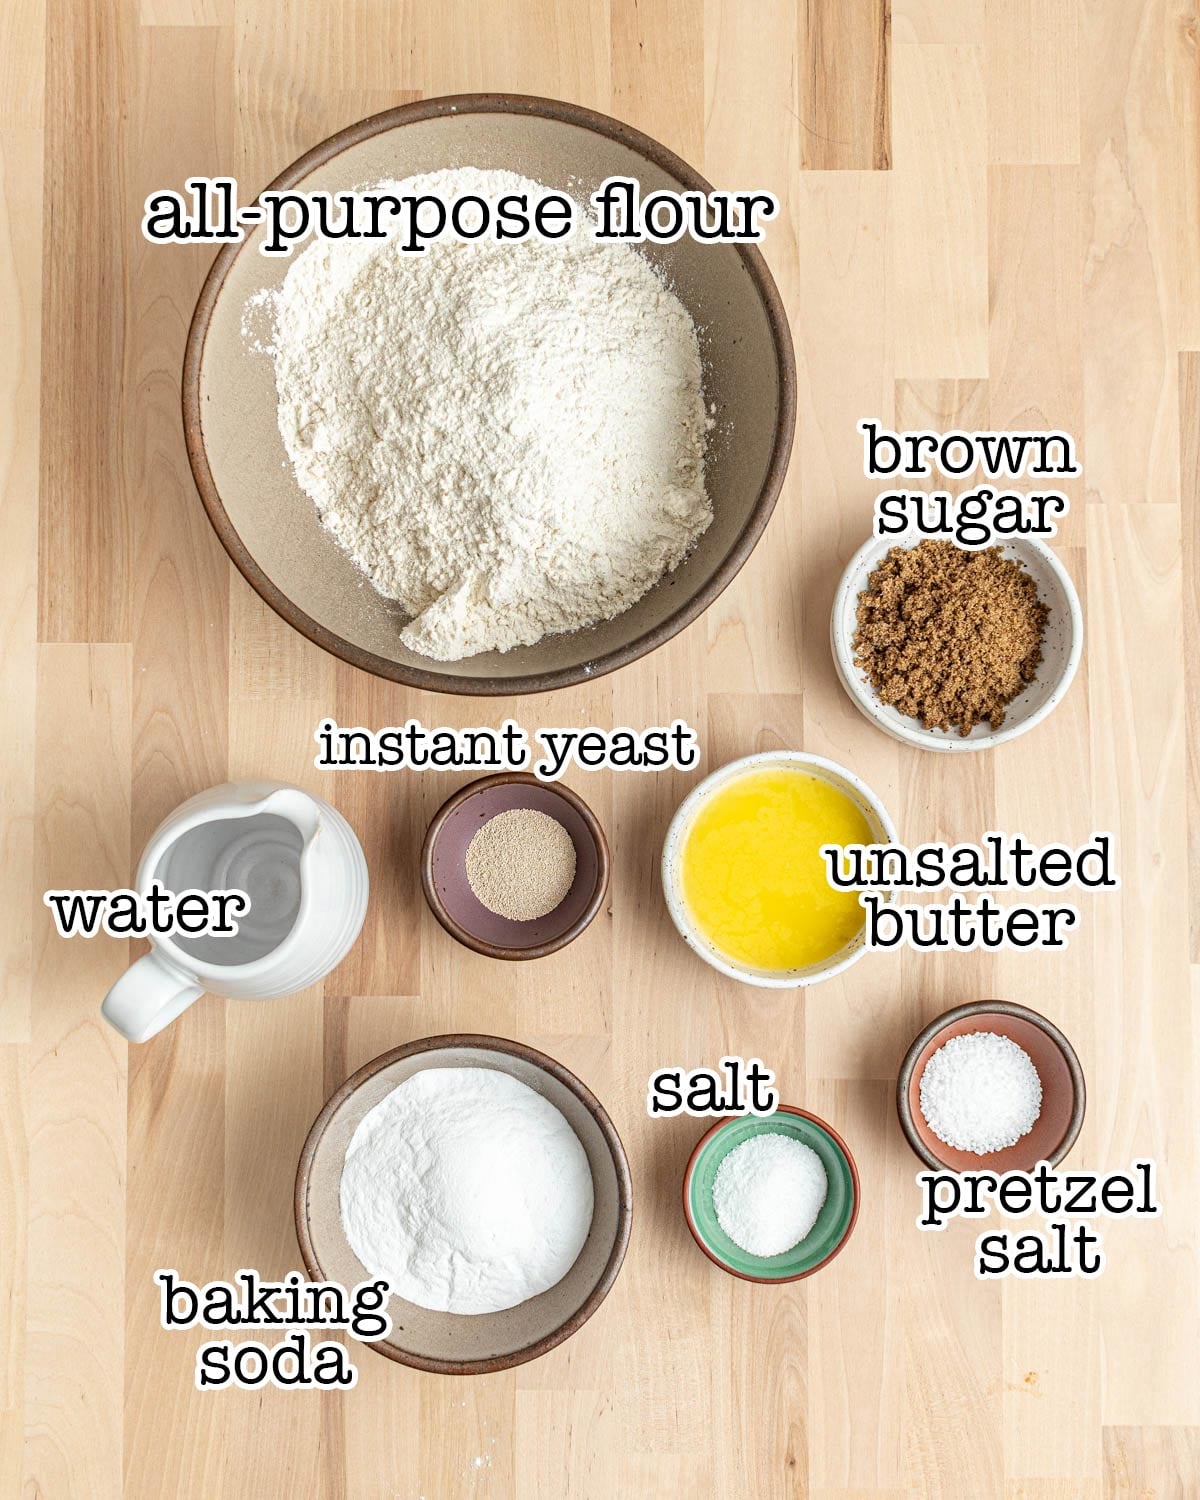
To make these pretzel bagels you will need all-purpose flour (bread flour will also work, but you may find you need just a bit more water in the dough), brown sugar, instant yeast, unsalted butter, salt (I use Diamond Crystal Kosher Salt), water, and pretzel salt. You'll also need baking soda and more water for boiling and dipping the pretzel bagels.
This is a Super Easy Pretzel Bagel dough
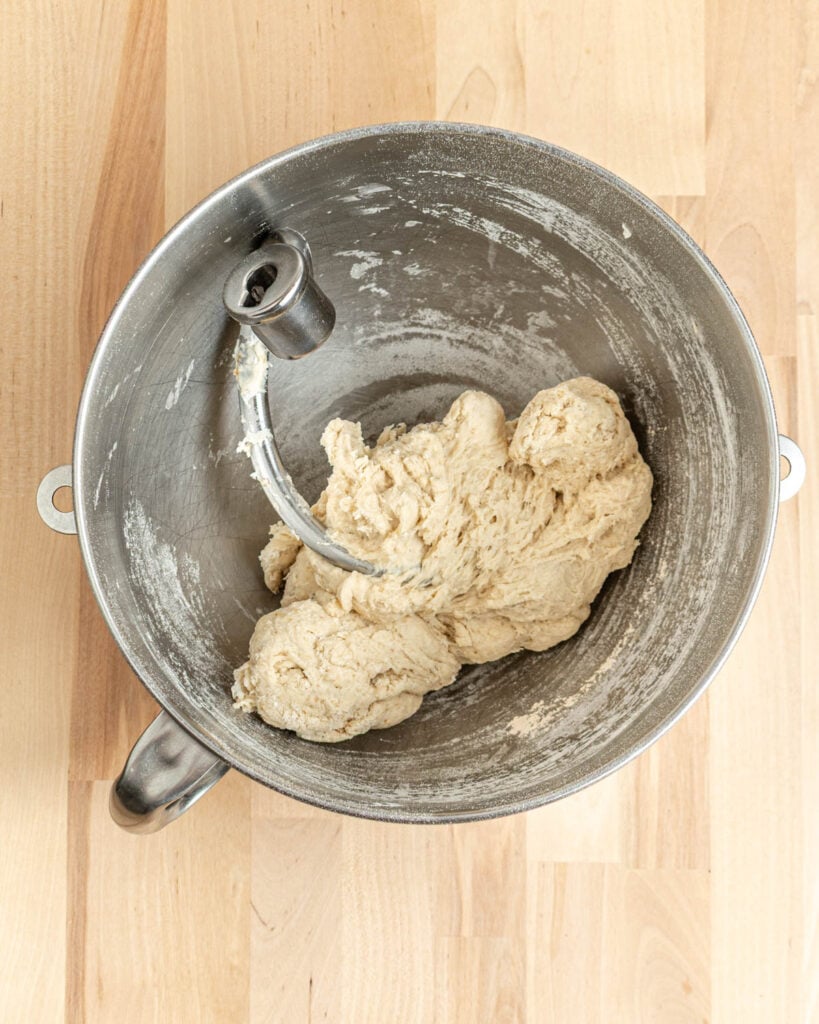
You're going to follow a really basic dough making process to make these pretzel bagels. First you'll mix the dry ingredients together — whisk well to break up any brown sugar clumps! Then you'll add the water and melted butter.
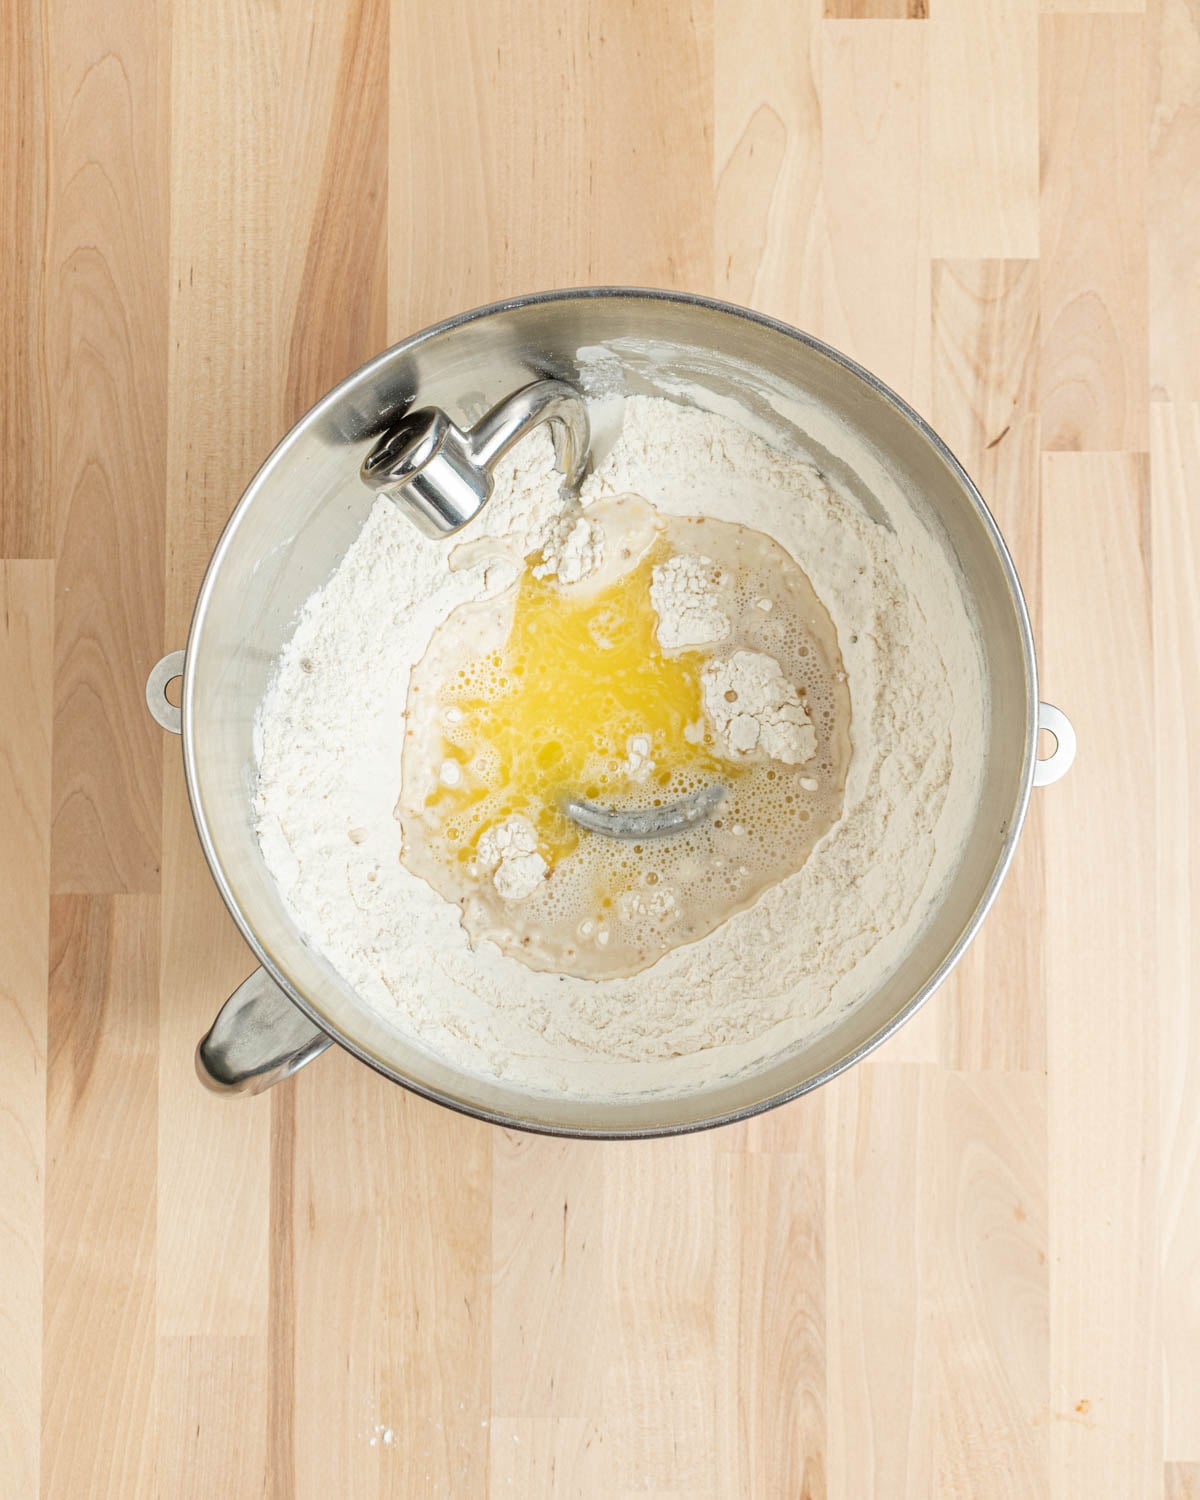
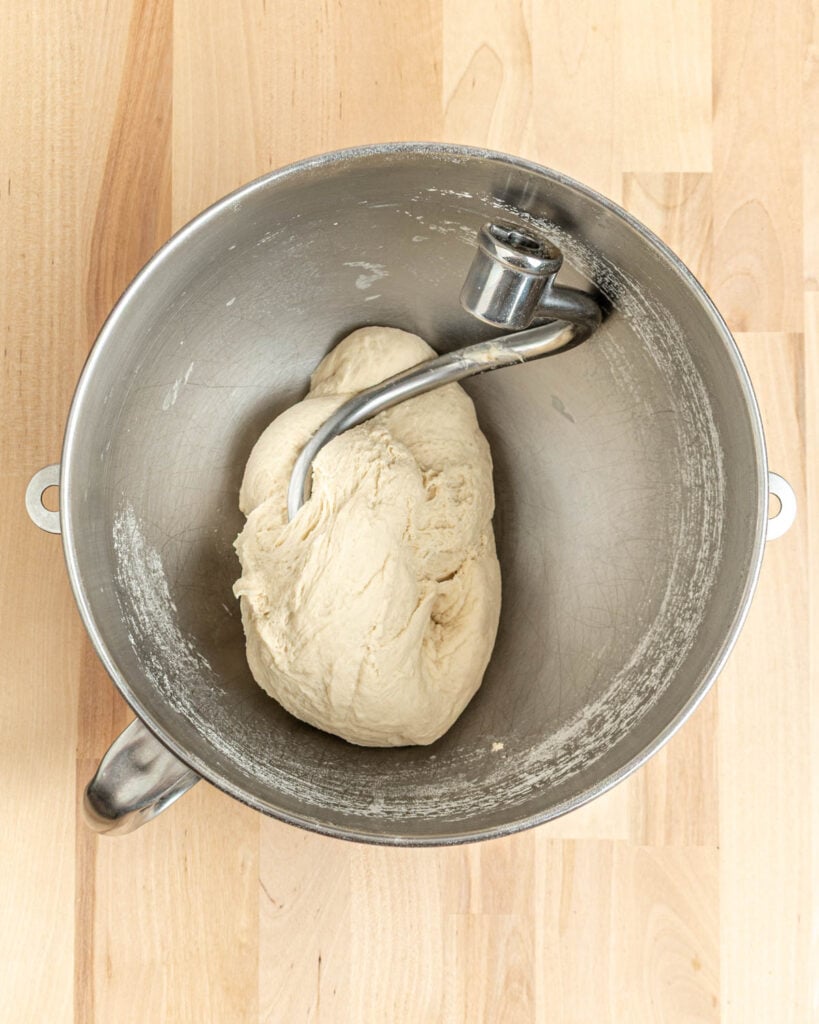
Start mixing on low speed so the flour doesn't go flying everywhere. This can take a few minutes, so be patient. You may need to pause and scrape down the sides of the bowl a few times to get all the flour incorporated. Once the dough comes together in a messy ball in the bowl, increase the speed just a touch and knead the dough until it's nice and smooth.
Mixing vs. Kneading:
- Mixing the dough is the step where you want all the ingredients to just come together. There shouldn't be any dry bits of flour in the bottom of the bowl and it should mostly be one messy looking lump on the dough hook. It can take a few minutes before the dough is completely mixed, and you can use this time to add more water or more flour if the dough needs it.
- Kneading is the step after mixing, where you're developing gluten in the dough. Gluten provides strength and structure and you'll see your messy, lumpy dough become smooth and fully hydrated by the end of the kneading process.
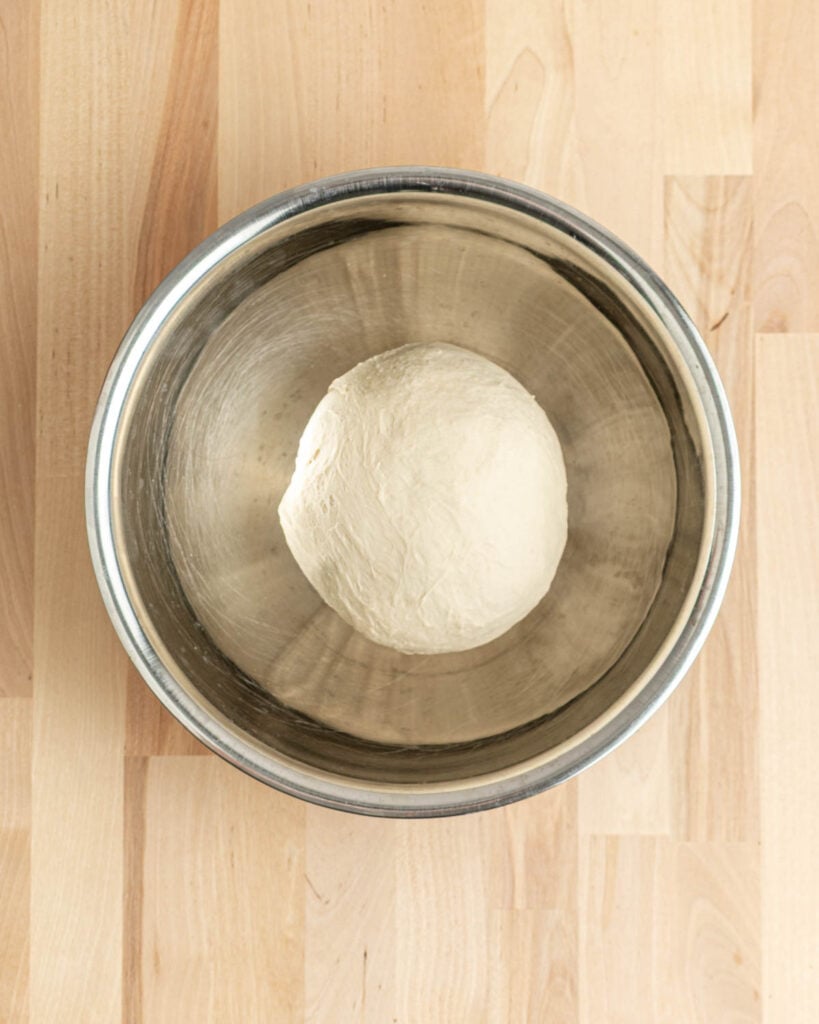
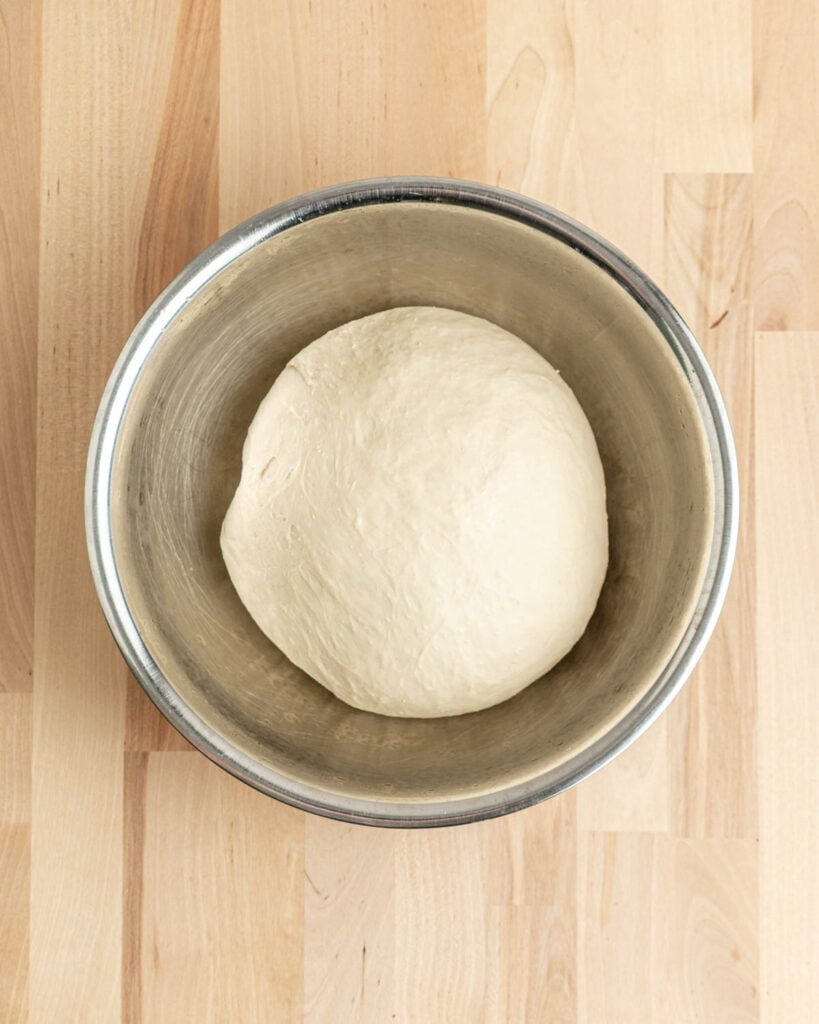
Once the dough has been kneaded, it needs time to rise. This gives the gluten network in the dough time to strengthen and fill up with lots of air bubbles. Tuck the dough into a tight ball and place it in a bowl to rise, covered, until doubled in size, about an hour.
How to Shape Bagels
Divide the dough into equal portions on an unfloured surface. If you're combining a few pieces together to make a portion, stack the smaller pieces on top of the bigger pieces. Tuck the edges up so the dough is smooth against the counter with a seam pinched together on top. Repeat until the dough ball feels fairly tight. Don't tear the dough, just stretch it.
Then, flip the dough over so the seam side is down against the counter. Cup your hand around the dough and slide it toward you. The dough will take on an oval shape. Rotate it 90 degrees and repeat to turn the oval into a round circle.
(Or, cup your hand around the dough with your pinkie-side flush against an unfloured counter and your thumb and forefinger making an O- or C-like shape above the dough. Move your hand in quick circles without picking your pinkie off the counter, and the dough will quickly shape itself into a nice smooth ball of dough.)


![[gif] a thumb pokes a hole through the bottom of a round ball of dough](https://thepracticalkitchen.com/wp-content/uploads/2019/08/How-to-Shape-a-Bagel-4.gif)
![[gif] two thumbs through the hole in the bagel dough rotating it and gentle stretching it](https://thepracticalkitchen.com/wp-content/uploads/2019/08/How-to-Shape-a-Bagel-5.gif)
![[gif] a fully stretched out round of bagel dough](https://thepracticalkitchen.com/wp-content/uploads/2019/08/How-to-Shape-a-Bagel-6.gif)
Once the dough has been shaped into balls, coat your hands in flour and stick a thumb through the bottom seam of the dough. Slide your other thumb in and gently squeeze and stretch, rotating the dough through your hands until the bagel hole is at least the same width as the sides of the bagel if not bigger.
You may want to repeat the stretching process again before boiling to keep the hole from closing up in the oven.
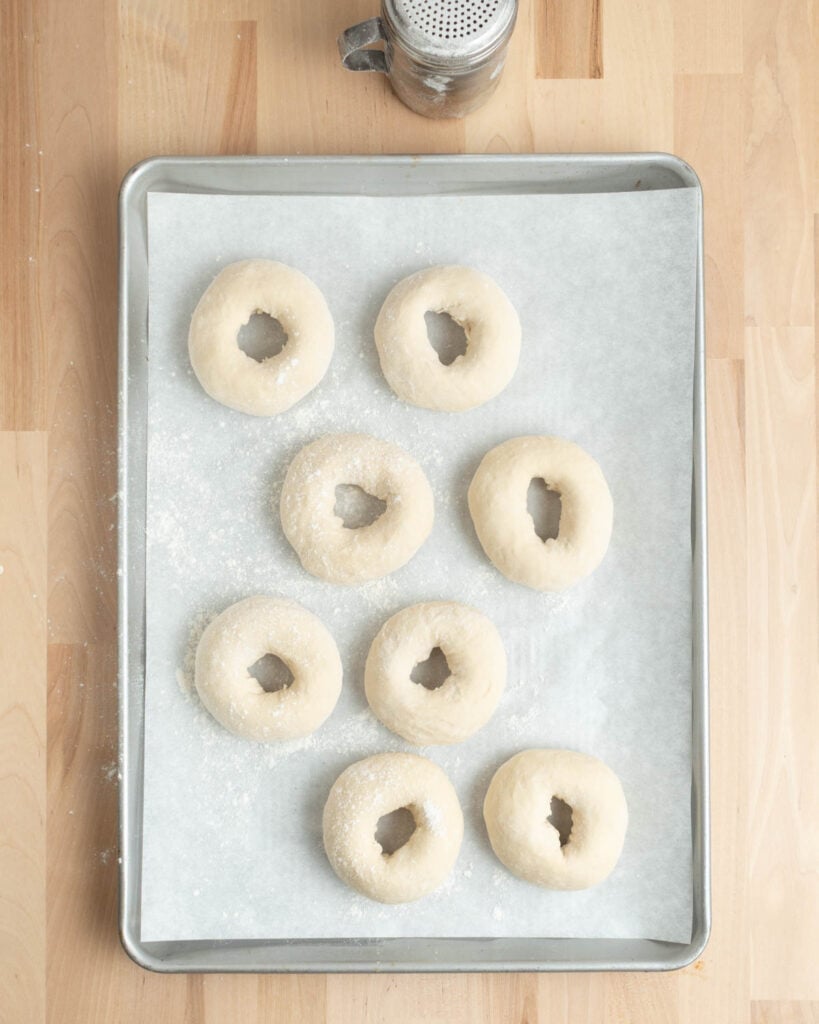
Cover the shaped pretzel bagels with a damp paper towel and place them in the fridge while you get one pot of water boiling and the baking soda dissolved in a separate water bath.
Set the two water baths up so they're near each other with room for the sheet pan nearby so you don't have to carry wet bagels across your kitchen between steps.
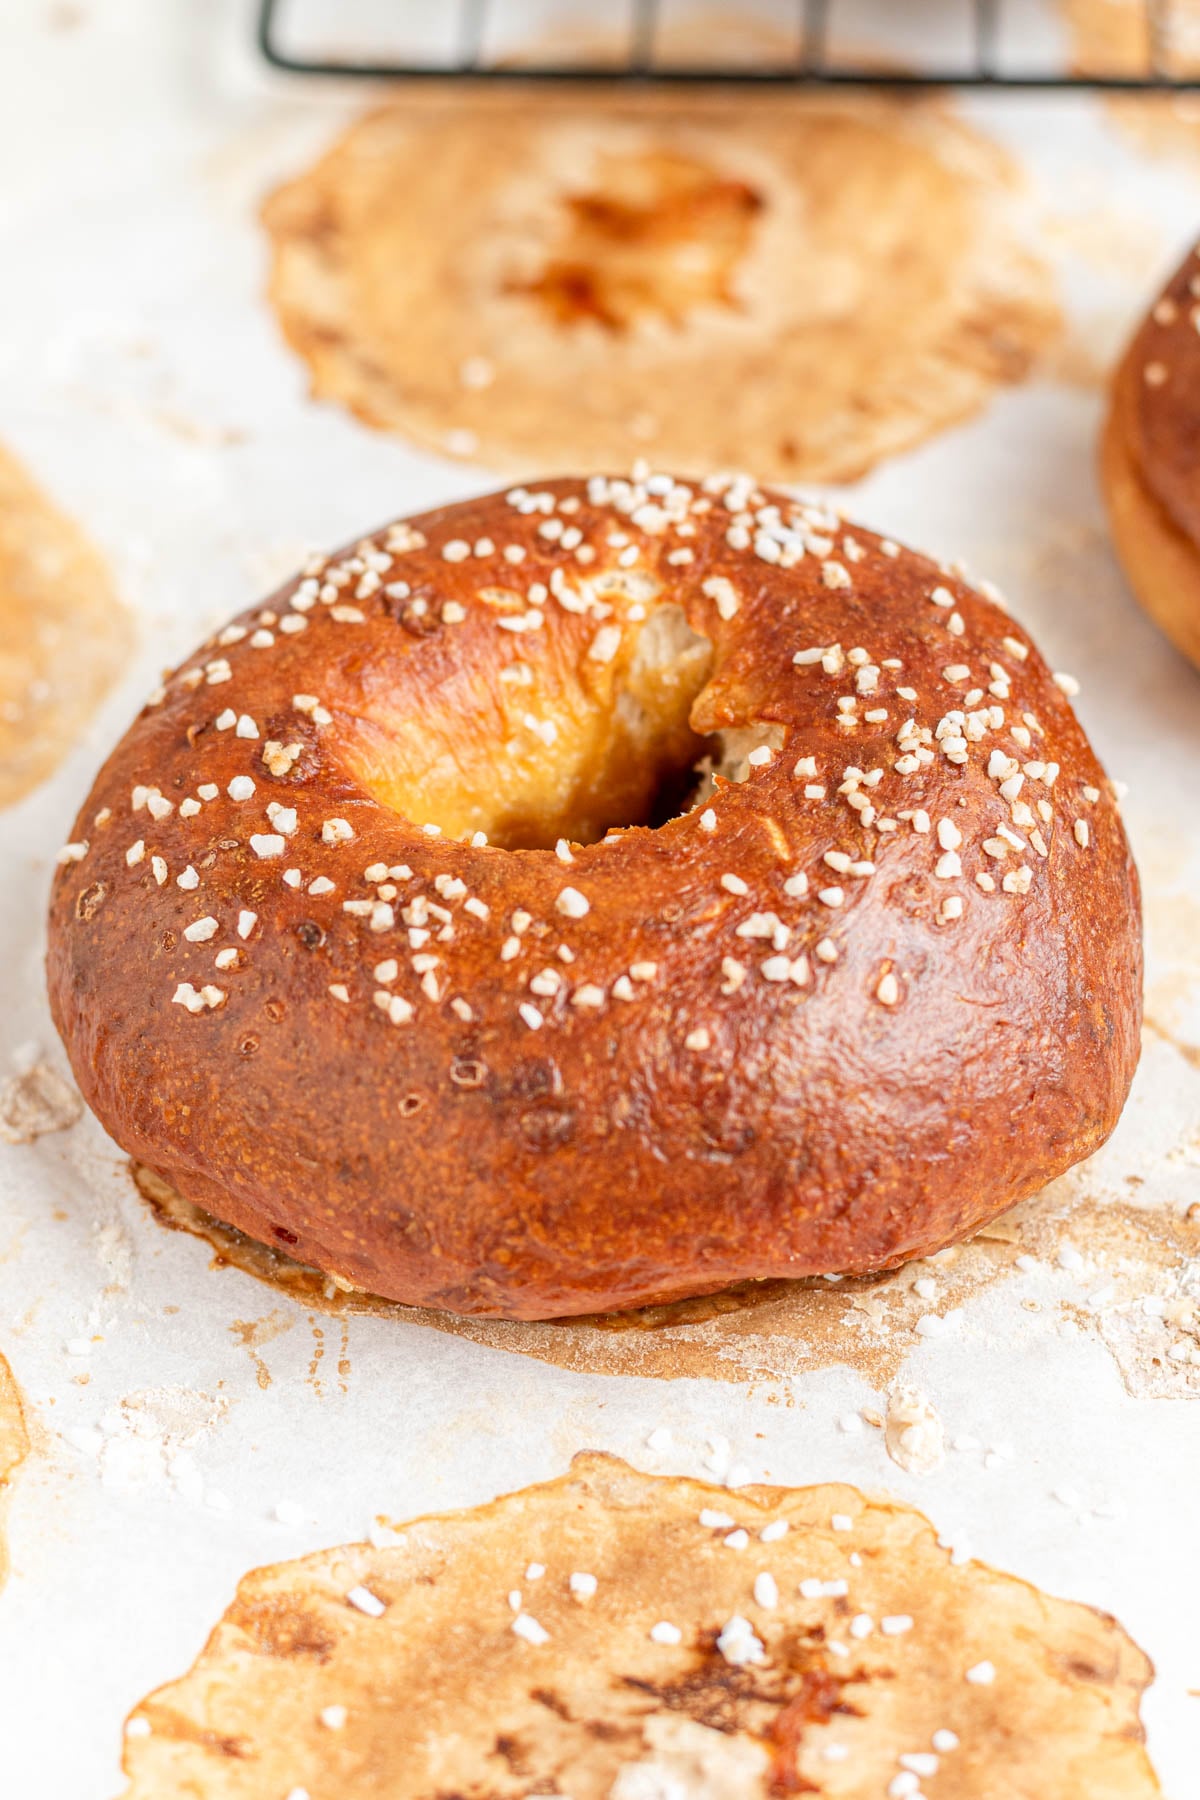
Bake the pretzel bagels until they are beautifully dark brown on the outside and have reached an internal temperature of 195°F. Let them cool on the pan for about 5-10 minutes then carefully peel them off the parchment paper and transfer to a wire rack to finish cooling.
If you don't transfer the pretzel bagels to a cooling rack, the baking soda solution tends to make the bottoms of the bagels damp and overly bitter. You really want to get that air flow around the bagels while they cool after baking.
Practical Tips and Recipe Notes
- To quickly melt the butter, microwave in 5-second bursts, stirring after each one. When there's just a little bit of solid butter left, stop microwaving and just stir it until the butter finishes melting.
- The butter in the pretzel bagel dough makes them a little stretchier to work with, so make sure your dough balls feel really tight and smooth before you poke the holes through.
- Start baking the baking soda right after you cover the dough to let it rise. The baking soda needs to bake for an hour and the dough needs to rise for an hour, so use the same hour to get both things done.
- Baked baking soda loses up to 30% of its weight in the baking process. The amount of baking soda listed in the recipe is for the amount you need before it's baked. If you want to, you can bake the baking soda in advance and store it in an airtight container until you're ready to make your pretzel bagels.
- Really make sure the baking soda is fully dissolved in the water bath before you dip the boiled bagels in it. Whisk it really, really, really well. There might be some clumps at the bottom of the bowl that don't dissolve, that's ok. Whisk the baking soda bath again right before you dip the pretzel bagels in it so that the baking soda is dispersed throughout.
- The baking soda solution might look clear, but it will leave a white residue behind when it dries. It wipes clean easily with water, but don't be surprised if you see white splash marks around your stove after baking!
- The ratio of water to baking soda for the baking soda bath is important! Too much water and the pretzel flavor won't be prominent enough. Too little water and you might end up with soapy, metallic-tasting pretzel bagels.
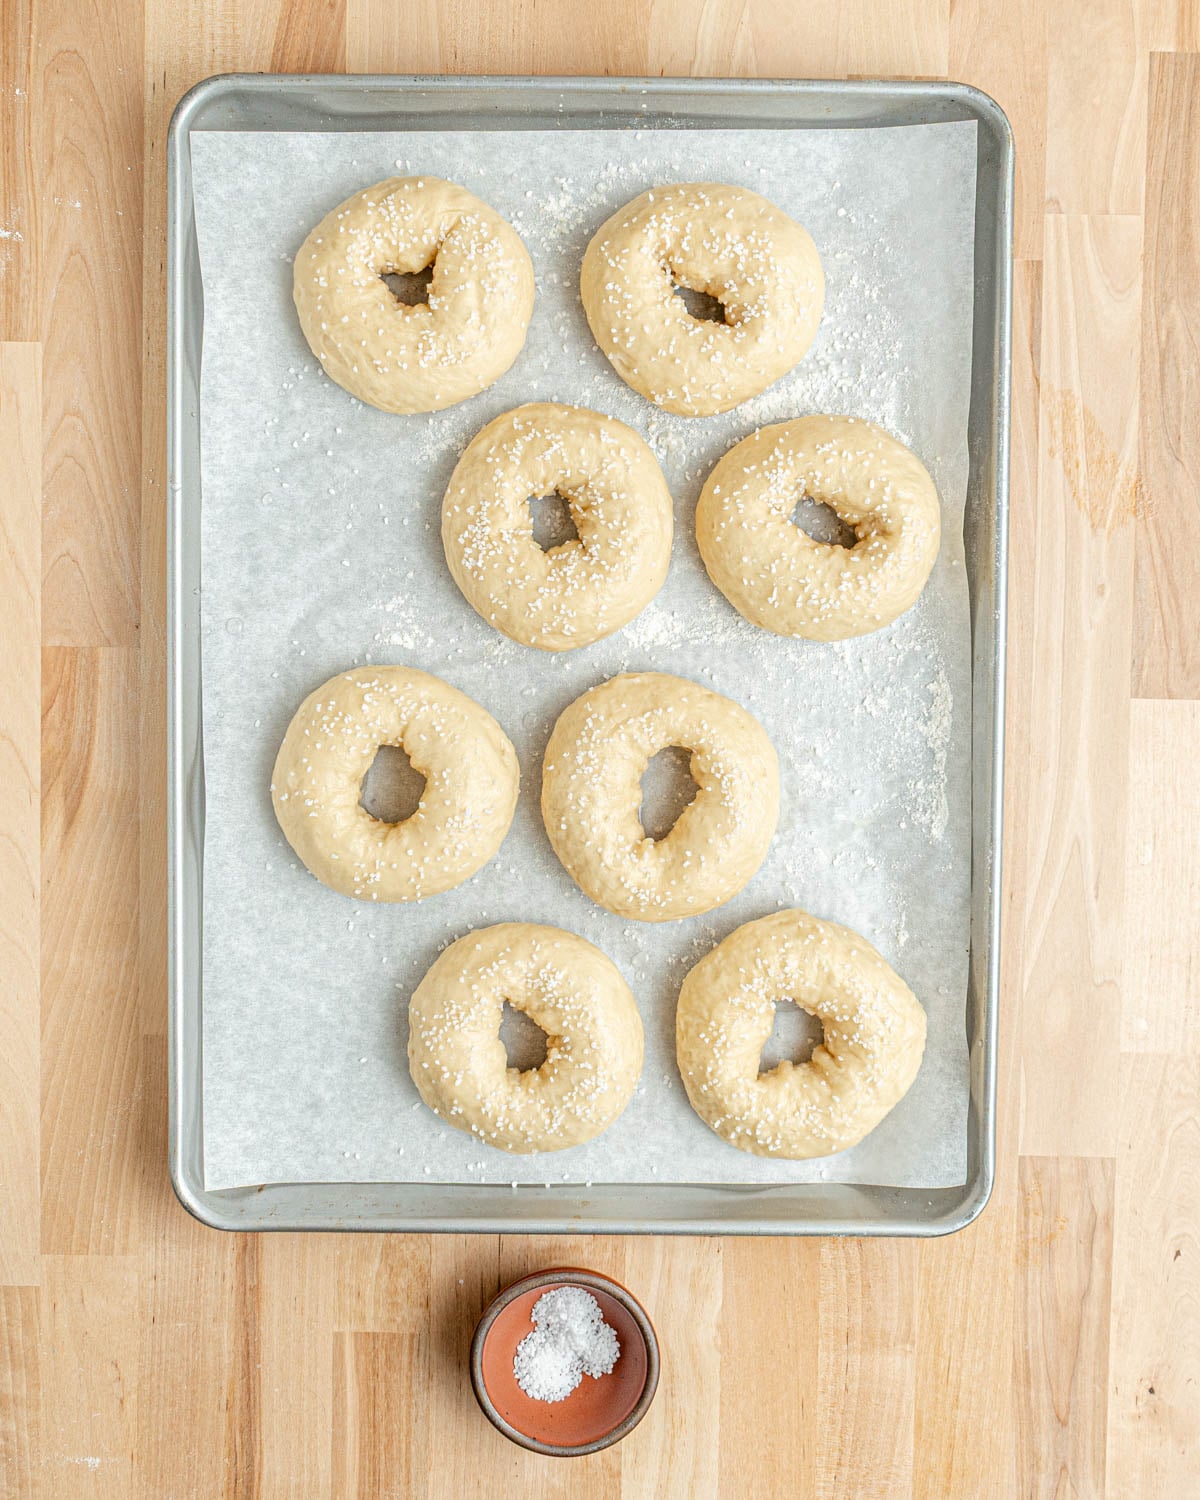
- I used King Arthur Baking's pretzel salt here, but any pretzel or flaky salt you like is fine. No need to egg wash them first, just sprinkle it right on top of the bagels before they go in the oven.
💭 Have More Bagel Questions?
I've rounded up answers to common bagel questions and how-to guides, including:
- How to knead bagel dough by hand and what it should feel like
- Why bagels are always boiled
- Step-by-step guides for bagel shaping and baking techniques
See my bagel-making 101 guide for more!
📖 Recipe
Easy Homemade Pretzel Bagels
Recipe Notes
- Pretzel bagels are best eaten within 8-10 hours of baking. The salt on top begins to draw moisture out of the bagels, drying them out pretty quickly. If you don't plan on eating the bagels right away, consider freezing them.
- Measure your baking soda by weight before you bake it. It loses 30% of its weight when you bake it so if you weigh it after it bakes you'll have way too much baking soda in your water bath.
- Make sure the baking soda is fully dissolved in the water bath before you dip the boiled bagels in it. If there are lots of clumps or the baking soda hasn't dissolved, your bagels might end up tasting soapy.
- If you don't have a mixer with a dough hook, follow the same instructions, just start mixing the dough in a bowl and then knead it on a lightly floured surface by hand for 8-10 minutes once the dough comes together.
Ingredients
Pretzel bagel dough
- 500 grams all-purpose flour
- 28 grams brown sugar (2 tablespoons, packed)
- 8 grams diamond crystal kosher salt
- 6 grams instant yeast (2 teaspoons)
- 275 grams water (90°F)
- 28 grams unsalted butter, melted (2 tablespoons)
- 1-2 teaspoons pretzel salt (for finishing)
Baking Soda Solution
- 150 grams baking soda (a heaping ½ cup)
- 5 cups water (1.2 kilograms)
Instructions
- Preheat oven to 300°F.
- Prep. Spread the baking soda on a sheet pan and set aside. In the bowl of a stand mixer, whisk together the dry ingredients: flour, brown sugar, salt, and yeast. In a separate bowl or measuring cup, whisk the salt into the water until dissolved. Make a well in the center of the dry ingredients and pour in the water and melted butter.
- Mix. Use the dough hook attachment to mix on low speed until the dough comes together in a shaggy, messy ball. You may need too pause and scrape down the sides of the bowl a few times. Be patient, this can take several minutes.
- Knead. Increase the speed of your mixer to medium-low and knead the dough until it's smooth, supple, and just slightly tacky (but not sticky) to the touch, about 2-4 minutes. If the dough is clinging to the sides or bottom of the bowl, dust in more flour 1 tablespoon at a time until the dough fully pulls away from the sides.
- Rise. Tuck the dough into a ball, place in a lightly greased bowl (you can use your mixer bowl), cover, and let it rise in a warm spot until doubled in size, about 1 hour.Place the sheet pan of baking soda in the oven for 1 hour while the dough rises. Then remove and set aside to cool.
- Pre-shape. Turn the dough out onto a clean, un-floured work surface and gently deflate it with your fingers. Divide the dough into 8 equal pieces, using a kitchen scale to be precise (each piece should be about 105 grams).To shape the dough into rounds, gently flatten a piece of dough against the counter. If you're combining multiple pieces of dough, stack the smaller pieces on top of the biggest piece to tuck them inside. Fold all the edges of the dough into the middle so you have a nice smooth, taught surface against the counter and the pinched together "seam" side facing up.Flip the dough over so the smooth side is up. Cup your hand gently around it with your pinkie against the counter. Slide your hand toward your body to pull the dough ball closer to you without rolling it. This will increase the surface tension on top of the dough and shape it into an oval. Rotate the dough 90° and repeat the sliding motion to turn the oval into a circle. Pinch the seam together at the bottom again to finish.Repeat with the rest of the dough. Cover the dough balls with a damp paper towel and let them rest for 10 minutes.
- Preheat oven to 420°F with an oven rack in the middle position.
- Shape. Dust the bottom of each dough ball with flour and use your thumb to poke a hole through the bottom seam of each dough ball and out the other side. Rotate the dough through your hands as you squeeze it to stretch the bagels out. You want the dough to stretch, not tear. The holes should be fairly large — twice the width of the bagel sides. Arrange the shaped bagels on a parchment-lined sheet pan and cover with a damp paper towel. Refrigerate for 10-30 minutes.
- Prep the water bath. While the bagels are in the fridge, fill a large, high-sided saute pan with about 2-3 inches of water. Bring it to a low boil or active simmer on the stove. In a separate bowl, combine 5 cups of cool water with the baked baking soda. Whisk well to make sure all the baking soda has dissolved.
- Boil and dip. Working in batches of 2 or 4, boil the bagels 45-60 seconds per side. Then use a wire spider to transfer the boiled bagels directly into the cool baking soda bath, and submerge for 10-15 seconds. Use the wire spider to transfer the pretzel bagels back onto the sheet pan.
- Bake. Sprinkle the pretzel bagels generously with pretzel salt. Bake for 20 minutes until deeply browned and shiny. Let bagels rest for 5-10 minutes on the sheet pan, then transfer to a wire cooling rack to finish cooling completely before eating.
Embee says
Do you not add any barley malt syrup to the bagel bath when you boil them? is it overkill or does it add a better crust?
Rebecca says
I don’t! Mostly because it’s not very easy to come by for most people and I don’t usually use it for any of my bagel recipes. I know it’s supposed to help with a better crust, I just haven’t actually ever tried it. I haven’t tried it with the baking soda either so can’t say if it’s overkill or not — if you try it let me know how it goes!
Raymond Grumney says
Tried this recipe today, and the centers (holes too small, will make them larger next time) as well as at some of the crusts, are kinda a caramel colored/consistency substance that clearly has a lot of the soda in it. Any suggestions?
Rebecca says
I think if you stretch the holes a little bigger you might not have the caramel colored spots with the soda in it! You could also try dipping the bagels in water quickly after the baking soda to rinse some of the excess soda off.
Jay says
These pretzel bagels are sooooooo good! I meticulously followed your very thorough instructions and they are amazing! Delicious pretzel crust and then soft chewy inside!! With some cheese and mustard I am transported to Germany with every bite! Thank you!!
Rebecca says
I’m so glad you like them!!
Beth says
This is one of the most loved recipes in my house. I make them every Sunday and my kids love to help. We size down to 12 bagels and reduce boiling time to 1 minutes total (thanks Rebecca for the assist). The way to go is cream cheese with everything bagel seasoning.
Rebecca says
So glad you like them!! I love that it’s become part of your family routine. So cute!
mike says
Could you use Lye instead of baking soda for the bath? If so how much would you recommend?
Rebecca says
You would need to use food grade lye. I have not personally used it because it scares me, so I can't tell you how much I'd recommend. I would suggest looking for a recipe from a trusted source who can speak directly to the safest way to use food grade lye for pretzel making instead! You should be able to use their method of water bath with my pretzel bagel dough.
Anja says
Easiest and best tasting bagels ever, and all recipe measurements are in grams, so if you use your kitchen scale, they always turn out really well!